


Views: 0 Author: Site Editor Publish Time: 2026-09-18 Origin: Site


Lighting geometry dictates workflow efficiency in professional automotive environments. Poor fixture placement compromises surface visibility and risks physical collisions with shop equipment. Shop owners face a constant tension during build-outs. You need optimal lumen delivery for precise paint correction while maintaining physical clearance for vehicles, technicians, and automotive lifts. We outline a framework for calculating the exact mounting height for overhead lighting based on ceiling constraints, equipment specifications, and vehicle profiles. This guide breaks down the physics of light drop-off and the structural realities of integrating overhead fixtures with two-post and four-post automotive lifts. You can use these parameters to engineer a shadow-free workspace. Proper planning prevents costly rework and ensures your technicians have the illumination required to spot micro-marring and holograms on every panel.
Light intensity degrades rapidly as it travels from the source to the vehicle surface. Physics dictates this behavior through the inverse square law. If you double the distance between the fixture and the paint, you receive only one-quarter of the original light intensity. You must calculate the exact distance to maintain target lux levels. Paint correction typically requires between 750 and 1000 lux at the panel surface. We verify these numbers using handheld lux meters placed directly on the vehicle hood and roof.
Mounting a detailing light tunnel too high forces you to over-spec the lumen output. You waste energy and increase heat generation inside the shop. Conversely, mounting fixtures too low creates intense hot spots on the vehicle roof. You want a mounting height that delivers consistent foot-candles across the entire hood and roofline. Most technicians find the sweet spot sits roughly three to four feet above the tallest vehicle roofline you service. We measure this from the diode face directly to the clear coat. If you install a fixture at 14 feet for a sedan sitting on the floor, the light dissipates into the ambient space. You end up relying on handheld inspection lights, defeating the purpose of an overhead array.
Ergonomics play a massive role in paint correction efficiency. If you mount lights too low, you introduce direct eye-line glare for your technicians. Direct glare causes eye fatigue, headaches, and missed paint defects. Technicians spend hours staring at highly reflective clear coats. You must protect their visual comfort to maintain quality control. High-intensity diodes placed directly in the peripheral vision will slow down your workflow.
Proper mounting height works in tandem with polycarbonate diffusers. The diffuser scatters the raw LED diode output. When positioned at the correct height, this scattered light creates a uniform wash. You eliminate harsh shadows and blinding reflections. The light wraps around the vehicle curves naturally. Technicians can spot swirl marks and holograms without squinting or shifting their physical position constantly. We often see shops install bare-diode fixtures at 8 feet. The resulting glare makes it impossible to look across the hood. Elevating the fixture to 9.5 feet and adding a frosted diffuser changes the entire working environment. The light becomes a tool rather than a hindrance.
Lighting vertical surfaces presents the hardest challenge in any shop. Doors, quarter panels, and bumpers require distinct lighting angles. Top-down flooding only illuminates horizontal panels. You must rely on the height-to-width ratio of your lighting setup to push light onto the sides. Overlapping light cones from the side arrays must intersect right at the beltline of the vehicle.
If you mount the overhead sections too high, the angle of incidence becomes too steep. The light travels straight down, missing the door panels entirely. If you widen the tunnel footprint, you must lower the mounting height to maintain the correct angle. The light should hit the side panels at roughly a 45-degree angle. This geometry ensures swirl marks on the lower rocker panels remain visible during polishing stages. We calculate the drop angle by measuring from the center of the bay outward. A 12-foot wide array mounted at 10 feet provides excellent side-panel coverage for standard sedans. If you raise that same array to 12 feet, the lower doors fall into shadow.
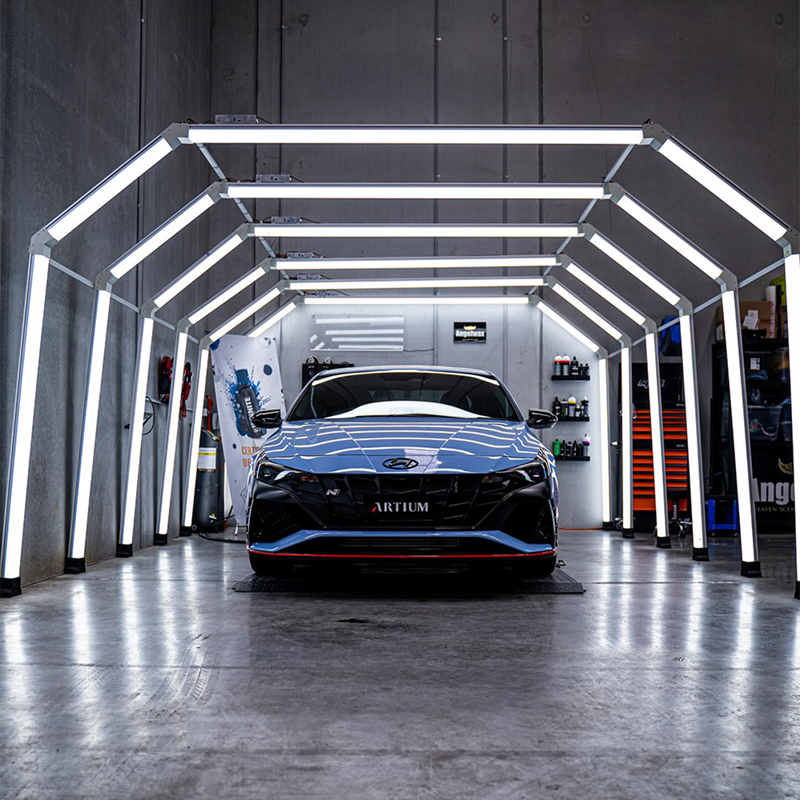
Standard detailing bays without automotive lifts offer the most flexibility. You only need to account for vehicle height and technician clearance. The optimal height range for these flat bays typically falls between 9 and 10 feet from the floor. This range accommodates large SUVs while keeping the light source close enough for intense defect spotting. We also factor in high-gloss epoxy floor coatings, which reflect a portion of the light back up onto the lower chassis.
You must also calculate clearance for rolling scaffolding or step stools. Technicians frequently use these tools to polish the roofs of large trucks. A 9-foot mounting height generally provides enough headroom for a technician standing on a two-foot platform. Always measure your specific scaffolding equipment before finalizing the suspension cable lengths. We recommend a minimum of 18 inches of clearance between the technician's head and the lowest hanging fixture. This prevents accidental collisions when moving quickly around the bay with heavy polishers.
Automotive lifts introduce rigid physical constraints. Most two-post clear floor models require at least 12-foot ceilings. The overhead crossbeam on these lifts often sits at exactly 11 feet 10 inches. You cannot mount a continuous lighting structure across this space without causing physical interference. You must position your car workshop tunnel lights parallel to the lift columns, avoiding the center crossbeam entirely. Asymmetric lift designs require even more careful planning, as the vehicle sits further back in the bay.
Floor plate style two-post lifts and standard four-post lifts operate differently. They often work within 8 to 9-foot ceiling constraints. You face a severe lack of vertical space here. You must utilize ultra-low-profile flush mounting techniques. In some cases, you must shift to angled wall-mounted segments to preserve maximum vehicle clearance.
Use this formula to calculate your absolute minimum light height:
If your ceiling cannot accommodate this formula, you must restrict the lift height when servicing tall vehicles under the lighting array. We install physical bump stops on the lift hydraulics to prevent accidental over-extension into the light fixtures.
Bay function dictates physical placement. Dry detailing zones prioritize proximity for defect spotting. Wash bays prioritize equipment protection and water clearance. High-pressure water spray creates wide arcs. Even with high IP-rated fixtures, you want to avoid direct, continuous blasts from a pressure washer wand. Chemical degreasers and iron removers atomized in the air can also degrade polycarbonate lenses over time if mounted too low.
Wash bays necessitate slightly higher mounting points. You might push the fixtures to 11 or 12 feet. Alternatively, you can use angled placements. Angling the fixtures 30 degrees inward allows you to mount them further away from the splash zone while still directing lumens toward the vehicle center. This approach extends the lifespan of the fixture seals and wiring connections. We also recommend using waterproof NEMA enclosures for junction boxes and routing all conduit above the fixture line. Water runs downhill. Keeping the electrical connections above the light source prevents moisture ingress.
Low-stance vehicles sit close to the floor. If you use a high ceiling mount, the light struggles to reach the lower rocker panels. This creates a "dark skirt" effect around the bottom quarter of the car. Technicians cannot see polishing results on the lower doors, exhaust surrounds, or carbon fiber splitters.
For shops specializing in sports cars, lower the lighting array. A mounting height of 8 to 8.5 feet works exceptionally well. The light wraps around the low rooflines and floods the vertical panels. You achieve intense clarity on the lower sections where road grime and heavy scratching typically occur. We often see Porsche and Ferrari specialists drop their center arrays even lower, sometimes to 7.5 feet, to maximize the intensity on flat hoods and rear engine covers.
Taller vehicles present the opposite problem. If you leave your fixtures at 8.5 feet and pull in a commercial van, the roof sits inches from the light source. This proximity creates massive roofline hot-spotting. The roof becomes over-exposed and blinding, while the side panels fall into deep shadow. Roof racks and overland equipment can also physically strike the fixtures.
You must elevate the fixtures to at least 10.5 to 11 feet to accommodate lifted trucks and vans. This height allows the light beam to spread before hitting the roof. The wider beam spread ensures some light spills over the edges to illuminate the massive side panels of these larger vehicles. When working on Mercedes Sprinters or Ford Transits, we push the side arrays out to 14 feet wide and mount them at 12 feet high. This creates a massive box of light that fully envelops the commercial vehicle.
Many shops service a mixed fleet. You might polish a low-profile Porsche in the morning and a lifted Ford F-250 in the afternoon. A static mounting height forces a compromise on one of those vehicles. Installing an adjustable suspension system solves this problem completely.
Adjustable pulley systems or motorized winch setups allow you to raise and lower the entire car detailing light tunnel. You can drop the rig to 8 feet for the sports car and raise it to 11 feet for the truck. Technicians work faster, produce better results, and spend less time fighting shadows with handheld inspection lights. We build these adjustable rigs using unistrut framing and heavy-duty aircraft cable. The entire grid moves as a single unit, keeping the geometric relationship between the center and side lights perfectly intact. We always install secondary safety lockouts on motorized winches to prevent accidental drops.
The beam angle of your LED diodes must match your chosen mounting height. Higher mounts require narrower beams. A 60-degree beam angle pushes light aggressively downward, preventing lumen loss in high warehouse ceilings. If you mount a wide-beam fixture at 14 feet, the light scatters across the shop floor instead of focusing on the vehicle. Lens optics play a huge role here; clear lenses push light further, while frosted lenses diffuse it quickly.
Lower mounts require wider beams. A 120-degree beam angle works perfectly for 8 to 9-foot ceilings. The wide spread prevents hot spots and creates a smooth, overlapping wash of light. Always verify the beam angle specifications before purchasing. Match the optics to your physical ceiling constraints.
| Mounting Height | Recommended Beam Angle | Primary Application | Risk of Incorrect Spec |
|---|---|---|---|
| 8 - 9 Feet | 100° - 120° (Wide) | Sports cars, flat bays, low ceilings | Hot spots on vehicle roofline |
| 10 - 11 Feet | 90° - 100° (Medium) | Mixed fleets, standard SUVs | Poor side-panel illumination |
| 12+ Feet | 60° - 90° (Narrow) | Lift bays, commercial vans | Light scatters, low surface lux |
Evaluate lighting systems based on their mounting hardware. The best systems offer multiple installation methods. Aircraft cable suspension provides the cleanest look and the most adjustability. Rigid track systems offer incredible stability in high-draft environments. Flush mount brackets work best for low-clearance scenarios.
Modularity matters when your business grows. You might start in a flat bay and upgrade to a two-post lift later. A modular LED light tunnel allows you to disconnect sections, reconfigure the shape, and change the mounting hardware. You avoid buying an entirely new lighting system when you relocate or upgrade your shop equipment. We prefer systems that use standard quick-connect fittings and 4040 aluminum extrusion profiles. This allows us to swap out a damaged section in minutes rather than rewiring the entire bay.
You must assess the physical weight of the lighting structure. Aluminum-body fixtures weigh significantly less than steel alternatives. However, a massive multi-bay grid still exerts considerable downward force. You must secure ceiling anchors into structural joists, steel purlins, or concrete decking. Never anchor a heavy lighting grid directly into drywall. Use wedge anchors for concrete and heavy-duty toggle bolts for hollow block walls.
Review electrical compliance carefully. Routing cables through suspended systems requires strain relief and proper jacketing. Flush mounts often require routing wires through the ceiling cavity. Ensure your chosen fixtures carry UL or CE listings. Electrical inspectors will check these certifications during shop build-outs. Non-compliant fixtures can halt your opening day and void your commercial insurance. We always run a dedicated 20-amp circuit for each lighting bay to prevent breaker trips when running polishers and vacuums simultaneously.
You face a direct trade-off between clearance and proximity. Flush mounts offer maximum physical clearance. They create a clean, integrated aesthetic. You never have to worry about a lifted truck hitting the fixtures. However, flush mounting on a 14-foot ceiling sacrifices proximity. You lose massive amounts of surface lux, making paint correction difficult. Flush mounts also trap heat against the ceiling, which can degrade the LED drivers prematurely if the shop lacks proper ventilation.
Suspended cable systems optimize lighting proximity. You can drop the fixtures to the exact mathematical sweet spot. The trade-off involves introducing physical obstacles into the airspace. Technicians must remember the height limits when raising vehicles on lifts or carrying long ladders through the bay. We mitigate this by installing high-visibility marker tape on the lowest hanging fixtures in high-traffic areas.
Modern workshops contain numerous overhead obstructions. HVAC ducts, garage door tracks, and radiant heaters block light paths. The vertical columns of two-post and four-post lifts create massive shadow zones on the vehicle doors. You must map these obstructions before finalizing your lighting layout.
You can mitigate these shadows through strategic placement. Offset the tunnel width to push the light outside the lift's operational footprint. Adjust the suspension drop-height to clear the bottom of the garage door tracks. If lift columns block the overhead light entirely, install supplementary low-angle wall lighting to fill the shadow zones. We frequently mount 4-foot LED battens vertically on the walls directly behind the lift columns to eliminate the blind spots created by the steel posts.
Routing power to suspended systems requires planning. You cannot have loose wires dangling from the ceiling. Run the power cables down the aircraft suspension cables using zip ties or braided wire looms. This keeps the installation looking professional and prevents accidental snags.
Voltage drop becomes a serious concern in long, continuous lighting arrays. If you link too many LED segments together in a single series, the lights at the end of the run will appear dim. You must inject power at multiple points. Place your LED drivers strategically to minimize the distance between the power supply and the light fixtures. Consult an electrician to calculate the correct wire gauge for long suspension drops. We typically use 12 AWG wire for long runs and limit series connections to six fixtures before running a new home run back to the driver.
The optimal mounting height represents a calculated intersection of your ceiling height, lift maximums, and primary vehicle types. You must balance the physics of light output against the physical realities of your workspace. Execute your installation by following these immediate next steps:
A: Yes, but you must use flush mounting hardware. An 8-foot ceiling severely limits your ability to use automotive lifts. You can safely operate floor plate style lifts for low-profile cars, but you cannot raise SUVs to full height. The lights will sit very close to the vehicle roof, so choose fixtures with wide beam angles to prevent hot spots.
A: The width depends on your mounting height. Generally, position the side arrays 10 to 12 feet apart. This width allows the light to hit the vehicle side panels at a 45-degree angle when mounted at a 9 to 10-foot height. This geometry ensures proper illumination of the lower doors and rocker panels.
A: They can interfere if planned poorly. Clear floor 2-post lifts have overhead crossbeams typically sitting at 11 feet 10 inches. You must position the lighting arrays parallel to the lift columns or suspend them outside the lift's operational footprint. Never run a continuous light bar directly through the crossbeam space.
A: The optimal color temperature ranges between 5000K and 6500K. This daylight-white spectrum provides the highest contrast for spotting paint defects. Warmer temperatures hide swirl marks, while extremely cool blue light causes severe eye fatigue during long polishing sessions.
A: You use adjustable aircraft cables anchored to the structural steel purlins or concrete decking. For highly drafted areas, use unistrut grids or rigid metal conduit to prevent the fixtures from swaying. Always ensure the anchors are rated for the total weight of the aluminum lighting array.
A: Yes. The inverse square law dictates that light intensity drops exponentially as distance increases. Mounting lights too high reduces the lux levels hitting the clear coat. This makes it incredibly difficult for technicians to spot micro-marring, holograms, and fine swirl marks during the final polishing stages.


