


Views: 0 Author: Site Editor Publish Time: 2026-09-14 Origin: Site


Achieving flawless visibility on the vertical axis of a vehicle—specifically doors, fenders, and quarter panels—is a persistent challenge in professional automotive detailing and paint correction. Standard overhead lighting setups inevitably cast harsh shadows below the vehicle's beltline. When technicians cannot clearly see the lower side panels, they miss clear coat defects, leave uneven ceramic coating high spots, and compromise quality control. Traditional workshop lighting fails to illuminate these lower sections adequately. The geometry of a vehicle dictates that light must strike the surface at specific angles to reveal micro-marring and holograms. Relying on ambient light or ceiling-mounted fluorescent tubes leaves the most vulnerable parts of the car in the dark. The engineered solution is a properly configured LED light tunnel. The effectiveness of this system relies entirely on specific structural angles, diffusion materials, color rendering capabilities, and robust installation methods.
Understanding how light interacts with automotive clear coat dictates how you build your bay. Perfect visibility for a detailer working on a side panel means creating a lighting environment where surface defects pop immediately without causing eye strain. You want a controlled reflection that shows the true condition of the paint. When you look at a door panel, you are actually looking at the light's reflection on the clear coat. If the source is improperly positioned, the reflection either misses your field of view or completely blinds you.
The vertical axis challenge is a basic geometric problem. Overhead lighting casts harsh shadows directly below the vehicle's beltline, obscuring the rocker panels and lower doors. Because the sides of a vehicle sit perpendicular to the floor, light traveling straight down from the ceiling grazes the side panels rather than illuminating them. This grazing effect hides deep scratches and makes it nearly impossible to gauge the leveling of a freshly applied ceramic coating. Technicians end up crouching, contorting, and holding handheld inspection lights in one hand while polishing with the other. This introduces fatigue and slows down the entire correction process.
Balancing defect contrast against panel washout requires precise control over light intensity and diffusion. Defect contrast happens when light catches the microscopic edges of swirl marks and scratches, casting tiny shadows that make the damage visible. If the light source is too intense and lacks proper diffusion, you get washout. Washout occurs when the sheer volume of direct light reflects off the high-gloss surface, blinding the technician and hiding subtle imperfections like coating high spots or faint holograms. The ideal setup provides enough directional intensity to create contrast, paired with enough diffusion to soften the reflection.
| Lighting Angle | Visibility Outcome on Side Panels | Technician Impact |
|---|---|---|
| Direct Overhead (90° to roof) | Heavy shadows below beltline; rocker panels invisible. | High fatigue; requires handheld lights for lower panels. |
| Floor Level Pointing Up | Highlights lower rockers but creates severe glare on upper doors. | Eye strain from looking directly into the light source. |
| Wall Mounted (45° to 90° to floor) | Even illumination across the entire vertical axis. | Optimal posture; clear visibility of defects and coating flashes. |
Selecting the right equipment requires looking past the visual appeal of the fixtures and evaluating the exact specifications that drive performance. You must demand specific features from lighting manufacturers to ensure the final installation actually improves your workflow.
To conquer the vertical axis challenge, floor-to-ceiling lighting structures are an absolute necessity. A proper setup ensures that light strikes the vehicle from multiple elevations simultaneously. By wrapping the light down the walls of the bay, you get consistent illumination from the roofline down to the rocker panels. This continuous vertical coverage eliminates the blind spots created by the vehicle's own shadow.
Positioning these vertical lights requires a careful balance between proximity and workspace clearance. Lights must sit between 12 to 36 inches away from the vehicle sides to optimize the angle of incidence. If the lights are mounted too far away, the intensity drops significantly, reducing defect visibility. If they sit too close, they restrict movement, increasing the risk of accidentally bumping the fixtures with a dual-action polisher or an air hose. The 12-to-36-inch range ensures the light strikes the clear coat at the optimal angle to reveal micro-marring while leaving ample room for the operator to work comfortably.
Raw brightness means nothing if the light distorts the true color of the paint. The Color Rendering Index (CRI) measures a light source's ability to reveal the colors of an object faithfully in comparison to a natural light source. A minimum of 90+ CRI is required to prevent color distortion, particularly on complex metallic and pearlescent paints. Lower CRI lights make paint appear flat or mask the subtle color shifts inherent in modern automotive finishes. This leads to poor color matching during touch-ups and masks the true depth of a polished panel.
Coupled with high CRI, the color temperature of the light dictates the working environment. A color temperature range of 5000K to 6500K is highly recommended because it mimics natural daylight. This crisp, cool white light is optimal for accurate defect spotting. Warmer temperatures below 4000K tend to hide fine scratches by casting a yellow hue. Excessively cool temperatures above 7000K introduce a blue tint that causes severe eye fatigue over long working hours.
Understanding the difference between raw lumen output and actual Lux is critical for designing a functional workspace. Lumens measure the total amount of visible light emitted by the diode itself at the source. Lux measures the light intensity that actually reaches the vehicle's side panel. A fixture might boast a massive lumen rating, but if that light is scattered inefficiently or mounted too far away, the Lux reading on the paint surface will be inadequate.
Professional paint correction environments require specific baseline Lux recommendations to ensure optimal visibility. For intricate polishing and coating applications on vertical panels, aiming for a consistent 1,500 to 2,500 Lux at the panel surface is ideal. This density provides the necessary illumination to spot the finest sanding marks and coating streaks without crossing the threshold into blinding washout.
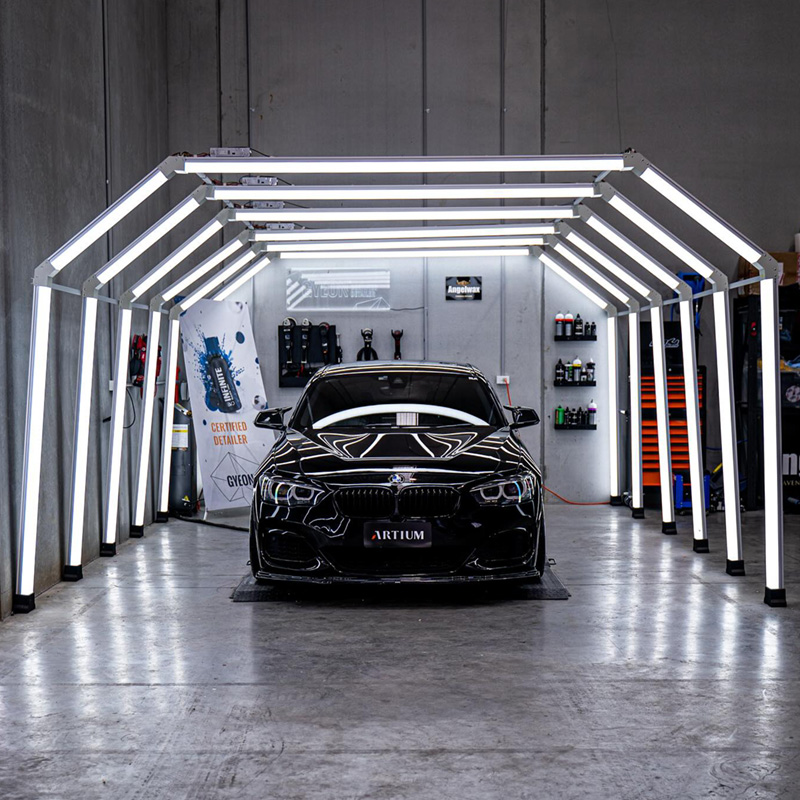
The architectural design of the lighting system dictates how effectively light distributes across the vehicle. Various structural approaches exist, each offering distinct advantages and trade-offs for professional environments.
Hex-grid designs dominate the industry due to their striking visual impact. These setups utilize interconnected geometric shapes to create a massive, diffuse light source. However, their effectiveness on side panels depends entirely on how you deploy the grid. If the grid is restricted solely to the ceiling, it acts as a giant overhead softbox. This is excellent for hoods and roofs, but terrible for side panels. Wrapping the grid down the side walls is essential to push light onto the vertical axis.
The primary trade-off with hex-grid systems is balancing high aesthetic appeal for marketing against the potential for uneven light distribution. If the wall segments of the grid are spaced too far apart, they create alternating bands of light and shadow on the vehicle's side. This inconsistency makes it difficult to track a polishing pass smoothly, as your visibility fluctuates as you move along the door panel.
Continuous linear LED bars mounted horizontally or vertically along the bay walls offer a highly functional alternative to grid patterns. By utilizing straight, unbroken lines of light, you can easily spot dents, ripples, and uneven clear coat textures. The straight reflection acts as a visual straightedge. Any distortion in the reflection immediately highlights a surface defect.
The trade-off for these superior, unbroken lines of light is the complexity of installation. This approach requires permanent wall mounting and precise leveling. If the linear bars are even slightly crooked, the reflections will be skewed, defeating the purpose of using them for dent and ripple detection. They demand a dedicated, perfectly square bay to function as intended.
When permanent wall mounting is not feasible, shops must choose between modular, freestanding archways and custom-built, flush-mounted wall systems. Freestanding archways are self-supporting structures that straddle the vehicle. They are highly mobile and can be relocated if the shop layout changes. Integrated systems are built directly into the facility's architecture, offering a cleaner look and zero footprint on the shop floor.
Space requirements, mobility, and structural rigidity play major roles in high-traffic shop environments. Freestanding arches consume valuable floor space and present tripping hazards or obstacles for carts and equipment. However, they offer unmatched flexibility. Integrated systems maximize floor space but require significant upfront construction and cannot be easily modified once installed.
The market offers solutions ranging from beginner-friendly modular kits to intermediate and professional custom setups. Modular kits utilize pre-sized connectors and require minimal tools, making them attractive for quick deployments. They snap together rapidly and often run off standard wall outlets.
Custom builds using raw aluminum channels and surface-mounted brackets offer ultimate flexibility for uniquely shaped detailing bays. A custom hardwired build allows you to dictate the exact length, angle, and intensity of every light bar. While this requires more planning, cutting, and electrical knowledge, the result is a perfectly tailored detailing light tunnel that maximizes the specific dimensions of your workspace.
The physical interaction between intense light and polished clear coats severely hinders your ability to work if you do not actively manage glare. High-gloss finishes act like mirrors. Throwing raw, unfiltered light at them creates a hostile visual environment.
Bare LED strips fail completely in professional settings due to harsh diode reflections. When a bare strip reflects off a polished door panel, you see hundreds of individual, blinding dots of light. This hotspotting makes it impossible to see the actual surface of the paint. The intense glare overpowers the subtle shadows created by scratches.
The mechanics of professional installations solve this through diffusion. LED strips must sit securely inside an aluminum extrusion track. These tracks allow frosted or milky polycarbonate diffusion covers to pop or slide seamlessly into place over the diodes. The aluminum provides a rigid, straight housing, while the cover fundamentally changes the nature of the light.
This diffusion cover scatters the light evenly, transforming the harsh individual diodes into a soft, continuous bar of light. This continuous reflection highlights defects without blinding you. The milky cover reduces the peak intensity of the light just enough to eliminate washout, allowing you to stare directly at the reflection on the paint for hours without discomfort.
Beyond diffusion, managing operator eye strain requires strategic positioning. The goal is to ensure the light reflects off the vehicle panel into your eyes, rather than shining directly from the fixture into your face. If wall-mounted lights sit exactly at eye level and point straight across the bay, you will constantly look directly into the source.
Positioning strategies involve angling the light fixtures slightly downward or utilizing V-shaped aluminum extrusions that direct the light at a 45-degree angle toward the floor. This forces the light to hit the lower side panels and bounce back up toward you. It maximizes surface illumination while keeping the direct light source out of your direct line of sight.
Frame the purchase of a comprehensive lighting system as a core business investment rather than a mere cosmetic upgrade. The right lighting directly impacts the speed, quality, and profitability of every vehicle that moves through the bay.
Eliminating blind spots on side panels drastically reduces rework. When you can clearly see the lower doors and rocker panels, you do not leave behind polishing holograms or un-leveled ceramic coatings. Preventing customer complaints regarding missed defects saves the business time and reputational damage.
Superior lighting speeds up the coating leveling process. Ceramic coatings require precise timing to wipe off the excess product before it cures. If the lighting is poor, you spend excessive time double-checking your work with handheld lights. A well-lit car detailing light tunnel allows you to see the coating flash instantly across the entire panel. This allows for rapid, confident leveling and faster vehicle turnaround times.
Analyzing the operational costs reveals the importance of thermal management. High-output LEDs generate significant heat, which degrades the diodes over time and increases the ambient temperature of the shop. This is where the aluminum housing becomes critical.
The aluminum extrusion acts as a massive heatsink, drawing heat away from the LED strips and dissipating it into the air. This thermal management prolongs the lifespan of the tunnel, ensuring the diodes do not burn out prematurely or lose their color accuracy. Efficiently dissipating this heat helps maintain a comfortable ambient temperature in the shop, reducing the load on air conditioning systems and keeping you comfortable during strenuous polishing sessions.
Installing high-draw commercial lighting involves significant technical hurdles. Avoiding common setup failures ensures the system remains safe, functional, and visually appealing for years.
Relying solely on adhesive backing for LED strips is a guaranteed path to failure. Detailing bays are inherently humid environments, subject to frequent temperature fluctuations from pressure washers, steamers, and seasonal changes. In these conditions, the standard double-sided tape found on most LED strips inevitably peels, causing the lights to sag or detach completely.
To prevent this, mechanical fasteners, surface-mounted brackets, and dedicated aluminum tracks are an absolute necessity. The aluminum track is screwed securely into the wall or frame, and the LED strip is adhered inside the track. Even if the adhesive weakens, the strip remains contained within the housing. This mechanical approach prevents sagging or collapse over time, maintaining the straight, professional lines required for defect spotting.
| Mounting Method | Durability in Humid Bays | Risk of Failure |
|---|---|---|
| Bare Adhesive Tape | Very Low | High (Peeling within months) |
| Plastic Clips | Medium | Moderate (Clips become brittle) |
| Aluminum Extrusion with Screws | Very High | Zero (Permanent mechanical hold) |
Electrical safety and capacity are paramount when installing large-scale car workshop tunnel lights. A common and dangerous mistake is daisy-chaining too many fixtures on a single standard breaker. Connecting too many lights in series causes voltage drop, resulting in the lights at the end of the chain appearing significantly dimmer than those at the beginning. Worse, it overloads the circuit, causing breakers to trip or creating a fire hazard.
Proper installation requires calculating the total wattage of the entire system and utilizing appropriately sized power supplies. Consult a licensed electrician to install dedicated 15A or 20A circuits specifically for the lighting tunnel. This ensures stable power delivery, eliminates voltage drop, and adheres to commercial electrical safety standards. Use proper gauge wiring for long runs from the power supply to the LED strips to maintain consistent voltage.
Mounting heavy LED tracks and diffusers presents unique challenges depending on the facility's construction. Attaching these systems to drywall requires entirely different hardware than mounting to concrete block or steel beams. Failing to use the correct anchors results in the fixtures pulling away from the wall under their own weight.
When mounting to drywall, heavy-duty toggle bolts or securing the tracks directly into the underlying wooden or steel studs is mandatory. For concrete, masonry anchors are required. If the walls cannot support the weight, suspension cables dropped from the ceiling joists or reinforced freestanding frames must be utilized. For surface-mounted LED panel lights that lack standard ceiling box brackets, utilizing custom Z-clips or direct-to-stud mounting channels ensures flush, secure wall integration without the risk of the fixture detaching.
An LED light tunnel is only as effective as its ability to illuminate the lowest vertical panels without causing glare or suffering from installation failures. Throwing thousands of lumens at a vehicle is counterproductive if the light is not properly diffused, angled, and supported by a robust mechanical and electrical infrastructure. The true value of these systems lies in their ability to create a controlled, high-contrast environment that reveals the exact condition of the clear coat across the entire vertical axis.
When shortlisting options, prioritize tunnels with 90+ CRI, robust aluminum housings, high-quality snap-in diffusers, secure surface-mounting hardware, and modular side-wall configurations over purely aesthetic overhead designs. A system that looks impressive but fails to illuminate the rocker panels is a poor investment for a professional detailing operation.
To move forward with optimizing your workspace, take the following next steps:
A: The optimal color temperature for paint correction is between 5000K and 6500K. This range closely replicates natural daylight, providing a crisp, cool white illumination. It allows technicians to spot fine scratches, holograms, and coating high spots accurately without the yellowing effect of warmer lights or the eye-straining blue tint of higher Kelvin ratings.
A: Tunnel lights should ideally be positioned 12 to 36 inches away from the side of the vehicle. This distance optimizes the angle of incidence for maximum defect visibility. It maintains enough physical clearance for the technician to operate polishers and move freely without bumping into the lighting structures.
A: No. Standard adhesive LED strips lack necessary diffusers, resulting in blinding glare. They also have low CRI and poor heat dissipation. The adhesive backings have a high failure rate in humid, temperature-fluctuating shop environments, inevitably peeling and sagging compared to secure, track-mounted commercial fixtures.
A: A high Color Rendering Index (CRI of 90+) is essential for color accuracy. It ensures that the true color of the paint, especially complex metallic and pearlescent finishes, is represented accurately. This prevents color distortion, makes metallic flake pop, and is crucial for spotting faint holograms and ensuring perfect color matching.
A: Glare is prevented by using frosted or milky polycarbonate diffusers popped into aluminum tracks. These covers scatter the harsh light from the bare LED diodes, creating a soft, continuous reflection. Strategic mounting angles that direct the light toward the paint rather than directly into the technician's eyes help eliminate blinding hotspots.
A: Yes, professional LED light tunnels typically require dedicated 15A or 20A circuits. Due to the high total wattage draw of multiple high-output fixtures, daisy-chaining them on existing standard breakers causes severe voltage drop, dimming, and tripped breakers. Proper power supplies and commercial electrical safety standards must be followed.
A: The best mounting method involves using rigid aluminum extrusion tracks secured with mechanical fasteners like heavy-duty anchors or direct-to-stud screws. Depending on the shop layout, surface-mounted brackets attached to the walls or reinforced freestanding modular frames are superior to adhesive tapes, ensuring the lights remain perfectly straight and never sag.


