


Views: 0 Author: Site Editor Publish Time: 2026-09-10 Origin: Site


The "sun check" ruins profit margins. You finish a multi-stage paint correction inside the bay. The clear coat looks flawless under overhead fixtures. You pull the vehicle outside, and natural sunlight instantly exposes dual-action (DA) haze, micro-marring, and holograms. Flat, poorly positioned shop lighting washes out shallow surface defects. Missed haze triggers customer complaints, unbillable rework, and kills operator confidence during the polishing stage. Upgrading a detailing bay takes more than maximizing total lumens. You need a strategic combination of fixture types, precise placement angles, and coordinated viewing techniques. This creates a diagnostic environment that forces haze to cast visible shadows. By optimizing your car detailing shop lights, you stop guessing and start correcting with absolute precision.
Paint correction requires leveling the clear coat to eliminate surface imperfections. Deep scratches, known as Random Isolated Deep Scratches (RIDS), are easily visible. They have steep, jagged walls that catch light and cast heavy, obvious shadows. Dual-action (DA) haze and micro-marring operate on a completely different physical level. When a dual-action polisher oscillates, the abrasive particles in the compound cut microscopic, shallow trenches into the clear coat. If the pad is too aggressive, or if the clear coat is exceptionally soft, these trenches form a uniform, cloudy pattern. Because these abrasions lack depth, they do not cast heavy shadows. Standard lighting environments fail entirely to expose them.
The primary culprit behind this failure is the washout effect. When you install standard fluorescent tubes or poorly placed floodlights, you create a massive, uniform wall of light. This omnidirectional illumination floods the paint surface from every conceivable angle. Instead of highlighting the microscopic peaks and valleys of DA haze, the light fills in the micro-shadows. The surface appears perfectly flat and glossy to the naked eye. You wipe off the polish residue, inspect the panel, and see a mirror finish. The light is actively masking the very defects you are trying to remove.
Understanding the science of defect visibility requires applying a basic optical principle: the angle of incidence equals the angle of reflection. Haze rarely shows up when you look directly into the center of a light beam reflecting off the paint. That direct reflection is too intense; it overloads your optic nerve. Instead, haze lives on the edge of the light's reflection, often called the corona. To see the uniform scratching of micro-marring, the light must hit the defect at a specific angle, cast a microscopic shadow, and bounce back to your eye. If the light source is too broad, too direct, or too close, this shadow never forms.
To force these micro-shadows to appear, you must manipulate the light and your viewing angle systematically:
Not all fixtures are created equal when evaluating paint finishes. Building a diagnostic bay requires understanding the specific optical properties of different light sources and how they interact with automotive clear coats. You cannot simply buy the brightest bulbs available and expect to see micro-marring.
A successful detailing bay utilizes two distinct types of light output. Point-source lighting provides sharp, focused beams. These are often handheld torches or stand-mounted spotlights utilizing COB (Chip on Board) LED technology. A point-source beam mimics the harsh, direct rays of the sun. It is strictly necessary for spotting rotary holograms, deep scratches, and heavy swirl marks. The focused beam penetrates the clear coat and reflects directly off the base coat, exposing deep defects. However, point-source light can sometimes be too intense for spotting uniform haze, causing glare that blinds the operator.
Diffused lighting offers a softer output that mimics an overcast day. By passing the light through a frosted polycarbonate lens or bouncing it off a textured reflector, the harshness of the LED diodes is reduced. Diffused light scatters the light waves, creating a broad, even wash over the panel. This is ideal for spotting uneven leveling, high spots in ceramic coatings, and the subtle, cloudy appearance of DA haze. A dedicated LED detailing light panel excels at providing this broad, even wash of light without causing eye fatigue during long polishing sessions.
| Lighting Type | Primary Function | Best For Detecting | Ideal Placement | Recommended Kelvin |
|---|---|---|---|---|
| Point-Source | Harsh, direct beam projection | Holograms, RIDS, heavy swirls | Handheld, mobile stands, low-angle spots | 5000K - 6000K |
| Diffused Panel | Soft, even ambient illumination | DA haze, ceramic high spots, wax residue | Ceiling grids, upper wall mounts | 4500K - 5500K |
| Linear Tube | Continuous reflection lines | Door dings, panel warping, broad marring | Horizontal wall mounts (belt-line) | 5000K - 6500K |
The Color Rendering Index (CRI) measures how accurately a light source reveals the true colors of an object compared to natural sunlight. For evaluating paint finishes, a CRI of 95 or higher is non-negotiable. Low-CRI lights emit a limited spectrum of light. They make metallic flakes look dull and can completely hide subtle color shifts, clear coat cloudiness, or burn-through on edges. High-CRI fixtures ensure you see the exact condition of the paint, allowing you to match touch-up paint accurately and spot faint haze on difficult colors like silver or white.
Color temperature, measured in Kelvin (K), dictates the warmth or coolness of the light. The optimal range for a detailing bay is between 4500K and 6500K. This range simulates natural daylight without introducing artificial blue or yellow tints. Lights warmer than 4000K cast a yellow hue that masks defects on red, orange, or yellow vehicles. Lights cooler than 6500K create a harsh blue glare. This blue light scatters easily in the human eye, causing severe eye strain and headaches during long polishing sessions.
Many shop owners attempt to save money by purchasing standard halogen or basic LED work lights from local hardware stores. These generic fixtures fall short in almost every category. They lack proper beam focus, often spilling light everywhere and destroying the contrast needed to see haze. Their lens diffusion is usually non-existent, exposing bare SMD diodes that create massive, blinding glare spots on the paint. Furthermore, generic work lights rarely offer CRI consistency. The light quality degrades rapidly, or the color shifts over time as the cheap diodes overheat. They also utilize low-quality drivers that cause invisible flickering, leading to rapid operator fatigue.
Specialized detailing brands engineer their fixtures specifically for paint inspection. They utilize custom optics to shape the beam, ensuring the light hits the panel rather than blinding the operator. They feature constant-current drivers for flicker-free operation and robust aluminum housings designed to dissipate heat and withstand the heavy dust generated by heavy cutting compounds.
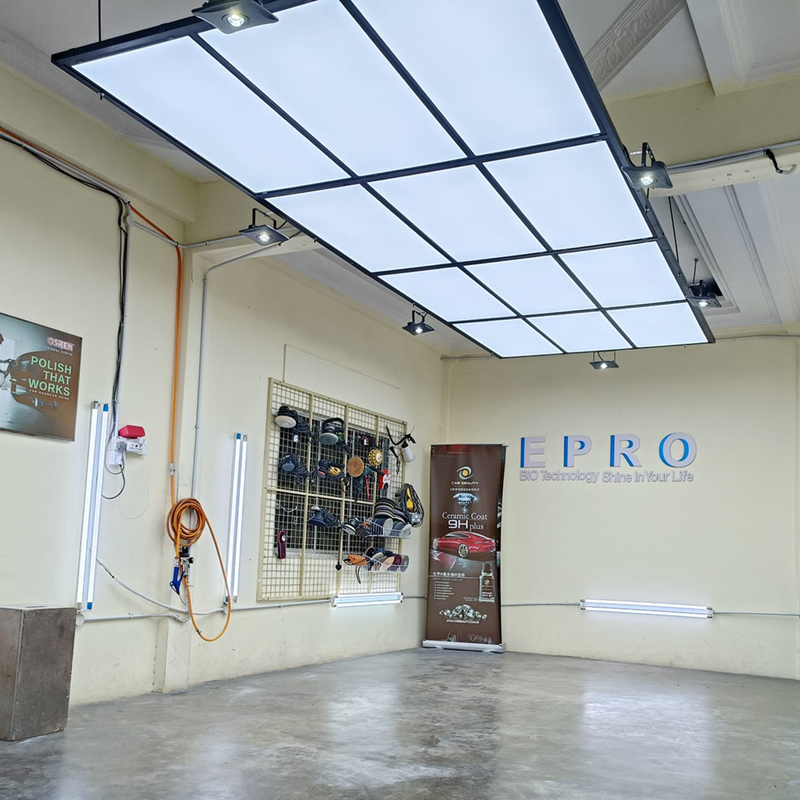
Buying high-quality fixtures is only half the battle. Where you mount them dictates their performance. Strategic placement creates a geometric web of light that forces defects to reveal themselves regardless of the vehicle's shape. Poor placement renders even the most expensive lights useless.
The most common mistake in shop design is placing a massive light source directly above the center of the vehicle. This overhead placement washes out the roof and hood. The light bounces straight back into your eyes, making haze impossible to see. Instead, employ the perimeter layout strategy. A LED ceiling panel light system should be mounted in a halo or U-shape footprint that is slightly wider than the vehicle itself.
For a standard bay, this means mounting the fixtures approximately 10 to 12 feet apart side-to-side, and extending 20 feet front-to-back. This perimeter approach means the light hits the horizontal panels at a slight angle. When you look down at the hood, you are looking into the reflection edge rather than directly into the bulb. Calculating the optimal distance between fixtures is vital. You want to ensure continuous reflection lines as you walk around the car. Gaps in the ceiling layout create dark zones where you might miss a patch of micro-marring.
For complex curves on modern hoods and trunks, integrating a square LED ceiling light configuration at the four corners of the bay provides overlapping, multi-directional diffusion. This ensures that even heavily contoured fenders receive adequate, angled illumination. A well-planned ceiling panel light grid acts as the foundation of your diagnostic environment, providing the baseline illumination needed to safely navigate the shop while casting the initial reflection lines for horizontal panel inspection.
Overhead lighting cannot illuminate vertical panels effectively. To inspect doors, fenders, and quarter panels, you must implement the horizon line technique. This involves mounting linear LED fixtures horizontally on the walls at belt-line height, approximately 36 to 48 inches from the floor. This placement creates a sharp reflection line right across the middle of the doors. As you sit on a detailing stool and polish the door, this horizon line exposes DA haze instantly.
Lower body panels require even more specific attention. Low-mount kick lighting is an absolute necessity. Floor-level or low-wall lighting, mounted 12 to 24 inches high, targets rocker panels and lower bumpers. DA haze frequently occurs in these areas because detailers are forced to use awkward polishing angles, often tilting the machine and applying uneven pressure. Without low-angle lighting, these defects go completely unnoticed until the car is parked on sunny asphalt.
When installing wall fixtures, evaluate the return on investment of articulating wall mounts versus static fixtures. Articulating mounts allow you to angle the light upward or downward depending on the vehicle profile. You can tilt the light up for a low sports car like a Corvette, or aim it straight ahead for a lifted heavy-duty truck. This adjustability maintains the perfect angle of incidence regardless of what rolls into the bay.
Even the most meticulously designed fixed lighting grid has limitations. Vehicles have complex geometries, and static lights cannot adapt to every curve. Breaking the static light pattern is essential for absolute certainty. You must cross-check your work with a handheld, high-CRI inspection light.
Using a handheld light requires specific dynamic angles and body mechanics. Do not just shine the light directly at the panel. Sweep the directional beam across the paint at a shallow 10-to-15-degree angle. Simultaneously, change your physical stance. Bob your head up and down. Move side to side. This physical movement catches the micro-shadows of DA haze that static wall and ceiling lights miss. Handheld supplementation guarantees process efficiency and prevents embarrassing rework.
More light does not equal better visibility. Falling into the lumen trap is a common error for shop owners upgrading their bays. They assume a brighter shop looks more professional and makes defects easier to see. In reality, excessive lumens cause your pupils to constrict. When your pupils shrink, less light enters your eye, severely reducing your ability to see fine surface variations and subtle haze. You end up blinding yourself with your own shop lights.
To combat this, implement zoned lighting control. Wiring your fixtures on separate, dimmable circuits provides a massive operational advantage. When correcting a side door, you can turn off the overhead ceiling grid entirely while keeping the wall lights active. This plunges the rest of the bay into darkness, maximizing the contrast on the specific panel you are working on. Contrast, not raw brightness, is what reveals defects. You need the surrounding area to be dark so the reflection line pops against the paint.
The physical environment of the bay also impacts lighting performance. High-gloss white walls act like giant mirrors. They bounce stray light everywhere, destroying the controlled contrast you just built. The light ricochets off the walls, hits the car from unintended angles, and washes out the shadows. To absorb stray light and keep reflections sharp, paint your bay walls with matte or satin finishes in neutral grays. A medium gray wall with a Light Reflectance Value (LRV) of 40 to 50 absorbs enough light to prevent washout while keeping the shop looking clean and professional.
Floor reflectivity is another critical factor. High-gloss epoxy floors bounce overhead light back up onto the lower panels. While this occasionally helps illuminate rocker panels, it more often creates severe glare that fights against your dedicated low-mount kick lighting. Opting for a matte or heavily flaked epoxy floor scatters the downward light, preserving the contrast generated by your directional wall fixtures.
Upgrading your shop lighting introduces several physical and infrastructural risks that must be managed during the installation phase. Failing to account for these variables will result in a bay that is uncomfortable to work in and expensive to maintain.
The most immediate ergonomic risk is glare and detailer fatigue. Poorly angled lights that shine directly into the operator's eyes rather than reflecting off the paint will cause severe headaches and visual exhaustion within hours. Mitigation requires using proper frosted diffusers on all ambient lights and ensuring wall mounts are angled downward at approximately 45 degrees. The light should hit the car, not your face. When positioning mobile stand lights, always place them so the beam points away from your direct line of sight.
Electrical load and wiring scalability present significant facility challenges. Before installing a comprehensive grid of high-output panels, you must assess your shop's electrical panel capacity. Running multiple dual-action polishing machines, heavy-duty air compressors, hot water extractors, and a massive new lighting system simultaneously can easily trip breakers. Consult a licensed electrician to ensure you have dedicated 20-amp circuits specifically for your lighting zones. Do not daisy-chain too many high-draw fixtures on a single line.
Heat dissipation and moisture resistance are also critical. While LEDs run significantly cooler than traditional halogen bulbs, high-output fixtures still generate substantial heat at the diode level. In an enclosed, climate-controlled detailing bay, dozens of fixtures can raise the ambient temperature, affecting how polishing compounds flash and dry. Furthermore, the fixtures themselves require adequate spacing and ventilation around their aluminum heat sinks to prevent premature diode failure. Because detailing bays are wet environments where pressure washers create atomized moisture, ensure all fixtures carry an IP65 rating or higher to prevent water ingress from shorting out the LED drivers.
A: The optimal color temperature is between 4500K and 6500K. This range closely simulates natural daylight. It provides a crisp, clean light that reveals defects accurately without casting artificial yellow or harsh blue tints that can mask subtle paint imperfections or cause eye strain during long polishing sessions.
A: Natural sunlight acts as a massive, single point-source light that hits the vehicle from a specific angle, casting sharp micro-shadows on shallow defects. Standard shop lighting often floods the car from all directions, washing out those shadows and making the paint look artificially flat and flawless.
A: There is no single lumen target, as contrast matters more than raw brightness. A standard two-car bay typically requires 50,000 to 80,000 total lumens distributed across multiple dimmable zones. Excessive lumens cause pupil constriction, making it harder to see fine micro-marring and causing operator fatigue.
A: Yes, but only if positioned correctly. If placed directly over the vehicle, it will wash out the roof and hood. If mounted in a perimeter halo layout slightly wider than the car, it creates the necessary angled reflection lines to reveal haze and uneven leveling.
A: Point-source lighting provides a sharp, focused beam ideal for spotting deep scratches and rotary holograms. Diffused lighting passes through a frosted lens to create a softer ambient glow, which is superior for spotting uniform DA haze, ceramic coating high spots, and leftover wax residue.
A: Wall lights should be mounted in two distinct zones. The primary horizon line should be at belt-line height, roughly 36 to 48 inches from the floor, to inspect doors. A secondary set of low-mount kick lights should be placed 12 to 24 inches high for rocker panels.


