


Views: 0 Author: Site Editor Publish Time: 2026-09-13 Origin: Site


Flawless lighting drives the entire paint correction and ceramic coating process. You cannot correct clear coat defects you cannot see. Installing high-end lighting in an improperly sized bay creates immediate operational friction. Many shop owners purchase a premium detailing light tunnel only to discover their physical bay lacks the width for ergonomic polishing. Others find they lack the ceiling height for proper light diffusion or the structural integrity for safe mounting. This guide provides a technical framework to calculate exact spatial requirements for your shop. We evaluate mounting configurations, account for environmental reflectivity, and outline how to mitigate installation risks. By understanding these dimensions, you ensure your lighting system enhances your workflow rather than restricting it. We break down the exact measurements needed for standard and oversized vehicles, electrical load planning, and structural prerequisites.
A successful lighting installation meets three specific criteria. First, it eliminates blind spots across all vehicle panels. Second, it allows unrestricted technician movement around the vehicle. Third, it provides optimal light reflection angles for spotting swirl marks and holograms. If the bay dimensions are too tight, the light source sits too close to the paint. This creates intense hot spots that blind the technician and mask subtle clear coat defects. You need enough distance for the light to diffuse properly before it hits the clear coat. When you position the fixtures correctly, the light wraps around the curves of the vehicle, exposing every micro-scratch.
You must choose a lighting footprint that matches your bay architecture. Full-ceiling hexagon grids require wall-to-wall symmetry. They spread light evenly across the entire room but demand a perfectly square or rectangular ceiling space. If your shop has irregular walls, exposed plumbing, or intrusive support columns, a full grid becomes a nightmare to install. You end up cutting aluminum channels and modifying connectors, which compromises the structural integrity of the grid.
Conversely, freestanding or suspended continuous arches require localized footprint planning. They focus intense light directly over the vehicle workspace. This makes them ideal for asymmetrical bays or shops sharing floor space with other automotive services like window tinting or vinyl wrapping. You center the arch directly over the wash bay or correction pad without worrying about the surrounding room shape. This localized approach also prevents light bleed into areas where you need darker conditions, such as interior detailing stations.
Bay width dictates your ability to work efficiently on side panels. The absolute minimum width for a functional bay is 14 to 16 feet. This allows a standard vehicle to pull in while leaving just enough room for a technician to walk past. However, the optimal width is 18 feet or more. Paint correction workflows require space to step back and evaluate reflection angles. You cannot properly gauge the depth of a scratch if your back presses against a wall.
Wall proximity heavily influences light behavior. If walls sit too close to the light source, they create severe glare bounce-back. Tight walls also prevent light from reaching lower rocker panels. An 18-foot width ensures light cascades down the sides of the vehicle naturally, illuminating lower doors and side skirts without harsh shadowing.
| Bay Width | Technician Clearance | Side Panel Illumination | Workflow Efficiency |
|---|---|---|---|
| 12 - 14 Feet | Minimal (1-2 feet per side) | Poor (Heavy shadowing on rockers) | Low (Cramped, high fatigue) |
| 14 - 16 Feet | Adequate (2-3 feet per side) | Moderate (Requires supplemental lighting) | Medium (Functional but restrictive) |
| 18+ Feet | Optimal (4+ feet per side) | Excellent (Full light cascade) | High (Unrestricted movement) |
Vertical clearance dictates even light distribution. You must maintain a specific distance between the vehicle roof and the light source. If the lights sit too low, they create intense hot-spots. This uneven light distribution causes uneven curing times for ceramic coatings. When you add infrared curing lamps to the mix, a low ceiling becomes a severe fire hazard.
Standard ceiling heights of 10 to 12 feet work best. This height accommodates suspended mounting systems perfectly. It allows you to drop the lights to the exact optimal height using adjustable cables. Low ceilings under 9 feet present a challenge. They require alternative flush-mount solutions rather than suspended tunnels. Flush mounting keeps the fixtures tight against the ceiling, maximizing vertical space but sacrificing adjustability. If you work on lifted trucks in a 9-foot bay, the roof of the truck practically touches the lights, rendering the overhead illumination useless.
Length calculations must account for standard vehicle sizes plus front and rear workspaces. A standard full-size truck or long-wheelbase sedan measures roughly 18 to 20 feet long. You need ample room to operate a dual-action polisher on the front bumper and rear tailgate. Therefore, a total bay length of 24 to 30 feet remains necessary. This provides enough buffer zone to move equipment carts and avoid tripping over extension cords at the front and rear of the vehicle. If your bay measures only 20 feet long, you have to open the garage door just to polish the rear bumper, exposing the vehicle to outside dust and debris.
Physical space directly impacts operational efficiency and service quality. When technicians work in cramped conditions, fatigue sets in rapidly. Proper ergonomic clearances reduce physical strain. They allow for fluid movement around the vehicle, leading to faster turnaround times and higher precision during defect identification. A well-sized bay means the technician spends less time moving equipment and more time actually correcting paint.
You must allocate specific square footage for peripheral equipment. A technician does not just stand next to a car. They use rolling detailing carts, step stools, and scaffolding for roof correction. Buffer extension cords need space to trail without snagging on tires. You need a dedicated 4-foot perimeter around the entire vehicle footprint. This prevents tripping hazards and keeps power tools safely away from the paintwork when not in use.
Consider the footprint of your specific tools. A standard detailing cart measures about two feet wide. If you only have three feet of clearance between the car and the wall, the cart blocks the entire walkway. You constantly push the cart out of the way just to move down the side of the vehicle. This constant shuffling destroys workflow momentum.
Many modern detailing shops utilize mid-rise scissor lifts or QuickJacks to access lower panels comfortably. Integrating lifts changes your spatial requirements drastically. When a vehicle elevates, the roof moves significantly closer to the ceiling fixtures.
You must calculate an additional 3 to 4 feet of vertical clearance. This prevents the vehicle roof from colliding with the car detailing light tunnel when fully elevated. If your bay has a 10-foot ceiling, using a lift with a suspended light tunnel creates massive risks. Lifts generally require ceiling heights of 13 to 15 feet to safely accommodate overhead lighting rigs. If you plan to install a 2-post lift, you also have to account for the vertical posts, which interfere with the side panels of a continuous arch lighting system.
Entry points often interfere with lighting installations. You must analyze how garage door tracks operate within the space. Roll-up doors track along the ceiling, potentially blocking the mounting points for your lights. The opening mechanisms and central motors also consume valuable overhead space. If you have standard overhead tracks, you might need to convert to a high-lift track system or a wall-mounted jackshaft opener to clear the ceiling for the lighting grid.
Ensure your entry width allows vehicles to pull straight into the tunnel without requiring sharp turns. A misaligned entry forces the vehicle off-center, ruining the symmetrical lighting effect required for accurate paint inspection. If the driver cranks the wheel to get into the bay, the car sits diagonally under the lights.
You must isolate your correction bay from wet wash bays. Water spray, heavy degreasers, and airborne polishing dust create cross-contamination. Moisture destroys electrical components. Isolating the bay protects the sensitive drivers and wiring of your lighting system. It also maintains lens clarity on the fixtures. If hard water overspray coats the LED lenses, it diffuses the light output and alters the color temperature, rendering the system less effective. Physical barriers, such as heavy-duty vinyl wash curtains or permanent drywall partitions, remain mandatory if the wash bay sits less than 15 feet away from the correction zone.
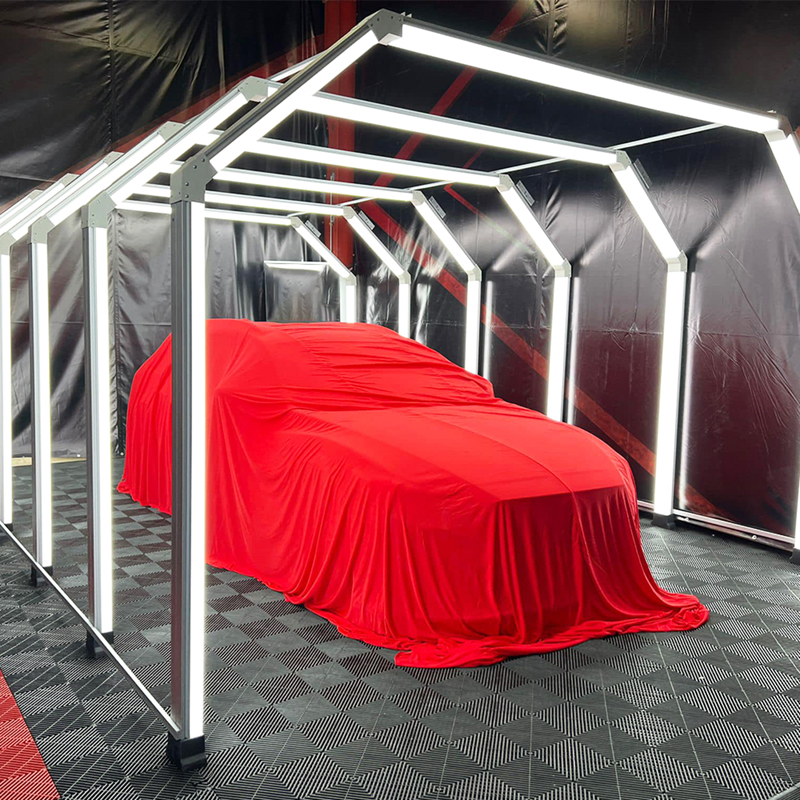
Bay architecture dictates your physical installation method. You cannot force a suspended system onto a weak drop ceiling. You must match the mounting approach to your building's structural reality. Evaluating your ceiling joists, wall studs, and floor space serves as the first step in selecting a lighting frame. Ignoring structural limits leads to sagging fixtures, broken connectors, and severe safety hazards.
You have three primary ways to mount car workshop tunnel lights. Each serves a specific architectural need.
Lighting rigs carry significant weight. Aluminum and polycarbonate LED systems generally weigh between 50 and 150 pounds, depending on the footprint. You must assess joist strength before ordering a system. Drywall anchors never provide sufficient support for suspending a heavy lighting grid over a client's vehicle. You must locate solid wood or steel trusses.
If the existing ceiling cannot support the load, you need structural reinforcement. This often involves adding cross-bracing between joists or spanning steel unistrut across multiple trusses to distribute the weight evenly. Never hang a lighting system from a suspended acoustic drop ceiling grid. The thin wire supports for drop ceilings fail under the dynamic load of a heavy aluminum light tunnel.
High-output lighting systems draw substantial power. You must outline the amperage requirements before installation. Most commercial setups require dedicated 15-amp or 20-amp circuits to prevent breaker trips when running polishing machines simultaneously. If you plug a 1000-watt lighting system into the same circuit as a heavy-duty shop vac and a dual-action polisher, you trip the breaker immediately.
You also must plan spatial requirements for mounting LED drivers and transformers. These components convert line voltage to low voltage for the LEDs. They generate heat and require ventilation. Furthermore, you must place them within a specific wire-run distance from the tunnel to prevent voltage drop. If the wire run stretches too far, the LEDs at the end of the tunnel appear dimmer than the ones near the power source. Planning these wiring pathways keeps the installation clean and compliant with safety standards. Use proper conduit to route the low-voltage wires from the drivers to the ceiling fixtures.
A detailing shop services a wide variety of vehicles. You must future-proof the bay to handle diverse client assets. Sizing your lighting strictly for small sports cars creates severe operational bottlenecks when a large truck arrives. Scalability requires planning for the largest vehicle you intend to service. You do not want to turn away a lucrative ceramic coating job on a large SUV simply because it does not fit under your lights.
For standard sedans and lower-profile vehicles, baseline dimensions remain straightforward. The arch angles of the lighting frame follow the natural curve of the vehicle greenhouse. This ensures light hits the hood, roof, and trunk lid evenly. You easily achieve side-panel illumination because the vehicle sits low relative to the side lighting bars. A standard 15-foot wide tunnel provides excellent wrap-around light for these vehicles. The light naturally cascades down the doors, illuminating the rocker panels without requiring the technician to set up auxiliary floor lights.
Oversized vehicles demand adjusted height and width calculations. SUVs and lifted trucks have massive surface areas. If the lighting rig sits too narrow, the side pillars of the frame physically obstruct the vehicle doors. If the rig hangs too low, the roof of a lifted truck blocks the overhead light, casting deep shadows down the sides of the vehicle.
Vehicle height severely impacts the effectiveness of side-illumination panels. For tall vans, fixed side lights often point directly at the tires rather than the door panels. To combat this, bays servicing large vehicles need wider footprints (18+ feet) and taller vertical clearances.
To properly accommodate oversized vehicles, follow these structural adjustments:
Choosing between custom and prefabricated systems involves conceptual trade-offs. You balance upfront costs, fitment accuracy, and project lead times. Your bay dimensions ultimately dictate which path offers the most value. A perfectly square, empty bay welcomes a prefabricated kit. A cramped bay with exposed ductwork demands a custom approach.
Prefabricated LED light tunnel kits offer several distinct advantages. They come with fixed costs, allowing for precise budget planning. The dimensions remain predictable, and the installation process moves faster because manufacturers pre-measure all connectors and wiring harnesses. You simply assemble the pieces according to the manual, hang the grid, and plug it in.
However, prefabricated kits have rigid sizing. They rarely align perfectly with non-standard bay dimensions. If your shop has asymmetrical ceilings, exposed HVAC ductwork, or odd column placements, a rigid kit fails to fit properly. You compromise on the ideal placement to make the kit work within the space. If the kit measures 16 feet wide and your bay measures exactly 16 feet wide, you have zero margin for error during installation.
Manufacturers tailor custom-fabricated tunnels to your exact bay geometry. They maximize every inch of available space, working around garage door tracks and structural columns. Custom setups also allow for specific color temperature mixing, combining warm and cool LEDs to reveal different types of paint defects. You specify exactly where you want the light concentrated based on your specific polishing habits.
The drawbacks include higher upfront costs and longer lead times. Custom systems require precise architectural measurements and specialized manufacturing. If you measure your bay incorrectly, the final product fails to fit, leading to costly modifications on-site. You also factor in the cost of a professional installation crew, as custom systems rarely come with simple plug-and-play connectors.
Installing a massive lighting grid involves inherent risks. Identifying what goes wrong during installation allows you to prevent costly mistakes. Poor planning leads to bad lighting, overheating, and potential safety hazards. You address environmental factors and electrical codes before you mount a single fixture.
Light Reflectance Value (LRV) measures how much light a surface reflects. Highly reflective bay walls create blinding glare. Dark floors absorb too much light, leaving the undercarriage in shadow. If you install a high-output light tunnel in a room with glossy white walls, the light bounces uncontrollably, washing out the contrast needed to see fine swirl marks.
To mitigate this risk, apply matte wall finishes. Painting walls dark grey or black absorbs excess scattered light. This focuses the visual contrast directly on the vehicle paint, making scratches pop. Pair these matte walls with high-gloss epoxy or polyaspartic floors. The glossy floor bounces the overhead light upward, illuminating the rocker panels and lower bumpers perfectly. This combination of dark walls and a reflective floor creates the ultimate high-contrast environment for paint correction.
High-output LEDs generate ambient heat. In enclosed, low-ceiling bays, this heat accumulates rapidly. Elevated room temperatures accelerate the flash time of ceramic coatings, making them difficult to level and wipe off. If the room gets too hot, the coating becomes sticky and leaves high spots on the paint.
Mitigate this by integrating proper HVAC considerations. Ensure adequate spacing between the light fixtures and the ceiling to allow for passive cooling. Mount the LED drivers in a well-ventilated area, away from the immediate vehicle workspace, to disperse their heat output safely. If your bay lacks central air conditioning, install commercial exhaust fans to pull the hot air out of the ceiling space.
Improper hardwiring creates a severe liability. Failing fire inspections or voiding your commercial insurance due to unpermitted electrical work ruins a business. Many shop owners try to cut corners by daisy-chaining multiple light fixtures together using cheap extension cords. This creates massive resistance, overheats the wires, and easily starts electrical fires.
Always mandate commercial-grade, UL-listed fixtures. Never rely on extension cords for permanent installations. Hire a professional, licensed electrician to calculate the load, run the dedicated circuits, and provide official sign-offs on the completed work. This ensures your shop remains safe and legally compliant. The electrician ensures the wire gauge matches the amperage draw and that all connections sit properly housed in junction boxes.
A: The minimum ceiling height for a flush-mounted system is 8 to 9 feet. However, for a suspended cable-mounted system, you need a minimum of 10 to 12 feet to allow for proper drop distance and light diffusion.
A: You need a minimum of 3 to 4 feet of clearance on all sides of the vehicle. This perimeter allows technicians to use rolling carts, operate polishers ergonomically, and step back to view paint reflection angles.
A: Vehicle lifts raise the car closer to the ceiling, requiring an additional 3 to 4 feet of vertical clearance. Bays using lifts typically need ceiling heights of 13 to 15 feet to prevent the vehicle roof from hitting the light fixtures.
A: Yes, commercial high-output lighting systems draw significant amperage and require dedicated 15-amp or 20-amp circuits. They also utilize external LED drivers or transformers that must be mounted in ventilated areas.
A: Tight bays with bright white walls create intense glare and bounce-back. Using matte dark grey or black walls absorbs excess light, focusing the contrast on the vehicle paint to make defects highly visible.
A: Yes, freestanding frames are ideal for leased spaces because they do not require drilling into the structural ceiling or walls. They are fully self-supported, making them easy to dismantle and relocate if the lease ends.


