


Views: 0 Author: Site Editor Publish Time: 2026-09-03 Origin: Site


Commercial and high-end residential lighting design is shifting rapidly toward geometric fixtures. Moving beyond standard linear troffers makes shop ceiling designs visually pop. When evaluating these fixtures, you will often hear terms like honeycomb LED lights, hexagonal LED lights, and hexagonal light kits used interchangeably. Manufacturers and shoppers use these terms to describe the exact same core fixture category. Integrating complex geometric shapes into standard ceiling infrastructures presents a real technical challenge. Improper layout leads directly to structural strain on drop ceilings. It also causes uneven lumen distribution and exposed wiring issues. This guide provides a technical framework for matching specific ceiling grid patterns and structural types with these fixtures. Following these principles ensures optimal illumination, structural safety, and seamless aesthetic alignment.
A successful installation requires adequate structural support, hidden power routing, and precise alignment. You cannot simply attach complex geometric fixtures to any ceiling surface without preparation. The underlying infrastructure dictates your layout possibilities. We must evaluate the physical ceiling type before selecting a grid pattern. Failing to assess the ceiling structure leads to sagging fixtures and code violations. Commercial spaces often present a mix of exposed decking, acoustic tiles, and finished drywall, each requiring a distinct mounting approach.
Standard acoustic tile grids have strict weight limitations. Most commercial T-bar grids support basic acoustic panels and lightweight troffers, typically rated for no more than 2 pounds per square foot. They are not engineered to hold large, interconnected metal or plastic frames. Open-frame tubular fixtures differ significantly from solid panel lights. Solid panels often drop directly into standard 2x2 or 2x4 grid slots, utilizing the existing grid structure for support. Interconnected frames require independent suspension. You must use independent suspension cables for large geometric builds. Tie aircraft cable directly to the true ceiling joists above the drop ceiling. Do not rest heavy frames directly on the T-bars. Doing so causes the grid to warp over time, potentially leading to a localized collapse.
Flush-mounting on drywall presents different challenges. Hard lids require heavy-duty toggle bolts or direct joist anchoring. You must locate the wooden or steel studs behind the drywall using a magnetic stud finder. Securing a massive grid solely to half-inch drywall guarantees failure, as the constant downward pull will eventually rip the anchors out. Open-joist ceilings offer significant accessibility advantages. They allow you to route wires freely and anchor suspension cables anywhere along the exposed beams. This flexibility makes open ceilings ideal for complex geometric layouts. You can span gaps easily by installing unistrut channels across the joists to create custom mounting points.
To properly suspend a large geometric frame from an open-joist or true ceiling above a T-bar grid, follow these specific steps:
Interconnected systems draw significant power. You must outline the power requirements before linking multiple units. Calculate maximum run lengths carefully to avoid issues. Voltage drop occurs if runs exceed manufacturer limits. This causes lights at the end of the chain to appear dim or flicker. You must balance the electrical load across multiple circuits for large installations. Always follow the 80% rule for LED drivers. Never load a power supply past 80% of its maximum rated wattage. This overhead prevents the driver from overheating during continuous operation and accounts for initial power surges when the lights are switched on.
Hide drivers and transformers above the grid whenever possible. This keeps the ceiling looking clean and professional. However, you must maintain code-compliant access for future maintenance. Place transformers in accessible junction boxes. Never bury power supplies behind permanently sealed drywall. Ensure adequate ventilation around drivers to prevent overheating. Heat buildup reduces the lifespan of LED components significantly. If you are working with a hard lid, plan for remote driver placement in an adjacent utility closet. Run low-voltage wiring through the ceiling cavity to feed the fixture nodes, ensuring you use the correct wire gauge to prevent voltage drop over long distances.
| Wire Gauge (AWG) | Maximum Run Length (12V System) | Maximum Run Length (24V System) | Recommended Application |
|---|---|---|---|
| 18 AWG | 10 feet | 20 feet | Short runs from local driver to single pod |
| 16 AWG | 15 feet | 30 feet | Medium runs across standard commercial rooms |
| 14 AWG | 25 feet | 50 feet | Remote driver placement in utility closets |
| 12 AWG | 40 feet | 80 feet | Large-scale continuous matrix installations |
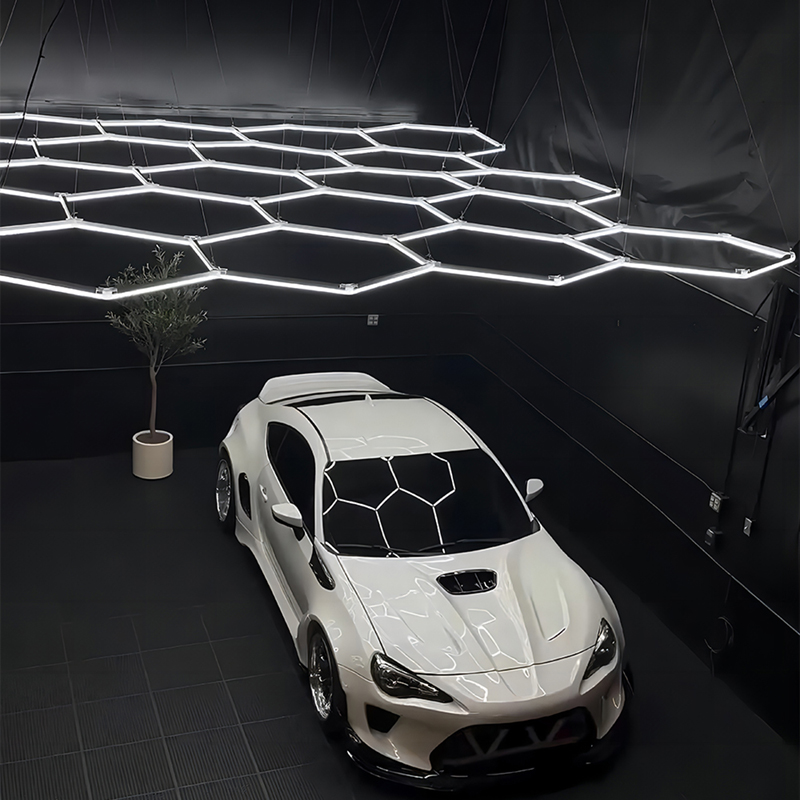
Professional installations rely on specific geometric layouts. Each pattern serves a distinct functional and aesthetic purpose. We break down the primary solution categories below to help you match the design to your space. Selecting the right pattern dictates not only the visual impact but also the complexity of the wiring and suspension required.
A continuous matrix is a wall-to-wall unbroken grid of interconnected hexagons. It creates a massive, unified lighting structure across the entire ceiling. This pattern is best for large showrooms, gyms, and open-plan retail spaces. It delivers incredibly high lumen output. The continuous design floods the space with bright, even light, eliminating dark corners entirely. The visual impact of a massive glowing ceiling is undeniable, drawing the eye upward and making the space feel expansive.
However, you must evaluate the risk of visual clutter. A massive grid can overwhelm a small room, making the ceiling feel oppressively low. There is also a major structural challenge involved. Aligning a rigid, large-scale fixture perfectly parallel to the room's walls is tough. If the room itself is slightly out of square, the grid will highlight that architectural flaw. You must leave a buffer zone between the grid edge and the walls. This negative space buffer hides minor architectural imperfections and makes installation much easier, providing room to maneuver the final connections.
Clustered pods consist of isolated groups of 3 to 7 hexagons. You place these clusters strategically over specific work areas. This pattern is best for barber stations, individual retail displays, and task-specific zones. It provides intense light exactly where you need it without wasting energy on transitional spaces. You can align a five-hexagon cluster directly over a barber chair to provide perfect 360-degree illumination for the stylist, ensuring no shadows fall across the client's face.
This layout allows for targeted lumen density. You avoid wasting energy lighting empty floor space. It also utilizes negative ceiling space effectively. The dark areas between clusters prevent the lighting from overwhelming the room's design. Clustered pods are easier to install than a continuous matrix. They require fewer suspension points and less complex wiring. You can power each pod independently, allowing for zoned switching. This means you only turn on the lights over active workstations, reducing overall energy consumption.
Hybrid grids combine straight LED light bars with diamond-shaped pieces or hexagonal nodes. This creates custom pathways and breaks up the continuous honeycomb look. It offers a highly customized, modern aesthetic. This pattern is best for hallways, directional retail flow, and modern office corridors. The straight lines guide foot traffic naturally, while the geometric nodes provide visual interest at intersections.
Mixing fixture types requires careful technical planning. You must ensure perfect color temperature (CCT) matching across different fixture styles. A mismatch between a 5000K straight bar and a 6000K hexagon looks terrible. You must also balance the visual weight of the pattern. Do not cluster too many shapes in one corner while leaving another bare. Map out the hybrid design on paper first to ensure the geometric flow makes sense within the room's footprint.
Consider these common hybrid configurations for commercial spaces:
Different industries require vastly different lighting outcomes. You cannot use the same layout for a detailing garage and a hair salon. We map specific grid patterns to the functional requirements of different industries below. Understanding the specific visual tasks performed in the space dictates the required lumen output, color temperature, and fixture placement.
Detailing studios require flawless, multi-directional illumination. You must create a "light tunnel" or a suspended overhead grid that surrounds the vehicle. A dense hexagonal pattern eliminates micro-shadows entirely. Light hits the vehicle from multiple angles simultaneously. This allows detailers to spot paint corrections easily. Swirl marks, holograms, DA sander pigtails, and clear coat scratches become highly visible under this intense geometric array.
Ceramic coating high spots are notoriously difficult to see under standard linear lighting. Using dedicated car detailing lights solves this problem. The geometric grid provides the necessary contrast to level coatings perfectly. You should center the grid directly over the wash bay or correction pad. Ensure the outer edges of the grid extend slightly past the vehicle's footprint. This guarantees that the lower rocker panels receive adequate illumination. We recommend a 6000K color temperature for detailing, as the cool white light mimics bright sunlight and exposes defects rapidly.
Retail spaces and salons require a careful balance. You need strong task lighting for haircuts or product displays. You also need comfortable ambient lighting for customers. The shop ceiling design should stand out without causing eye strain. A massive, blinding grid will drive customers away. You must tailor the lumen output to create an inviting atmosphere while maintaining enough brightness for precision work.
Space the grids to produce a soft diffusion of light. This flatters subjects in barbershops and salons. Harsh, direct overhead lighting creates unflattering facial shadows. A dispersed geometric layout wraps light around the client, filling in shadows under the chin and eyes. You must maintain a high color rendering index (CRI) clarity across the area. Look for fixtures with a CRI of 90 or higher. High CRI ensures hair colors, skin tones, and retail products look vibrant and true to life. A 4000K neutral white temperature works best in these environments, bridging the gap between clinical task lighting and warm residential tones.
| Commercial Application | Recommended Grid Pattern | Ideal Color Temperature (CCT) | Minimum CRI Requirement |
|---|---|---|---|
| Auto Detailing Studio | Dense Overhead Matrix | 6000K - 6500K | 85+ |
| Hair Salon / Barbershop | Clustered Pods over Stations | 4000K - 5000K | 90+ |
| Retail Showroom | Continuous Matrix or Hybrid | 3500K - 4000K | 90+ |
| Gym / Fitness Center | Continuous Matrix | 5000K | 80+ |
You must balance fixture density, energy consumption, and visual comfort. Throwing as many lights as possible onto the ceiling is a mistake. Proper spacing ensures even coverage without creating uncomfortable glare zones. Calculating the exact number of fixtures prevents over-illumination and keeps the electrical load manageable.
Never start an installation without a physical or digital plan. We strongly recommend using layout infographics and ceiling grid mapping software. These tools help you visualize spacing factors before committing to a physical installation. They allow you to test different configurations virtually. You can spot potential collisions with HVAC vents, fire sprinklers, or security cameras early. Measure the room twice. Account for the exact dimensions of the assembled lighting frame, including the corner connectors, as these add several inches to the overall footprint.
You need a standard formula for determining unit counts. The number of units depends on ceiling height and desired foot-candles at the working plane. Higher ceilings require tighter spacing or higher wattage units to push light down to the floor. Lower ceilings allow for wider spacing. If you install a massive grid on an eight-foot ceiling, the room will be unbearably bright and cause severe eye strain for anyone working underneath it.
| Ceiling Height | Grid Pattern | Recommended Spacing | Target Foot-Candles |
|---|---|---|---|
| 8 - 10 feet | Clustered Pods | 4 - 6 feet between clusters | 50 - 70 fc |
| 10 - 14 feet | Continuous Matrix | Wall-to-wall (2 ft buffer) | 70 - 100 fc |
| 12 - 16 feet | Hybrid Linear | 8 - 10 feet between nodes | 40 - 60 fc |
| Any Height | Detailing Tunnel | Centered directly over vehicle | 100+ fc |
Over-illuminating a space carries significant risks. Densely packed fixtures create intense glare. This causes eye fatigue for employees working long shifts. You must evaluate the use of diffusers to soften the light output. Frosted polycarbonate covers work exceptionally well. They scatter the LED diode light, creating a smooth, continuous line of illumination rather than a dotted string of harsh lights.
Use dimmable drivers to control output. Dimmers allow you to adapt to changing ambient light conditions throughout the day. You can run the lights at full power during intricate tasks. You can dim them down for general ambient lighting later. Ensure your dimmers are compatible with the specific LED drivers used in your geometric kit. Mismatched dimmers cause severe flickering and premature driver failure. We recommend using 0-10V dimming systems for large commercial grids, as they provide smoother control over multiple fixtures compared to standard TRIAC dimmers.
Planning and executing these installations involves common points of failure. Recognizing these risks early prevents costly teardowns and ensures a safe, durable build. Commercial environments demand rigorous adherence to safety standards and structural integrity.
Interconnected plastic or lightweight aluminum frames are prone to sagging. This happens in the middle of a large, continuous grid. Gravity pulls down on the unsupported center nodes. The entire ceiling looks warped and unprofessional. Aluminum housings offer better rigidity than cheap plastic, but they still require proper support over long spans. If you are installing in an area prone to vibrations, such as a gym with heavy equipment drops, the suspension system must be robust.
You must mandate the use of laser levels during installation. Eyeballing a large geometric grid never works. Specify the maximum distance between suspension anchor points. A good rule of thumb is anchoring every two intersecting nodes. Use adjustable aircraft cable grippers. These allow you to micro-adjust the height of each node until the entire grid is perfectly level. Lock the grippers in place only after verifying the level across both the X and Y axes of the room.
Improper wiring is a severe fire hazard. Daisy-chaining too many fixtures together is the most common mistake. This leads to melted connectors or tripped breakers. The internal wiring of the first fixture cannot handle the current draw of fifty subsequent fixtures. The copper traces inside the connectors will overheat and fail, potentially sparking a fire inside the ceiling cavity.
Emphasize strict adherence to manufacturer-specified maximum link limits. If the manual says link no more than ten tubes, stop at ten. Run a new power feed for the eleventh tube. Prompt the inclusion of UL-listed or CE-certified components only. Cheap, uncertified power supplies fail frequently and void commercial insurance policies. You must hire licensed electrical contractors for hardwired commercial grids. They ensure the installation meets all local building and fire codes, including proper grounding, Class 2 low-voltage compliance, and correct conduit routing.
A: No, there is no technical difference. Shoppers, installers, and brands use both terms interchangeably to describe the exact same geometric lighting kits. The terminology simply varies based on regional preferences and manufacturer marketing strategies.
A: Yes, but with caveats. Solid panel versions can drop directly into the grid. However, interconnected open-frame kits require independent suspension. You must tie aircraft cables directly to the true ceiling joists to prevent the T-bar grid from sagging under the weight.
A: You connect them using dedicated LED drivers. Plug-and-play kits often plug into standard outlets above the ceiling. Commercial hardwired systems require an electrician to splice the driver's input wires directly into the building's existing 120V or 277V lighting circuits.
A: The best layout is a perimeter-plus-center-fill design. This creates a dense overhead matrix that extends slightly beyond the vehicle's footprint. This specific pattern eliminates micro-shadows, providing the intense, multi-directional contrast needed for paint correction and ceramic coating application.
A: Yes. Many systems offer hybrid connectors that allow you to attach straight bars to hexagonal nodes. You can add diamond shapes or linear runs to break up the pattern. You must plan your circuits carefully to avoid exceeding maximum link limits.
A: Spacing depends on your ceiling height and beam angle. For an 8 to 10-foot ceiling, leaving 4 to 6 feet between clusters provides even ambient lighting. Always consult spacing factor infographics provided by the manufacturer for precise foot-candle targets.
A: Standard T-bars are sufficient only for lightweight, drop-in panel versions. If you are building a large, interconnected frame system, independent suspension is mandatory. The T-bar grid itself does not need reinforcement if the fixture weight is carried by the true ceiling above.


