


Views: 0 Author: Site Editor Publish Time: 2026-09-05 Origin: Site


Poor visibility in precision environments carries a heavy operational cost. When technicians work under inadequate illumination, they miss subtle paint defects, apply uneven polishing pressure, and suffer from severe eye strain. This directly increases rework time and frustrates clients. Traditional linear or point-source lighting inherently creates harsh directional shadows. These fixtures cast intense glare and distribute lux unevenly across complex three-dimensional surfaces like vehicle bodies, custom cabinetry, or detailed workbenches.
Geometric, multi-directional illumination provides a highly engineered solution to these visibility challenges. By overlapping light fields from multiple angles, a hexagrid working lighting system eliminates directional blind spots. This structural approach to workspace illumination acts as a strict functional requirement for rigorous quality control, ensuring that every surface angle receives consistent, shadow-free light.
Single-source lighting systems, such as traditional high-bay fixtures or standard fluorescent tubes, project light from a centralized point. A standard high-bay LED might push 30,000 lumens straight down toward the floor. This creates massive high-contrast zones on the working plane. When a technician leans over a fender to operate a dual-action polisher, their torso completely blocks that single beam path. This casts a hard, dense shadow directly onto the work area. The technician must constantly step aside or shift their posture to check their progress. Working constantly in these high-contrast environments forces the human eye to rapidly adjust between blinding reflections and dark voids. This constant pupil dilation leads directly to focal fatigue and tension headaches over a long shift.
Multi-directional illumination fundamentally changes how light interacts with physical objects in the room. By arranging light sources in a continuous geometric pattern, you generate dozens of overlapping light fields. When an object blocks light from one direction, the adjacent nodes immediately fill in the dark space from the opposite side. This physical phenomenon expands the penumbra—the soft edge of a shadow—until the shadow density is entirely neutralized. The result is a completely shadowless working plane. Technicians can see surface details clearly without constantly shifting their body position or bringing in secondary handheld inspection lights.
Precision work requires strict adherence to baseline illumination metrics. You cannot simply install brighter bulbs and expect better results. General workspace environments typically require a minimum of 750 to 1000 lux at the working plane. However, high-detail tasks like automotive paint correction, surface inspection, and fine fabrication demand 2000 lux or higher. Measuring lux at the exact height of the workbench or vehicle hood ensures the light actually reaches the target surface with enough intensity to be useful.
Uniform light distribution is just as critical as raw intensity. When light hits high-gloss or heavily textured surfaces unevenly, it creates optical illusions. A technician might perceive a flat panel as wavy, or miss a shallow dent because a harsh reflection masks the defect. Consistent lux distribution across the entire grid prevents these visual distortions, allowing for accurate surface assessment.
| Task Type | Minimum Lux Requirement | Recommended Color Temperature | Primary Visibility Goal |
|---|---|---|---|
| General Assembly & Maintenance | 750 - 1000 Lux | 4000K - 5000K | Safe navigation, tool identification, and general mechanical work. |
| Woodworking & Fabrication | 1000 - 1500 Lux | 5000K | Reading fine measurements, aligning cut lines, and ensuring safety near blades. |
| Paint Correction & PDR | 2000+ Lux | 6500K | Spotting micro-marring, holograms, clear coat scratches, and shallow dents. |
| Ceramic Coating Application | 2000+ Lux | 5000K - 6500K | Identifying high spots, leveling issues, and uneven flashing before the coating cures. |
The structural design of a honeycomb LED lights setup relies on precise 120-degree angles. Every connection point in the grid forces the light beam to spread outward and overlap with the adjacent light tube. Standard linear shop lights leave massive dark gaps between the fixtures. The specific hexagonal geometry ensures that there are no dead zones anywhere inside the perimeter. The interlocking pattern acts exactly like a massive, room-sized softbox, projecting light from 360 degrees around the subject.
This geometric advantage becomes highly apparent when illuminating three-dimensional objects. Standard overhead lighting struggles to reach vertical panels, lower rocker panels on vehicles, or the undersides of complex fabrications. The wide, overlapping beam spreads of a hexagonal grid wrap the light around the curvature of the object. This continuous wrap effect illuminates the sides and lower sections of the subject that traditional directional spots completely miss.
Raw LED diodes produce intense, piercing light that causes severe glare. To make this light usable for precision tasks, the system must utilize high-quality diffusers. Polycarbonate (PC) diffusers offer superior impact resistance and excellent light transmission compared to cheaper acrylic alternatives. A properly frosted PC diffuser scatters the directional light from the diodes, softening the output and significantly widening the overall beam angle.
Proper diffusion prevents harsh LED hot-spots from reflecting directly off clear coats and polished metals. If you can see individual diode dots reflecting on a freshly polished surface, the diffuser is inadequate. Smooth, continuous lines of light are necessary to read the surface correctly. This smooth reflection helps technicians spot micro-marring, dual-action sander pigtails, and uneven leveling during the finishing process.
Designing the layout of the grid determines its overall effectiveness. A targeted, ceiling-mounted configuration works well for illuminating specific workbenches or single vehicle bays. It provides excellent top-down visibility and neutralizes shadows on horizontal planes like hoods, roofs, and trunk lids. However, for maximum side-panel visibility, extending the grid down the vertical walls creates a highly effective light tunnel.
Wall-to-wall installations surround the subject entirely. This configuration bounces light off the epoxy floor and lower walls, pushing illumination into the deepest recesses of the workspace. While a full light tunnel requires more hardware, complex mounting, and careful electrical planning, it delivers the ultimate shadow-free environment for high-end inspection and detailing.
The automotive finishing industry relies heavily on flawless surface visibility. Dedicated car detailing lights require the highest possible Color Rendering Index to ensure accurate color matching and defect detection. When correcting paint, technicians must identify micro-marring, swirl marks, holograms, and shallow dents. A properly sized hexagonal grid highlights these defects by casting uniform, straight reflection lines across the clear coat. Any disruption in the reflection line instantly reveals a dent or surface imperfection, making the grid an indispensable tool for PDR technicians who need to read the metal's topography.
Applying Paint Protection Film (PPF) and vinyl wraps requires absolute precision. Even a single speck of dust or a minor adhesive line can ruin a panel installation. Uniform, shadow-free lighting prevents these tiny defects from being overlooked during the application process. The overlapping light fields ensure that technicians can see clearly under the film as they squeegee out air and moisture, regardless of where they are standing around the vehicle. It also highlights adhesive stretch marks and silvering before the film sets permanently.
In fabrication shops and woodworking studios, safety and precision go hand in hand. A technician leaning over a table saw or a CNC router often casts a shadow directly onto their measurement marks. Installing a geometric light setup above the workbench eliminates these dangerous tool shadows. It improves safety by keeping spinning blades and sharp edges fully illuminated, while also increasing precision during intricate cutting, measuring, and assembly tasks. You can read calipers and tape measures perfectly without constantly adjusting your overhead shop lights.
Selecting the right system requires understanding how specific lighting metrics translate to real-world outcomes. The Color Rendering Index (CRI) measures how accurately a light source reveals the true colors of an object compared to natural sunlight. A CRI of 90 or higher is strictly non-negotiable for color matching paint or detecting subtle surface defects. Lower CRI ratings will wash out red and blue tones, making accurate color blending impossible.
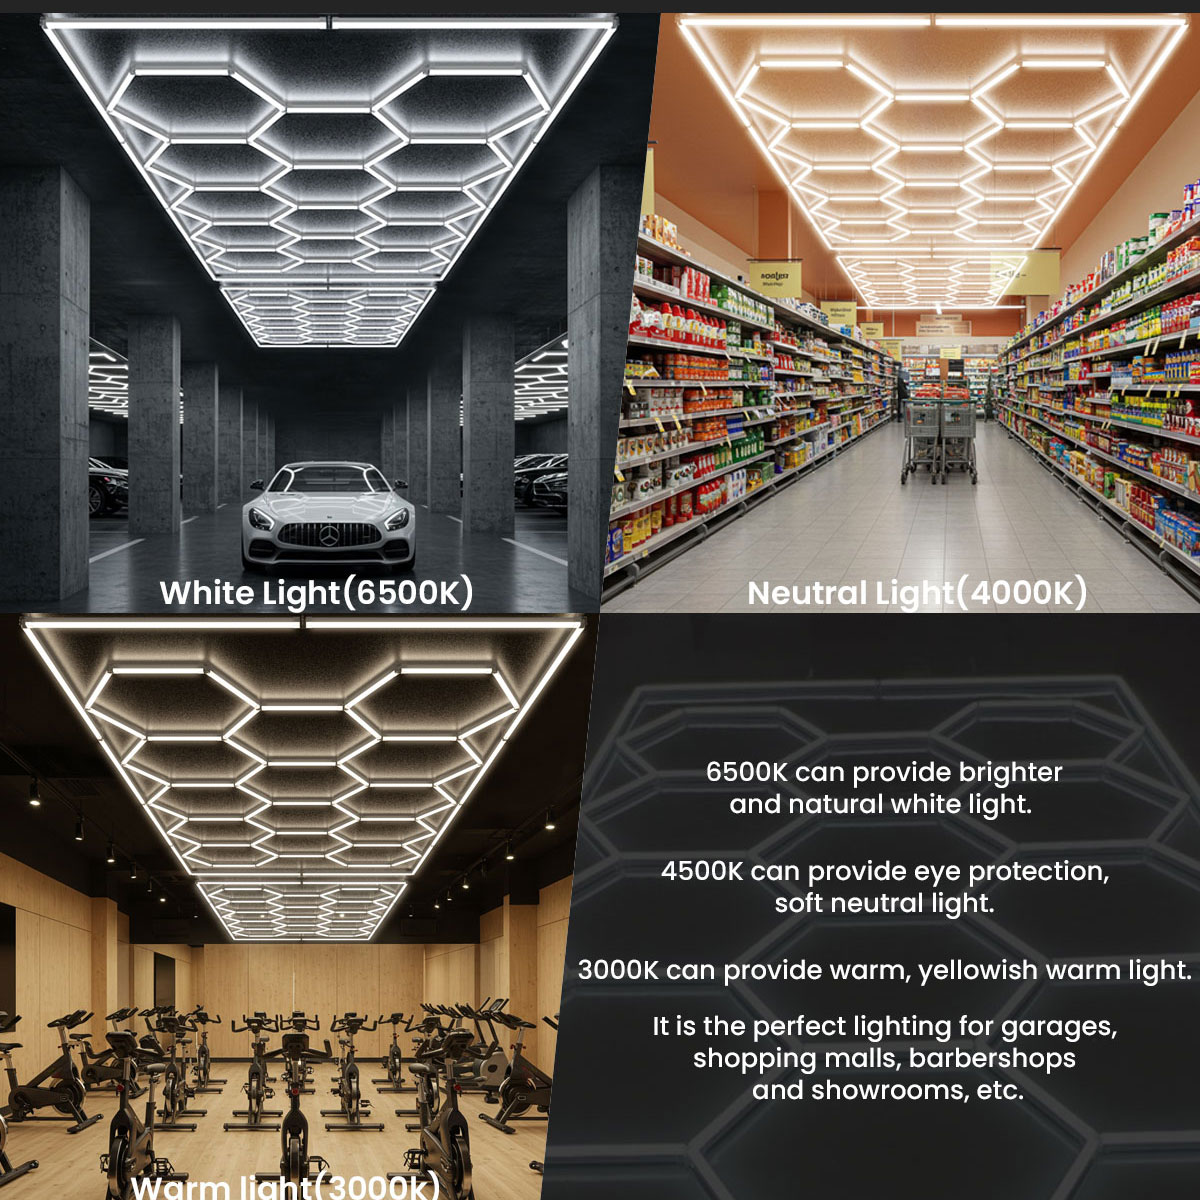
Color temperature, measured in Kelvin, dictates the visual warmth or coolness of the light. A 4000K temperature provides a neutral, natural white that is easy on the eyes for long shifts. However, a 6500K daylight temperature provides stark, high-contrast illumination that excels at revealing clear coat scratches and swirl marks. Lumen density dictates the total brightness. You must calculate the required lumens per square foot based on your specific ceiling height and the complexity of the tasks performed in the space. Hexagonal LED lights must balance these three metrics perfectly to be effective.
| Lighting Metric | Recommended Specification | Practical Outcome in Workspace |
|---|---|---|
| CRI (Color Rendering Index) | > 90 CRI | Accurate color matching; prevents washed-out tones during paint inspection. |
| Color Temperature | 5000K - 6500K | 6500K highlights surface scratches; 5000K reduces eye strain for general work. |
| Lumen Output | 110 - 130 Lumens per Watt | Ensures high brightness without excessive heat generation or energy draw. |
| IP Rating | IP54 or IP65 | Protects internal diodes from moisture, polishing dust, and chemical off-gassing. |
The physical construction of the light tubes directly impacts their longevity. Premium systems utilize extruded aluminum housing rather than cheap PVC plastic. Aluminum acts as a highly efficient heat sink, pulling thermal energy away from the LED diodes. Proper thermal management prevents the diodes from degrading prematurely, ensuring the system maintains its lumen output over time (often referred to as the L70 rating). If heat cannot escape a plastic housing, the diodes will burn out rapidly.
Environmental durability is equally important. Workspaces generate dust, moisture, and chemical vapors. An Ingress Protection rating of IP54 or IP65 is necessary for detailing bays and fabrication shops. This rating ensures the internal circuitry is sealed against water spray from pressure washers, airborne polishing compound dust, and chemical off-gassing from ceramic coatings and harsh solvents.
A major advantage of these systems is their modular nature. Buyers must evaluate the quality of the plug-and-play connector systems. Robust Y-connectors and 120-degree V-connectors ensure structural integrity, keeping the grid rigid and perfectly aligned. Flimsy plastic connectors will sag over time, ruining the aesthetic and disrupting the reflection lines on the vehicles below.
While modularity allows for massive custom configurations, there are strict limitations to daisy-chaining. Running too many tubes in a single continuous series causes severe voltage drop. The lights at the end of the run will appear noticeably dimmer than those at the start. Large systems require multiple power injection points to maintain consistent brightness across the entire grid. You must plan your wiring routes to feed power evenly to different sections of the layout.
Commercial lighting installations represent a significant infrastructure investment. Scrutinize warranty terms carefully before purchasing. A standard 2-year warranty might suffice for a residential garage, but commercial operations should seek 5-year warranties. Furthermore, verify the availability of individual replacement tubes. If a single segment fails, you should be able to unclip and replace that specific tube without dismantling the entire ceiling grid. A vendor that does not sell individual parts will force you to buy entirely new kits for minor repairs.
Proper layout design starts with measuring the primary subject size. For an automotive detailing bay, the hexagonal light grid should extend 2 to 3 feet wider and longer than the largest vehicle you service. This overhang ensures the light wraps around the sides of the vehicle rather than just illuminating the roof. If the grid is too narrow, the sides of the vehicle will remain in shadow, defeating the purpose of the installation.
Ceiling height plays a critical role due to the inverse-square law of light. As the distance from the light source doubles, the light intensity drops to one-quarter of its original strength. If you have 15-foot ceilings, flush-mounting the grid will result in insufficient lux at the floor level. In high-ceiling environments, you must suspend the grid to bring the light plane closer to the working surface, typically aiming for a suspension height of 9 to 10 feet off the floor.
Installing a massive lighting grid requires strict electrical planning. You must calculate the total amperage draw of the system before plugging it in. The formula is simple: divide total watts by your voltage to get the required amps. A large grid can easily pull 1500 watts. On a 120V system, that equals 12.5 amps. Running a continuous load requires adhering to the National Electrical Code 80% rule, meaning you should not exceed 12 amps on a standard 15-amp breaker for extended periods.
To mitigate the risk of voltage drop and circuit overloads, large setups must be segmented. Use proper 12-gauge wire to handle the current, and divide the grid into multiple segmented power supplies. Each segment should tie back to a dedicated 20-amp circuit. Additionally, ensure all power supplies and fixtures carry proper UL or CE certifications. Installing uncertified electrical equipment can void commercial property insurance policies in the event of an electrical fire.
Wiring the entire grid to a single switch is often inefficient. Implementing smart controls and grid zoning offers significant operational benefits. By wiring the outer perimeter separately from the inner hexagonal sections, technicians can control light intensity based on the task at hand. If a technician is working exclusively on a door panel, they can illuminate the outer perimeter while keeping the inner grid off. This targeted zoning reduces energy consumption and minimizes unnecessary heat generation in the workspace during the summer months.
The physical installation method depends entirely on your ceiling structure. Direct-to-drywall or flush mounting works best for low-clearance environments with ceilings under 10 feet. It maximizes vertical space and keeps the fixtures secure against the drywall using heavy-duty toggle bolts. However, flush mounting requires precise measuring to ensure the grid remains perfectly square across the ceiling joists.
Aircraft cable suspension is the preferred method for high ceilings, exposed steel trusses, or corrugated metal roofs. Suspension allows you to drop the light plane to the optimal height. However, suspended aluminum grids require structural reinforcement.
When evaluating the financial investment, it helps to break down the conceptual cost tiers. Budget DIY kits offer an entry point for hobbyists, but they often utilize PVC housing, lower CRI diodes, and lack proper IP ratings. Commercial-grade architectural systems utilize extruded aluminum, high-output drivers, and robust locking connectors. Beyond the hardware, buyers must factor in hidden installation costs. Hiring a professional electrician to run dedicated circuits, install conduit, wire smart switches, and mount structural hardware often equals or exceeds the cost of the lighting kit itself.
The true value of a geometric lighting system is realized through operational efficiency. Quantify the value of defect reduction. Catching a single high spot in a ceramic coating before it cures saves hours of wet sanding and preserves the shop's reputation. Faster task completion directly increases the volume of work a shop can handle per week.
There is also a powerful secondary marketing value. High-end lighting dramatically improves facility aesthetics. A brightly lit, futuristic workspace creates highly shareable social media content. When clients see their vehicles or fabrication projects illuminated under a professional grid, it builds immediate customer trust. This perceived value easily justifies premium service rates and higher hourly billing.
A: Yes, they draw more total wattage because they utilize dozens of fixtures to blanket the ceiling. However, the LED efficacy remains highly efficient. The massive increase in lux and complete shadow elimination makes the higher energy draw a necessary and productive trade-off for commercial workspaces.
A: The optimal height for the light plane is between 9 and 10 feet from the floor. If your ceiling is exactly 10 feet, flush mounting works perfectly. For ceilings 12 feet or higher, you must use aircraft cables to suspend the grid down to the 10-foot mark.
A: Standard kits operate on non-dimmable drivers. If you require dimming capabilities, you must specifically order a system equipped with dimmable LED drivers. You must also pair these drivers with a compatible 0-10V wall dimmer switch to prevent the diodes from flickering.
A: A 6500K color temperature replicates harsh, direct sunlight. This stark, cool white light creates maximum contrast on clear coats. It forces micro-scratches, swirl marks, and sander pigtails to stand out visually, whereas warmer 4000K lights tend to blend and hide these fine defects.
A: Commercial-grade systems are entirely modular. If one tube fails, you do not have to dismantle the ceiling grid. You simply disconnect the dead tube from its corner connectors, slide it out, and snap a new replacement tube into the existing layout in minutes.
A: It depends on the total wattage. You must calculate the amperage draw. Electrical code dictates that continuous loads must not exceed 80% of the breaker capacity. Therefore, a 15-amp circuit safely handles 12 amps. Large commercial grids usually require splitting the load across multiple dedicated circuits.


