Beltline blindness remains a persistent challenge in professional auto detailing. Modern vehicle designs feature sharp curves, flared fenders, and deep body lines that create heavy shadows on doors and quarter panels. Relying solely on overhead fixtures means the upper half of the vehicle blocks light from reaching the lower sections. This shadow gradient obscures clear coat defects on vertical surfaces, causing you to miss horizontal scratches, apply uneven compounding pressure, and compromise ceramic coating installations.
Proper illumination directly impacts shop efficiency. A professional lighting setup reduces paint correction time by eliminating shadow blind spots. You stop wasting time grabbing handheld inspection lights and prevent costly rework after the vehicle rolls out into the sun. Solving this requires a 360-degree, multi-directional lighting architecture. Evaluating side panel coverage means balancing fixture placement, light diffusion, and specific technical specifications to achieve true cross-lighting without blinding the technician.
- Cross-Lighting is Mandatory: Effective side panel illumination requires intersecting light paths from both overhead and wall-mounted or low-angle fixtures to reveal multi-directional paint defects.
- Overhead Limitations: A standard ceiling panel light setup, regardless of lumen output, cannot physically bend light around a vehicle's beltline; dedicated vertical lighting is a structural requirement for paint correction bays.
- Technical Baselines: Decision-makers must prioritize fixtures with a Color Rendering Index (CRI) of >90, moisture-proof casings (IP65+), and appropriate diffusion to prevent eye fatigue during extended polishing sessions.
- Scalability and ROI: The choice between wall-mounted arrays and mobile detailing stands depends heavily on bay width, vehicle clearance, and budget, but both approaches yield a high ROI by drastically reducing correction time.
The Physics of Detailing Shadows: Why Overhead Lighting Fails on Vertical Surfaces
Light distribution in a standard rectangular detailing bay follows strict geometric rules. Fixtures mounted directly above the vehicle project light straight down. The roof, hood, and trunk lid catch the majority of this illumination. These horizontal surfaces physically block the light rays from reaching the lower third of the doors and the rocker panels. The vehicle itself acts as an umbrella. This geometric problem worsens exponentially when you work on larger vehicles like SUVs, lifted trucks, and commercial vans. The taller the vehicle, the deeper the shadow cast on its own side panels.
Many shop owners attempt to fix this by increasing the brightness of their overhead fixtures. They install a massive ceiling panel light array, hoping the sheer volume of lumens will flood the lower panels. This approach fails. Light does not bend around physical objects. Increasing overhead lumens simply creates harsh, unworkable glare on the hood and roof. The intense reflection off the horizontal clear coat causes severe eye fatigue, while the lower doors remain hidden in darkness. You cannot overpower bad lighting geometry with raw brightness.
Defect visibility relies entirely on how light intersects with a scratch. Swirl marks are essentially circular micro-scratches. They catch light from almost any angle, making them relatively easy to spot under general lighting. Random Isolated Deep Scratches (RIDS), however, are directional. A horizontal scratch on a vertical door panel is practically invisible under vertical overhead light. The light rays run parallel to the scratch valley, failing to catch the edges. To see horizontal defects on side panels, you must project light horizontally across the surface. Low-angle, directional illumination is the only way to expose the true condition of the clear coat on vertical planes.
Understanding the inverse square law of light further explains overhead failures. As light travels away from its source, it loses intensity rapidly. A fixture mounted ten feet in the air might deliver excellent lux readings on a car roof located four feet below it. By the time that same light reaches a rocker panel just inches off the floor, the intensity has dropped so significantly that it cannot penetrate the clear coat to reveal fine sanding marks or compounding haze. You need light sources positioned physically closer to the lower panels to maintain the necessary intensity for defect inspection.
- Overhead light strikes horizontal surfaces at a 90-degree angle, maximizing reflection and visibility on hoods and roofs.
- The beltline of the vehicle physically obstructs vertical light paths, casting the lower doors and rocker panels into deep shadow.
- Horizontal scratches on vertical panels require low-angle, horizontal light projection to catch the edges of the defect valley.
- Light intensity drops exponentially over distance, rendering high-mounted ceiling fixtures useless for illuminating lower vehicle sections.
Success Criteria for Side Panel Illumination
Accurate defect spotting requires precise color rendering. The Color Rendering Index (CRI) measures how accurately a light source reveals the true colors of an object compared to natural sunlight. For paint correction, a CRI of >90 is the absolute baseline. High-end shops should aim for >95. Low CRI lights wash out subtle paint hues and hide faint holograms left behind by rotary polishers. Color temperature is equally critical. You should target temperatures between 5000K and 6000K. This range mimics crisp, natural daylight. Temperatures below 4000K cast a yellow hue that masks warm-colored defects, while anything above 6500K introduces a blue tint that strains the eyes and distorts metallic flakes.
Mounting lights at eye level or knee level introduces a massive glare risk. Bare LED diodes emit intense, concentrated beams. Staring directly into these diodes while polishing a door panel causes immediate eye strain and temporary blind spots. A high-quality LED detailing light panel utilizes frosted or heavily diffused lenses. Diffusion scatters the light evenly across the panel. It softens the harshness of the beam while maintaining enough intensity to highlight scratches. Proper diffusion allows you to look directly at the reflection of the light source in the paint without squinting.
Detailing bays are harsh environments. Fixtures mounted low on walls or on rolling stands face constant abuse. They get hit by rolling stools, bumped by polisher cords, and splashed with water. Durability is non-negotiable. Side lighting must feature shock-resistant housings. If your bay handles both washing and paint correction, moisture-proof casings are mandatory. Look for IP65 or IP67 ratings. An IP65 rating ensures the fixture can withstand direct water jets from a pressure washer without short-circuiting. Unsealed lights will fail rapidly when exposed to airborne compounding dust and chemical overspray.
Proper side illumination is a direct productivity tool. When you can see the entire panel clearly, your workflow accelerates. You spot every flaw in real-time as the polisher moves across the paint. You know exactly when a scratch is leveled out. Without side lights, technicians must constantly stop the machine, wipe down the panel, grab a handheld inspection torch, and check their work. This stop-and-go process adds hours to a multi-stage correction job. Continuous, clear visibility allows you to achieve a flawless finish faster and with far less physical effort.
| Specification | Minimum Requirement | Ideal Target | Impact on Detailing Workflow |
| Color Rendering Index (CRI) | >90 | >95 | Ensures accurate color matching and reveals faint holograms. |
| Color Temperature | 5000K | 5500K - 6000K | Mimics natural daylight, preventing eye strain and color distortion. |
| Ingress Protection (IP) | IP54 (Dry Bays) | IP65+ (Wash Bays) | Protects internal diodes from water jets, wheel acid, and polish dust. |
| Lens Type | Semi-Frosted | Heavily Diffused | Prevents blinding glare when fixtures are mounted at eye level. |
Structural Approaches to Side Panel Lighting
Choosing the right structural setup depends entirely on your physical space and daily workflow. There are three primary methods for illuminating vertical panels. Each approach carries specific installation requirements and operational trade-offs.
Wall-Mounted Vertical Light Bars
Wall-mounted fixtures involve fixed installations running parallel to the vehicle. These bars are typically mounted horizontally along the wall at different heights, or vertically to cover the entire height of the car. Installers often use Unistrut channels or heavy-duty French cleats to secure these fixtures to concrete block or drywall.
This setup offers significant advantages. It requires zero floor footprint, keeping your workspace clear of tripping hazards. The fixed positions provide consistent, repeatable cross-lighting for every vehicle that enters the bay. It creates a highly professional, clean aesthetic that appeals to high-end clientele. Wall-mounted arrays are ideal for high-volume commercial shops where vehicles constantly cycle through.
However, this approach has strict spatial requirements. You need a wide bay—minimum 14 to 16 feet across. Light needs physical distance to spread and diffuse before it hits the paint. If the walls are too close to the car, the light creates a narrow, blinding hotspot rather than a wide inspection band. Additionally, fixed angles cannot be easily adjusted. A light height optimized for a low-slung sports car will not properly illuminate the upper doors of a lifted truck.
Mobile and Stand-Mounted Lighting Solutions
Mobile solutions utilize heavy-duty rolling stands equipped with adjustable LED panels. These stands can be wheeled around the vehicle as you work. High-quality stands feature articulating arms and locking polyurethane casters that roll smoothly over concrete expansion joints.
Adaptability is the primary benefit here. You can adjust the height, angle, and distance of the light source for every specific panel. If you need to inspect a complex curve on a bumper, you simply roll the stand into the perfect position. This flexibility makes mobile stands highly practical for small garages or narrow bays where wall mounts are impossible. They accommodate any vehicle size perfectly.
The downside is the physical footprint. Mobile stands introduce tripping hazards. Power cords drag across the floor, catching on polisher cables and creeper wheels. The bases of the stands take up valuable floor space, and you must find a safe corner to store them when washing vehicles to prevent water damage.
Low-Angle Floor Lighting (The "Knee-High" Setup)
This setup involves fixtures mounted directly to the wall just 12 to 24 inches off the floor, angled slightly upward toward the vehicle. Installers often use wedge brackets to achieve the precise 15-degree upward tilt required to catch the lower body lines.
Low-angle lighting is exceptional for illuminating the lowest parts of the vehicle. Rocker panels, lower door edges, and complex wheel faces are notoriously difficult to see. Upward-angled floor lights catch the bottom edges of scratches that overhead and mid-level lights miss entirely.
Unfortunately, this zone is the most dangerous area in a detailing bay. Fixtures mounted this low are highly susceptible to water pooling, heavy chemical spills from wheel cleaners, and physical impact. Technicians frequently kick them or ram them with rolling detailing stools. Maintaining low-angle lights requires heavy-duty protective cages and rigorous daily cleaning to remove accumulated dirt and polish dust.
Integrating Side Lighting with Your Car Detailing Shop Lights Setup
Side panels cannot exist in a vacuum. They must integrate seamlessly with your primary overhead lighting. If your overhead lights are drastically brighter or a different color temperature than your side lights, your eyes will struggle to adjust. You must balance the output. Match the color temperature exactly across all fixtures. If your overheads are 5000K, your side panels must also be 5000K. When selecting car detailing shop lights, ensure the lumen output of the side fixtures complements the ceiling rather than fighting it. A massive brightness disparity creates harsh shadows where the two light zones meet.
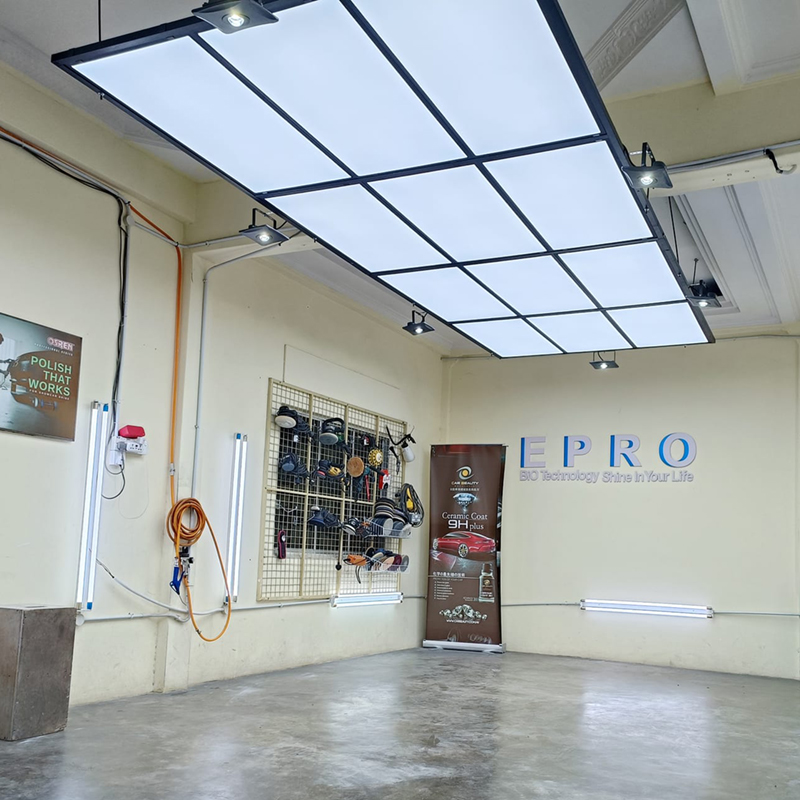
The positioning of your overhead LED ceiling panel light dictates how effective your side lighting will be. Do not place overhead panels directly above the center of the vehicle. This creates a massive shadow down the sides. Instead, arrange overhead panels in a U-shape around the perimeter of the bay, or in two parallel tracks running just outside the width of the vehicle. This allows the overhead light to wash down the sides of the car, meeting the side lighting halfway and creating a smooth, shadow-free transition.
Many modern shops incorporate a square LED ceiling light grid for ambient illumination. These geometric grids look fantastic and provide excellent, even coverage across horizontal surfaces like hoods and roofs. However, they are ambient lights, not inspection lights. You must pair these overhead grids with dedicated, switchable side panels. The grid provides the general working light, while the side panels provide the targeted, directional beam needed for defect inspection.
Zoning your electrical circuits is a critical integration step. Wire your side panels on completely separate circuits from your overhead grids. Use heavy-duty relay switches or smart contactors to manage the load. During the final inspection phase, overhead lights can sometimes wash out faint holograms on the doors. By putting everything on separate switches, technicians can plunge the room into darkness and turn on only the side lights. This isolation technique forces the side lighting to highlight every remaining defect on the vertical panels without any interference from ceiling reflections.
Implementation Realities, Budgeting, and Adoption Risks
Before purchasing fixtures, you must address the physical constraints of your workspace. Bay width dictates your options. Narrow bays under 12 feet wide simply cannot support wall-mounted side lights. If you mount high-output LEDs on walls that are only two feet away from the vehicle doors, you will blind yourself. The light cannot diffuse properly over such a short distance. In these confined spaces, wall mounts cause severe glare and physical obstruction. You will constantly bump your elbows against the fixtures while polishing.
Budgeting requires a realistic assessment of your shop's scale. Small or home-based garages should start with high-quality mobile stands. This controls initial costs while providing the necessary vertical illumination. You can buy one or two excellent stands and move them as needed. Large commercial bays, however, lose money on mobile stands. The time technicians spend moving lights and managing cords eats into profit margins. High-volume shops must invest the capital into hardwired, wall-mounted setups to maximize long-term operational efficiency.
Do not underestimate the hidden costs of electrical work. Retrofitting wall-mounted fixtures is rarely a simple plug-and-play operation. You must account for conduit installation, running new wiring through concrete block or drywall, and potentially upgrading your breaker panels. High-output LED arrays draw significant amperage. Adding ten wall fixtures to a bay might overload your existing circuits. Always factor in the cost of a licensed electrician to ensure compliance with local commercial electrical codes.
Finally, plan for maintenance and degradation. Detailing bays are filled with airborne contaminants. Polishing dust, ceramic coating overspray, and harsh wheel acids float through the air and settle on light lenses. Over time, this chemical and abrasive layer degrades the polycarbonate covers of low-mounted fixtures. The lenses become cloudy, drastically reducing lumen output and altering the color temperature. You must implement a strict weekly cleaning schedule using non-abrasive cleaners. Factor in the eventual cost of replacing the lenses or the entire fixture every few years due to environmental wear and tear.
- Wipe down all low-mounted light lenses weekly using a 50/50 mix of isopropyl alcohol and distilled water to remove compound splatter.
- Inspect the silicone seals around IP65-rated fixtures monthly to ensure water resistance remains intact.
- Check mobile stand casters for tangled extension cords or debris that could cause the stand to tip over onto a vehicle.
- Verify the color temperature of older fixtures annually, as degrading diodes can shift toward a blue or yellow spectrum over time.
Conclusion
- Measure your bay width from wall to wall to determine if fixed side lighting will cause glare or physical obstruction.
- Assess your current electrical panel capacity with a licensed electrician before purchasing hardwired wall fixtures.
- Source IP65-rated fixtures with a verified CRI of over 90 and frosted lenses to ensure durability and prevent eye strain.
- Wire your side lighting on a separate circuit from your overhead lights to allow for isolated, dark-room defect inspections.
FAQ
Q: What is the ideal height for wall-mounted car detailing shop lights?
A: For comprehensive coverage, install two rows of lights. Mount the lower row at 24 to 36 inches off the floor to illuminate rocker panels and lower doors. Mount the upper row at 60 to 72 inches to cover upper doors, windows, and the sides of taller SUVs and trucks.
Q: Can I use a standard LED ceiling panel light on the wall for side illumination?
A: No. Standard ceiling panels lack the necessary moisture resistance for wall mounting in a detailing bay. They also lack proper diffusion for close-range viewing, which will cause severe eye strain and blinding glare when mounted at eye level.
Q: How many lumens do I need for side panel detailing lights?
A: Raw lumen output is less important than lux on the surface. Aim for fixtures that deliver roughly 3,000 to 5,000 lumens per panel, heavily diffused. Too many lumens at close range will wash out defects and blind the technician.
Q: Why do my side panels look flawless in the shop but show swirls in the sun?
A: This happens when you lack high-CRI cross-lighting. Overhead lights cannot illuminate vertical scratches. Without dedicated side lighting, you fail to inspect the paint with a focused, low-angle light source, leaving hidden compounding swirls behind.
Q: Are square LED ceiling light grids enough to light the sides of a car?
A: No. While overhead grids provide excellent ambient light and horizontal coverage for hoods and roofs, their fixed overhead position inherently casts deep shadows on vertical panels, obscuring defects on the doors and fenders.
Q: Do side detailing lights need to be waterproof?
A: Yes. Any light mounted below 4 feet, or located in a multi-use wash and polish bay, must carry an IP65 or higher rating. This ensures the fixture survives water spray, chemical spills, and airborne polishing dust without short-circuiting.


