


Views: 0 Author: Site Editor Publish Time: 2026-09-13 Origin: Site


Standard shop lighting and single-point inspection lamps fail to expose macro-level clearcoat distortions. You often only notice these defects when moving a vehicle into natural sunlight. This oversight leads to rework and compromised quality control. Detailers and body shops struggle to consistently identify surface imperfections during paint correction. Orange-peel, clearcoat runs, sinkage, and silicone fish-eyes easily hide in uneven light distribution. Background reflections further complicate the inspection process.
A properly calibrated detailing light tunnel shifts defect detection from guesswork to a predictable visual science. It utilizes geometric reflection and controlled environmental illumination to reveal exactly what needs correction. You will learn the physics behind straight-edge reflection, technical specifications for optimal setup, and how to integrate this lighting system into your facility to eliminate blind spots in your workflow.
Continuous, linear light sources act as a high-contrast visual grid. They map directly across the vehicle's clearcoat. When you inspect a painted panel, you are not actually looking at the paint itself. You are looking at how the clearcoat reflects the light source back to your eyes. If the light source is a perfectly straight line, the reflection on a perfectly flat panel will also be a straight line. Surface imperfections physically alter the angle of reflection. Orange-peel, dents, clearcoat runs, and sinkage disrupt the light path. The straight-edge of the light appears warped, jagged, or broken to the observer. You see exactly where the clearcoat lacks flatness.
Defect detection relies heavily on the technician's viewing angle. You must actively move your line of sight. Manipulate the geometric reflection across the panel. Bending your knees and shifting side to side forces the light line to travel over the curvature of the door or hood. This movement highlights high spots and low spots instantly. A static inspection will always miss defects hiding just outside the immediate reflection zone.
A car detailing heavy light tunnel serves a specific diagnostic purpose. It excels at macro-defect detection. You use it to spot polishing residue, compounding dust, and coating inconsistencies. It provides the baseline environment for overall finish leveling. When applying a ceramic coating, the uniform light allows you to see the coating flash. You can easily spot the rainbow effect or dark streaks that indicate a high spot before the coating cures.
Handheld inspection lights perform a different job entirely. They deliver an intense, focused beam. You need this focused beam for micro-scratches, swirl marks, and holograms left behind by a dual-action polisher. A tunnel does not replace handheld lights. Instead, it creates the foundation required for comprehensive paint correction. You need both tools to achieve a flawless finish. The tunnel handles the macro geometry. The inspection light handles the micro abrasion. Relying solely on one lighting type leaves massive blind spots in your quality control process.
| Lighting Type | Primary Function | Defects Revealed | Usage Phase |
|---|---|---|---|
| Light Tunnel (Ambient/Grid) | Macro-level surface geometry and leveling | Orange peel, dents, clearcoat runs, coating high-spots | Initial inspection, coating application, final wipe-down |
| Point-Source (Handheld/Tripod) | Micro-level abrasion detection | Swirl marks, DA haze, holograms, micro-marring | Compounding, polishing, spot correction |
Pure white light is an absolute necessity for automotive paint correction. You must target the 5000K to 6000K range. This spectrum mimics natural midday sunlight. Deviations toward warm yellow or cool blue spectrums cause severe diagnostic problems. Warm light artificially masks polishing residue and makes white paint look yellowed. Cool blue light hides holograms and causes rapid eye fatigue during long polishing sessions. Accurate color matching requires a Color Rendering Index (CRI) of 90 or higher. High CRI allows you to spot coating inconsistencies before they cure. It ensures that metallic flakes pop and red paints do not look muddy.
Luminous intensity requires careful calibration. Many shops make the error of over-illuminating the workspace. They assume brighter is always better. Excessive brightness causes visual washout. The clearcoat acts like a mirror. If you shine too many lumens directly at a mirror, you blind the technician and hide the exact defects you want to reveal. You must balance brightness to maintain high contrast. A properly calibrated system highlights the defect through shadow and contrast without straining the eyes.
Continuous light arcs must follow standard vehicle profiles. The shape of the tunnel dictates the reflection quality. An effective LED light tunnel wraps illumination around the car. It creates an unbroken grid from the roof down to the floor. Gaps in the lighting structure create dead zones on the paint surface. If the arches are spaced too far apart, you will have dark spots on the hood and roof where defects can hide.
Vertical illumination presents a specific challenge in detailing bays. The lowest 12 inches of a vehicle are notoriously difficult to polish. Overhead lighting casts a shadow from the car's beltline, leaving the rocker panels in the dark. Lower-tier lighting prevents these blind spots. You need light hitting the doors and lower bumpers directly from the side. Proper configuration ensures the light grid reaches the lowest vertical surfaces. Without lower arcs or wall-mounted vertical bars, technicians struggle to correct lower door panels accurately and often miss heavy tar or iron deposits.
Distracting reflections from outside the tunnel environment ruin defect detection. You must control the ambient space around the vehicle. Bare LED diodes create multiple micro-reflections. When you look at the paint, you see hundreds of tiny dots instead of a solid line. This confuses the eye and masks true paint texture. Matte diffusers over the LEDs soften the harshness. They blend the individual diodes into a single, continuous bar of light. This creates a sharp but non-blinding reflection line.
Dark, non-reflective background materials isolate the light source. A white room bounces light everywhere, destroying the contrast needed to see paint defects. Install fabric strips or acoustic panels between light arcs. These materials absorb sound and block stray reflections. Painting the surrounding walls a flat, dark gray or black further enhances the contrast of the light grid on the vehicle. The floor should also be a medium gray epoxy or tile to prevent harsh uplighting that blinds the technician from below.
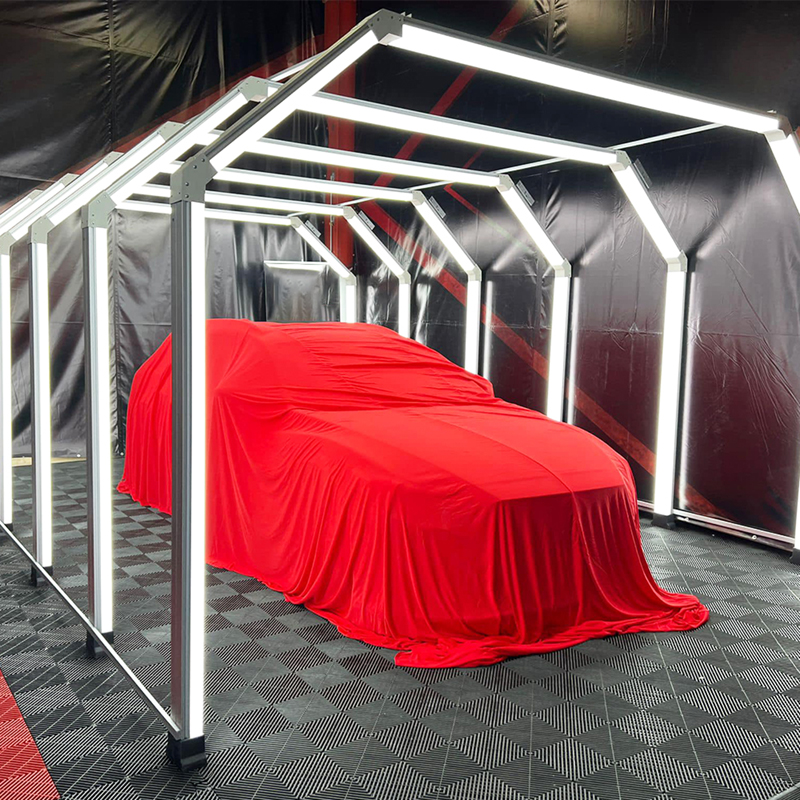
Minimum bay dimensions dictate your installation success. You must allow sufficient physical clearance around the vehicle. Technicians need room for polishers, scaffolding, rolling carts, and physical movement. A cramped bay creates safety hazards and limits visibility. If a technician is backed up against a wall, they cannot step back to view the light reflection at the proper angle. We recommend leaving at least four feet of clearance on all sides of the vehicle.
Scalability matters when planning your layout. You can adapt modular tunnel kits for standard sedans easily. However, oversized commercial vehicles, lifted trucks, or large SUVs require wider and taller configurations. Measure your largest typical vehicle before ordering components. Ensure the arches clear the highest rooflines and widest mirrors you service regularly. You must also account for garage door tracks, ceiling heaters, and openers that might interfere with the upper light bars.
Running continuous LED arrays demands serious electrical planning. Calculate the total amperage draw carefully before installation. A large tunnel system can draw significant power. You absolutely need dedicated circuits for these systems. Avoid sharing power with heavy machinery, air compressors, or shop vacuums. A sudden voltage drop from an air compressor kicking on can cause the LEDs to flicker, dim, or prematurely burn out the drivers.
Decide between hardwiring and plug-and-play modular connectors. Hardwiring offers permanence and reliability for custom builds. Modular connectors provide easier maintenance and rapid replacement if a section fails. Address driver placement early in the build. Direct current (DC) power loses voltage over distance. Voltage drop across long runs of LED housing causes dimming at the far ends of the tunnel. Place power supplies strategically, distributing them evenly across the grid to maintain uniform brightness across the entire structure.
Miscalculating the height and spacing of the arches is the most common installation failure. This error results in overlapping light zones. Overlapping zones wash out defects rather than highlighting them. The light from one arch bleeds into the reflection of the next arch, destroying the contrast. You must systematically adjust angles, height, and diffusion. This iterative troubleshooting process gets the car workshop tunnel lights perfectly dialed in for your specific bay.
Thermal management also requires strict attention. Enclosed detailing bays trap heat from high-output LEDs. The diodes generate heat that must be dissipated through the aluminum housing. Poor ventilation impacts LED lifespan negatively and causes color shifting over time, turning pure white lights into a dull yellow. Ensure adequate airflow around the fixtures. Leave space between the light housings and the walls to allow heat dissipation.
A dedicated lighting environment transforms workflow efficiency on the shop floor. You save significant time during the final inspection phase. Technicians eliminate the need to constantly reposition tripod lights, drag extension cords around the car, and adjust beam angles. The entire vehicle receives uniform inspection lighting simultaneously. This setup speeds up the leveling process during multi-stage paint correction, allowing a single technician to process a vehicle faster without sacrificing quality.
This setup reduces customer callbacks drastically. You will stop missing high-spots in ceramic coatings. A high spot is simply excess coating that cured before it was leveled, leaving a dark smudge. In a poorly lit shop, you won't see it until the customer pulls the car outside. Leftover polishing compounds in panel gaps become glaringly obvious before the vehicle leaves the bay. Catching these errors internally protects your reputation and prevents the embarrassment of a client finding a hologram in direct sunlight.
The showroom effect carries immense weight in the high-end detailing industry. A highly technical, brightly lit inspection environment builds immediate trust. High-net-worth clients dropping off exotic cars want to see professional infrastructure. This visual impact justifies premium pricing tiers for paint correction and ceramic coating packages. It visually separates your facility from standard, dimly lit wash bays.
Clients perceive higher value when they see their vehicle under surgical-grade lighting. The tunnel acts as a powerful marketing tool for your business. Filming social media content, recording paint correction 50/50 shots, or taking delivery photos inside the tunnel elevates your brand image. It visually communicates your commitment to absolute perfection and rigorous quality control to prospective customers online.
Evaluate the upfront capital expenditure carefully based on your business model. Custom-fabricated architectural lighting requires a massive budget, specialized electrical contractors, and weeks of downtime to install. Off-the-shelf, modular LED kits offer a much more accessible entry point. They snap together quickly and can be installed over a weekend. Base your decision on monthly vehicle throughput and the specific services you offer.
High-volume wash and wax operations may not need a full tunnel, as they are not performing heavy defect removal. Low-volume concourse correction facilities absolutely require one to guarantee flawless results. Weigh the initial cost against the reduction in rework hours. Factor in the increased premium service sales generated by the enhanced facility appearance. A well-planned tunnel pays for itself through efficiency gains, faster coating application times, and higher ticket averages.
A: The optimal color temperature is between 5000K and 6000K. This range produces a pure white light that mimics natural midday sun. It prevents the masking of defects, polishing residue, and holograms. Temperatures below 5000K appear yellow and hide imperfections, while temperatures above 6000K appear blue and cause severe eye strain during long polishing sessions.
A: No. A light tunnel reveals macro-distortions like orange peel, dents, and coating high-spots. It provides uniform ambient illumination. Intense point-source handheld lights remain necessary for detecting micro-marring, fine swirl marks, and dual-action polisher holograms. Both lighting types are required for comprehensive paint correction.
A: Straight lines of light create a geometric reflection on the clearcoat. Surface texture physically distorts this reflection. When you look at the reflection of the light edge, orange peel makes the straight line appear fuzzy, jagged, or heavily textured instead of sharp and continuous.
A: Washout occurs due to excessive luminous intensity or overlapping light zones. If the lights are too bright or positioned too closely together, they flood the surface with light, eliminating the shadows and contrast needed to see defects. The system must be dialed in and calibrated for optimal brightness.
A: You need enough space to accommodate the vehicle plus a minimum of four feet of clearance on all sides. This clearance is mandatory for safe machine polishing, allowing technicians to move freely with tools, cords, and rolling stools without bumping into the lighting structure.
A: You prevent glare by installing matte or frosted diffusers over the raw LED diodes. To stop outside reflections, isolate the light source using dark wall treatments, matte paint, or fabric strips between the light arcs. This absorbs stray light and creates a high-contrast inspection environment.
A: Yes. Standard LED detailing lights do not emit the UV rays or infrared heat required to accelerate the curing process of ceramic coatings. They provide safe, bright illumination that allows technicians extended working times to properly level the coating without causing it to flash prematurely.


