


Views: 0 Author: Site Editor Publish Time: 2026-09-02 Origin: Site


Managing a multi-service automotive facility presents a distinct operational challenge. Standardizing lighting across a massive shop floor frequently results in uncontrolled light spill, inefficient workflows, and a complete lack of visual organization. Traditional linear high-bays or recessed troffer lights fail to delineate specific work areas, such as detailing bays versus mechanical repair stations. Without restrictive physical barriers, this uniform lighting approach leads to compromised task visibility and spatial confusion for both technicians and visiting clients.
Modular lighting systems offer a highly effective dual-purpose architectural and functional solution. By deploying geometric lighting grids overhead, shop owners can visually define distinct service zones, entirely transform the overall look of the workspace, and meet the strict technical requirements of specialized automotive tasks. This approach eliminates the need for interior walls while providing the precise, multi-directional illumination necessary for high-end automotive care.
Open-concept shop floors maximize usable square footage but often suffer from a chaotic visual layout. When you rely on standard 400W metal halides or basic 4-foot LED strip lights, the illumination blasts outward in every direction. This washes out the entire room and provides zero visual structure. The geometric footprint of a honeycomb grid naturally frames a vehicle parked beneath it. This creates a dedicated overhead halo effect that instantly signals a specific work zone to technicians and customers alike.
Instead of building drywall partitions that impede vehicle movement and block HVAC airflow, facility managers can use overhead illumination to carve out dedicated workspaces. The sharp, defined edges of the lighting matrix create an invisible perimeter on the shop floor. This keeps different service teams focused within their designated areas. A mechanic working on a suspension swap stays within their illuminated square, while the detailing team operates in their own brightly lit zone twenty feet away.
When outfitting multiple adjacent bays, calculating the physical distance between individual grids is mandatory to maintain distinct visual boundaries. Placing grids too close together causes light spill, blending the zones and defeating the purpose of spatial organization. If the light cones overlap at eye level, you lose the visual separation on the floor.
A standard rule for facility layout involves maintaining specific separation distances based heavily on the ceiling height. Higher ceilings require wider spacing to account for the wider cone of light dispersion. This calculated gap ensures that the floor beneath remains visually segmented, allowing a clear walking path or staging area between active service bays.
| Ceiling Height | Recommended Grid Separation | Visual Effect on Floor |
|---|---|---|
| 8 to 10 Feet | 6 to 8 Feet | Sharp, highly defined floor boundaries. |
| 10 to 14 Feet | 8 to 12 Feet | Moderate boundary definition, slight ambient overlap. |
| 14 to 18+ Feet | 12 to 15+ Feet | Soft boundaries, requires suspension cables for sharp zoning. |
Strategic lighting deployment directly influences shop floor logistics. Assigning specific grid sizes or distinct color temperatures to different bays directs vehicle flow and organizes the facility logically. You can eliminate the need for painted floor lines that inevitably chip, peel, and fade under heavy tire traffic.
This visual hierarchy guides drivers naturally toward the correct bay without relying on excessive floor signage. Technicians also benefit from this organization, as their tools, carts, and equipment remain localized within the illuminated boundary of their specific task zone.
The secondary benefit of these geometric systems lies in their striking visual impact. The geometric look reflects brilliantly on freshly polished paint, glass, and glossy floor epoxies. These systems completely transform the look of a standard garage, elevating it from a utilitarian workspace to a high-end automotive studio.
This aesthetic upgrade serves as a powerful visual cue for customer trust. Clients dropping off expensive vehicles feel reassured by a pristine, brightly lit environment. Furthermore, the distinctive reflections create highly shareable environments for social media marketing. Shops can showcase their completed work under premium, studio-quality conditions, capturing photos and videos that stand out on digital platforms.
Paint correction requires flawless visibility. Technicians must identify microscopic clear coat defects before applying ceramic coatings or sealants. Facility managers consistently position these geometric grids as essential car detailing lights due to their unique optical properties. When you use a dual-action polisher, you need to see exactly how the compound is breaking down on the panel.
The multi-angled light distribution of the matrix floods the entire work area with bright, even light from dozens of different vectors simultaneously. This intersecting light path effectively eliminates harsh single-source shadows. It makes spotting micro-scratches, swirl marks, holograms, and subtle paint imperfections significantly easier. When applying a ceramic coating, the multi-directional light exposes high spots and streaks instantly, ensuring the technician does not miss defects on the lower rocker panels or complex bumper curves.
Applying Paint Protection Film (PPF) and color-change vinyl wraps demands absolute precision and accurate color representation. In this zone, high-CRI (Color Rendering Index) lighting is non-negotiable. A CRI rating of 90 or above ensures accurate color matching when blending wrap panels or verifying the clarity of transparent films.
The intersecting lines of the grid also serve a functional purpose during installation. Technicians use the straight reflections of the light tubes on the vehicle's surface to read the material. By watching how the reflection bends, installers can identify tension lines, stretch marks, or trapped air bubbles in the film. To manage eye fatigue when working with highly reflective chrome or gloss films, shops often utilize frosted diffusers on the light tubes to implement effective glare reduction strategies.
Wet zones and heavy mechanical areas require robust hardware. When outfitting wash bays or fluid application zones, evaluating the Ingress Protection rating is mandatory. IP65+ rated fixtures are necessary to withstand ambient moisture, high humidity, and direct water spray from pressure washers. Standard indoor-rated fixtures will quickly short-circuit when exposed to atomized water from a foam cannon.
In dry mechanical repair bays, overhead hexagonal LED lights provide a massive advantage over traditional single-point shop lights. The wide, dispersed footprint reduces under-hood shadows. Instead of a single bulb casting a dark shadow over the engine block the moment you lean over the fender, the grid pushes light deep into the engine bay from multiple angles. This minimizes the constant need for handheld drop lights or headlamps during complex engine teardowns.
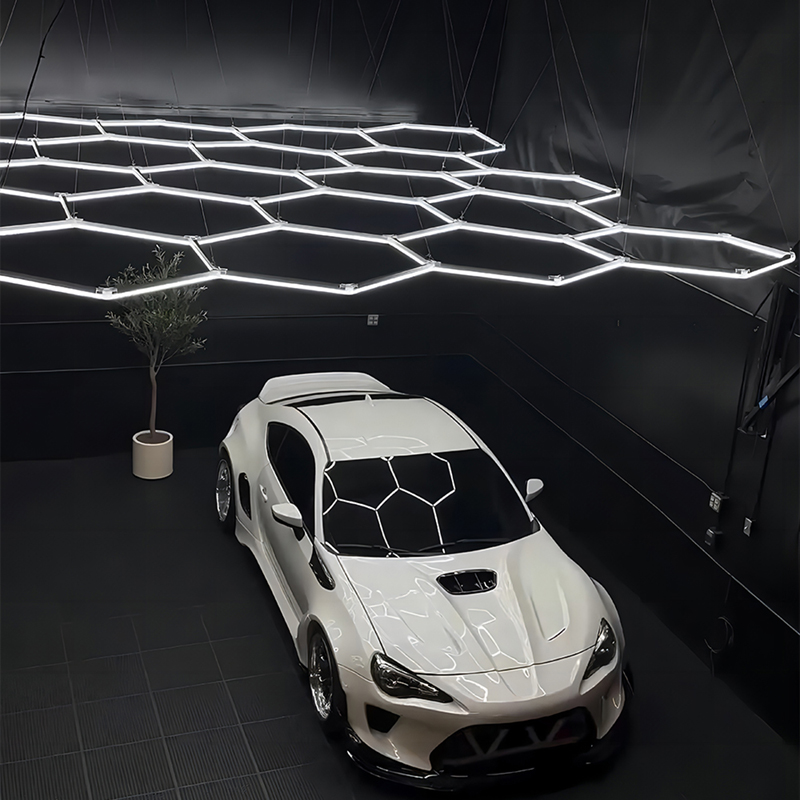
Visual appeal means nothing without adequate functional illumination. Calculating required lumens per square foot based on the bay's specific purpose is the first step in system design. General storage or staging areas may only require 30 to 50 foot-candles, whereas precision detailing and paint correction bays demand 100 to 150 foot-candles for optimal visibility.
Lumen output dictates the true functional brightness of the hexagonal light. When reviewing specifications, buyers must look at the total system lumen output rather than just the wattage. Higher efficacy diodes produce more light while consuming less power. A massive grid that only outputs 20,000 lumens will look great in photos but will leave the shop floor too dim for actual mechanical work.
| Service Bay Type | Recommended Lux Level | Ideal Color Temperature | Minimum CRI Requirement |
|---|---|---|---|
| General Mechanical Repair | 500 - 750 Lux | 4000K - 5000K | 80+ |
| Vinyl Wrap & PPF | 750 - 1000 Lux | 5000K - 6000K | 90+ |
| Paint Correction & Detailing | 1000 - 1500 Lux | 6000K - 6500K | 90+ |
| Wash Bay (Wet Zone) | 500 - 800 Lux | 5000K | 80+ (Must be IP65+) |
Selecting the correct color temperature directly impacts technician performance and eye comfort. A 4000K rating provides a neutral white light, which is highly effective for general mechanical repair bays where extreme contrast is not strictly necessary. It provides a comfortable working environment for long shifts without causing severe eye strain.
However, for paint correction, detailing, and color-matching, a daylight spectrum between 5000K and 6500K is ideal. This cooler temperature mimics natural sunlight, exposing the true condition of automotive paint. It prevents the yellowing effect that warmer lights cast on white or silver vehicles, ensuring the technician sees the exact color profile of the clear coat they are correcting.
Purchasing the correct hardware requires matching pre-configured sizes to the specific dimensions of the service bay. Buyers must guide their selection by measuring the exact footprint of the vehicles they service most frequently. Standard one-car kits typically measure around 8 by 16 feet, while two-car footprints scale up accordingly.
To maximize side illumination, the grid should slightly overlap the vehicle's footprint by at least one to two feet on all sides. Scaling five-section or multi-section modular kits allows facility managers to fit non-standard bay dimensions perfectly. This modularity ensures that the honeycomb LED lights can grow or adapt if the shop floor layout changes in the future. You can easily add more sections to lengthen the grid if you start servicing longer commercial vans or heavy-duty trucks.
Constructing a large-scale lighting matrix requires methodical planning and adequate floor space. The most practical approach involves building the entire kit on the ground before attempting any overhead installation. Trying to piece together dozens of aluminum tubes while standing on a scissor lift is inefficient and dangerous.
Deploying these systems correctly relies on standard high-bay spacing logic, typically optimized for 10 to 19-foot ceilings. The mounting method depends entirely on the facility's architecture. For lower, finished drywall ceilings, flush-mounting the grid directly to the ceiling joists provides a clean, integrated look. You will need to use toggle bolts or locate the wooden trusses to ensure the grid is securely anchored.
In industrial warehouses with exposed steel beams and high ceilings, the grid must be suspended. Installers use adjustable aircraft cables wrapped around the steel purlins to drop the lighting matrix to the optimal height. Maintaining an ideal distance of roughly 8 to 10 feet above the vehicle roof prevents light dissipation, ensuring the maximum amount of lumens actually reaches the work surface.
Large lighting grids draw significant power, making electrical planning a critical step. Installers must calculate the total amperage of the assembled kit before wiring it to the panel. A standard 15A or 20A circuit has strict continuous load limits. Exceeding these limits will cause breakers to trip constantly and risk overheating the wiring.
Facility managers must determine the maximum grid size permitted per circuit based on the manufacturer's wattage specifications. For massive, multi-bay continuous grids, a single power source is insufficient. You will need multiple dedicated power drops to distribute the electrical load safely. Injecting power at multiple points across a massive grid also prevents voltage drop, which causes the lights at the far end of the circuit to appear visibly dimmer than those near the power source.
Long-term reliability depends on avoiding common installation failures. Connector fatigue is a primary risk. If the grid is hoisted unevenly by the installation team, the plastic or aluminum joints can crack under the twisting stress. You must lift the grid evenly using multiple ladders or a wide scissor lift.
Grid sagging over time is another frequent issue, usually caused by insufficient suspension points across the middle of the matrix. Installers must anchor the grid at regular intervals across the interior Y-connectors, not just at the outer perimeter. Finally, prioritizing rigid aluminum housings over cheap plastic alternatives ensures the structural framework remains perfectly flat and dissipates heat effectively over years of continuous operation.
Facility owners must challenge the urge to purchase lighting solely for the visual trend. A visually striking grid is entirely useless for professional automotive work if the CRI falls below 85 or if the diffusers cause excessive glare on the vehicle's clear coat. High-quality systems balance the geometric aesthetic with professional-grade photometric performance.
Investing in premium diodes and superior diffusion materials ensures that the light output actually improves task visibility rather than just serving as a decorative ceiling piece. Cheap kits often use low-grade polycarbonate diffusers that turn yellow after a year of heat exposure, ruining both the light quality and the aesthetic appeal of the shop.
Evaluating the maintenance lifecycle of overhead lighting is crucial for busy shops. Traditional high-bay fixtures often require replacing the entire unit or dealing with complex internal ballasts when they fail. This requires shutting down the bay, bringing in a lift, and paying an electrician for hours of labor.
In contrast, a modular matrix simplifies upkeep. Replacing individual LED tubes within the network takes only minutes and does not require dismantling the entire structure. You simply unclip the dead tube from the corner connectors and snap a new one into place. Shops can keep a few spare tubes in inventory, ensuring that a single burnt-out section does not compromise the lighting quality of an active service zone.
A: Yes, the terminology is completely interchangeable in the automotive lighting market. Both terms refer to modular, multi-sided LED tube configurations that connect to form a geometric grid. Shoppers and manufacturers use both terms to describe the exact same ceiling kits.
A: They provide a massive, multi-directional light spread. By casting light from dozens of intersecting angles simultaneously, they eliminate harsh single-source shadows. This comprehensive coverage highlights microscopic paint defects, swirl marks, and uneven polishing that standard linear lights often miss.
A: General mechanical repair requires roughly 50 to 75 lumens per square foot. However, precision detailing and paint correction bays demand significantly brighter environments, typically requiring 100 to 150 lumens per square foot to ensure flawless visibility of the clear coat.
A: Yes. While flush mounting is impossible on a steep pitch, installers use adjustable aircraft suspension cables. By lengthening the cables on the higher side of the slope and shortening them on the lower side, the grid remains perfectly level above the workspace.
A: The optimal distance from the light source to the vehicle surface is generally 8 to 10 feet. If your ceiling is higher than 12 feet, suspending the grid with cables prevents severe light dissipation and maintains high lux levels on the vehicle.
A: Standard indoor grids are usually IP20 rated and will fail if exposed to water. For a wash bay or wet zone, you must specifically purchase an IP65+ rated grid. These feature sealed connectors and waterproof housings designed to withstand moisture and direct spray.


