


Views: 0 Author: Site Editor Publish Time: 2026-09-20 Origin: Site


High-end automotive detailing operates under a strict dual mandate. Lighting must be harsh enough to expose micro-marring and paint defects during correction, yet controlled enough to produce clean, continuous reflections for final inspection and client presentation. Uncontrolled, direct point-source lighting creates blown-out highlights. It obscures the true condition of the clear coat and results in poor marketing photography. Facility owners often over-illuminate workspaces without considering diffusion. This brute-force approach leads to severe technician eye fatigue, inaccurate color rendering, and missed holograms that only appear when the vehicle is pulled into direct sunlight. Moving beyond basic shop lights requires a structured evaluation process. Professional setups rely on engineered solutions like tunnel configurations, diffused grids, large ceiling scrims, and indirect reflection systems. By treating the vehicle's surface as a curved mirror, you can manipulate light to highlight body lines and ensure flawless paint correction.
Automotive clear coat functions exactly like a curved mirror. When you look at a polished vehicle, you are rarely looking at the paint itself. You are looking at the reflection of the surrounding environment on the clear coat. Success in lighting design means controlling what the car reflects. Simply blasting the surface with thousands of lumens does not improve visibility. Instead, it creates intense glare that forces the human eye to stop down. This effectively hides subtle surface transitions, swirl marks, and sanding pigtails. Proper illumination controls the geometry of the light source. It ensures the reflections cast onto the vehicle serve a diagnostic purpose during correction and an aesthetic purpose during delivery.
To achieve this, we must evaluate the shop environment. Look at the walls, the floor, and the ceiling. Every surface bounces light. If your walls are painted dark gray, they absorb light and kill reflections. If your floor is a high-gloss white epoxy, it bounces light back up onto the rocker panels. You must engineer the entire bay, not just hang a few fixtures.
Direct lighting involves aiming a bare diode or bulb straight at the vehicle panels. Highly directional light is useful in small, handheld inspection torches to catch the edges of a scratch. However, using it for general bay illumination is counterproductive. Direct overhead lighting creates harsh glare and deep shadows in the lower body lines. It completely hides subtle surface transitions. The intense hot spots wash out the actual color of the paint.
Indirect and bounce lighting solve this problem. By aiming lights at white ceilings or walls at specific angles relative to the observer or camera, the light scatters. This scattered, indirect light drops onto the vehicle as a soft, continuous gradient. Gradient lighting highlights the curvature of the body panels. It makes the vehicle look three-dimensional and glossy. It eliminates the blinding hot spots that cause eye strain. Technicians can work for extended periods without visual fatigue.
Consider a standard two-car garage setup. If you mount four high-bay LED fixtures directly above the vehicle, the roof and hood will be blindingly bright. The doors and fenders will be cast in shadow. By redirecting those fixtures to bounce off a bright white ceiling, the entire room fills with soft, even illumination. The vehicle reflects the illuminated ceiling, not the individual diodes.
The fundamental rule of reflection control is that the light source must be nearly the size of the vehicle. This maintains unbroken reflection lines along the flanks and hood. Small light sources create small, isolated reflections. Continuous strip designs or massive overhead arrays ensure that as you walk around the vehicle, the reflection line does not break. An unbroken reflection line instantly reveals dents, ripples, or orange peel in the paint.
Large ceiling scrims and massive softboxes are frequently deployed in high-end studios. They ensure the light footprint exceeds the dimensions of the vehicle. When the light source is larger than the car, it produces long, clean reflections. These reflections perfectly follow the vehicle's body lines. This is the exact principle used in automotive CGI and commercial car photography. We apply it practically to a daily detailing environment.
If you are polishing a long hood on a classic car, a four-foot shop light will only show you a four-foot section of the paint. You have to constantly move your head or the light to check your work. A continuous twenty-foot light array allows you to see the entire panel at once. You can verify the leveling of the clear coat in a single glance.
To master shop lighting, you must understand how different paint defects interact with light. A perfectly leveled clear coat reflects light directly back to the observer. This creates a sharp, mirror-like image. When the clear coat is damaged, it scatters the light. Swirl marks are essentially microscopic V-shaped trenches in the clear coat. When light hits these trenches, it bounces in multiple directions. This scattering is what makes the swirl mark visible to the human eye.
Different defects require different lighting strategies to become visible. Deep scratches and heavy oxidation are visible under almost any lighting condition. However, micro-marring, dual-action haze, and fine sanding marks require specific light angles. If your light source is too broad and heavily diffused, it will fill in these microscopic trenches with light from multiple angles. This washes out the contrast and hides the defect. This is why a combination of diffused ambient light and directional inspection light is necessary.
Holograms, caused by the improper use of a rotary polisher, are particularly tricky. They are essentially a uniform pattern of micro-scratches. They often remain invisible under flat, diffused shop lighting. They only reveal themselves under a strong, single point-source light, like the sun. To spot holograms indoors, you need a high-intensity, high-CRI inspection light held at a specific angle to mimic the sun's rays.
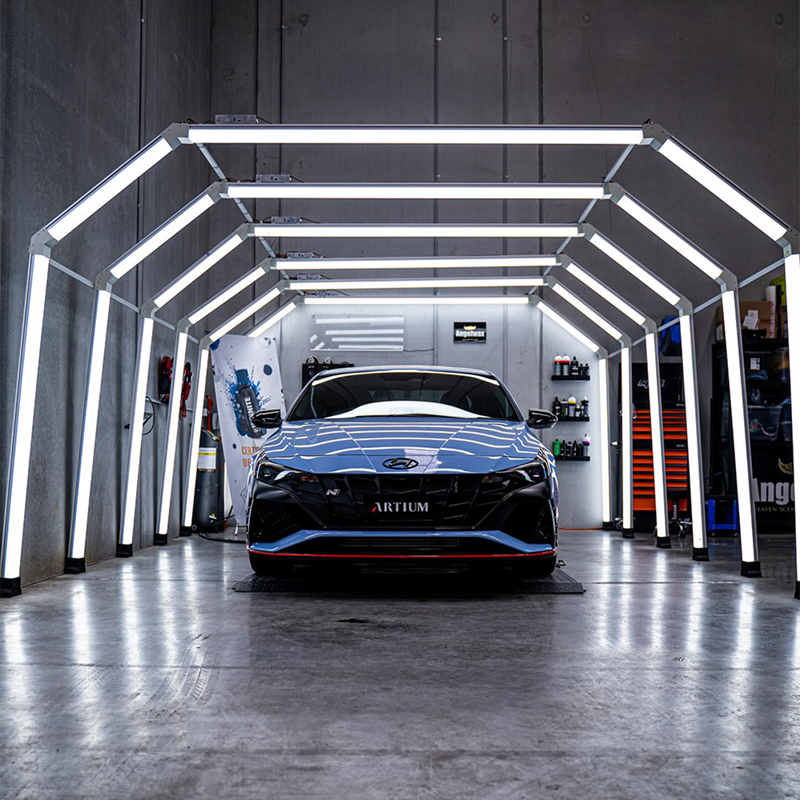
The architecture of a detailing light tunnel typically consists of illuminated archways or continuous hexagonal grids. These wrap from the ceiling down the side walls. This configuration provides true 360-degree illumination. The primary advantage is the total elimination of shadows in notoriously hard-to-reach areas. Wheel wells, lower rocker panels, and deep front grilles receive adequate light. For retail environments, the visual impact is unmatched. The tunnel acts as a framing device that elevates the perceived value of the service.
However, this approach comes with specific constraints. The initial capital expenditure is higher than standard overhead fixtures. Tunnel systems also have rigid footprint requirements. They demand dedicated floor space and specific ceiling clearances. This makes them less suitable for multi-purpose bays where vehicle lifts or large equipment might interfere with the side columns. You must measure your bay accurately before committing to a tunnel structure.
Suspended LED strip grids offer a highly functional alternative for manipulating gradient lighting. These systems often integrate softboxes or frosted covers to diffuse the output. The geometric patterns serve a dual purpose. Beyond general illumination, they act as diagnostic tools. Technicians spot paint distortion by observing how the perfectly straight lines of the grid reflect on the curved panels of the vehicle. If the reflected line wavers or breaks, the surface is not perfectly flat.
Hexagonal grids are particularly popular. They provide multiple intersecting lines. This allows you to check paint texture from any angle. Rectangular grids offer long, continuous lines that are excellent for checking the straightness of body panels. Both options are modular. You can expand them as your shop grows.
Overhead lighting struggles to properly illuminate the lowest 20 inches of a vehicle. Low-angle lighting is an absolute necessity for correcting rocker panels, intricate wheel faces, and lower bumpers. Fixed wall-mounted fixtures placed at knee height provide consistent side illumination. They require the vehicle to be parked in the exact same spot every time.
Mobile detailing stands equipped with adjustable, diffused LED panels offer more flexibility. Technicians can move the light source precisely where it is needed for localized correction work. A combination of overhead grids and mobile side lights provides the most versatile setup for a busy shop.
| Lighting Configuration | Primary Advantage | Defect Spotting Capability | Installation Complexity |
|---|---|---|---|
| Direct Point-Source | High intensity for deep scratches | Excellent for micro-marring, poor for overall finish | Low |
| Overhead Hex Grids | Diagnostic straight-line reflections | Excellent for orange peel and dents | Medium |
| Full Tunnel Systems | 360-degree shadow elimination | Excellent for lower body panels and final inspection | High |
| Mobile LED Stands | Targeted low-angle illumination | Excellent for rocker panels and wheels | None |
While uncontrolled natural light is detrimental, controlled natural light can be a valuable asset. If your shop has large bay doors facing north, you receive consistent, indirect sunlight throughout the day. North-facing light is highly prized in photography and detailing because it is soft and color-neutral. It does not cast harsh, moving shadows like direct southern exposure.
You can harness this light by positioning your final inspection area near these doors. However, you must still have the ability to block it out when necessary. Motorized blackout shades allow you to switch between natural inspection and controlled artificial lighting in seconds. Never rely solely on natural light, as weather conditions and time of day will dictate your ability to work.
Standard commercial lighting often distorts the true color of automotive paint. A Color Rendering Index (CRI) of 95 or higher is required to see the true depth of the paint. It helps spot subtle holograms left behind by rotary polishers. Lower CRI lights wash out metallic flakes. They make color-matching during touch-ups nearly impossible. Professional car workshop tunnel lights engineered specifically for detailing prioritize this high CRI baseline.
Color temperature carries equal weight. The optimal Kelvin range sits right at 5000K. This accurately replicates natural midday daylight. Lighting that pushes into the 6500K range becomes too blue. It causes severe eye strain over a long shift and artificially enhances the appearance of gloss. Dual-temperature systems offer significant value. Technicians can switch between warm and cool light to check their compounding and polishing work under different simulated environmental conditions.
A common misconception in shop design is that brighter is always better. Excessive lumen output without proper control simply turns the clear coat into a blinding mirror. Calculating the required lumens per square foot must factor in the specific tasks being performed. It must also account for the light absorption properties of the vehicles.
Dark-colored vehicles absorb significantly more light than white or silver cars. A well-designed bay uses dimmable drivers. This allows the technician to lower the output when working on a white vehicle to prevent glare. They can increase the output when correcting solid black paint. You should aim for around 100 to 150 foot-candles of illuminance at the vehicle surface for general detailing tasks. Paint correction may require localized bursts of higher intensity.
The material used to cover the LED diodes dictates the quality of the reflection. Bare diodes create a dotted line reflection effect on the paint. This is highly distracting and obscures surface defects. Proper diffusion mitigates this diode-spotting.
Polycarbonate covers with a frosted finish are standard for rigid fixtures. They offer durability and decent light scattering. For high-end inspection areas, photographic softbox materials or stretched fabric scrims provide superior diffusion. They turn harsh LED strips into soft, continuous bands of light. These bands glide smoothly over the vehicle's contours.
When selecting diffusers, consider light transmission loss. Heavy diffusion materials can reduce lumen output by up to 30 percent. You must compensate for this loss by selecting higher-output fixtures or adding more fixtures to the array.
| Lighting Metric | Optimal Range for Detailing | Impact on Paint Correction | Common Pitfalls |
|---|---|---|---|
| Color Rendering Index (CRI) | 95+ | Reveals true paint color and subtle holograms. | Using 80 CRI lights washes out metallic flake. |
| Color Temperature (Kelvin) | 5000K | Replicates natural midday daylight for accurate color matching. | 6500K causes eye strain and artificially boosts gloss. |
| Illuminance (Foot-candles) | 100 - 150 at surface | Provides adequate brightness without blinding glare. | Over-illuminating white cars hides surface defects. |
| Beam Angle | 120 degrees (Diffused) | Creates soft, continuous reflections across body panels. | Narrow beam angles create harsh hot spots. |
Upgrading to a car detailing light tunnel directly impacts labor efficiency. Proper ambient and directional lighting drastically reduces the time technicians spend constantly picking up and putting down handheld inspection lights. When the environment itself reveals the defects, the compounding and polishing phases move faster.
Accurate lighting prevents come-backs. Missing a patch of holograms because the shop lighting was inadequate leads to customer complaints when they view their car in the sun. Eliminating these errors protects the shop's reputation and preserves profit margins. You spend less time re-doing work and more time processing new vehicles.
Consider the process of ceramic coating application. Ceramic coatings require precise leveling. If you leave a high spot, it will cure into a dark, oily-looking smudge. Spotting these high spots requires excellent lighting. If your shop lighting is uneven, you will miss them. Once the coating cures, the only way to remove a high spot is to machine polish the panel and reapply the coating. This wastes time and materials.
A properly illuminated bay eliminates this risk. The continuous reflections allow the technician to see the coating flashing across the entire panel simultaneously. They can easily spot the rainbow effect of the solvents evaporating and wipe off the residue at the exact right moment. The lighting directly contributes to a flawless application and prevents costly rework.
The delivery process is a major touchpoint in high-end detailing. A highly aesthetic delivery bay validates the customer's investment in premium services like ceramic coatings or paint protection film. Applying cinematography and CGI lighting principles to real-world bays ensures the correct angle to the camera. This produces flawless bounce reflections.
When a vehicle is parked under a properly diffused tunnel, continuous, clean reflections follow the body lines perfectly. This eliminates the need for complex CGI or heavy post-production editing when capturing portfolio photography or content for social media. You can shoot high-quality video straight from your smartphone. The lighting does all the heavy lifting.
Commercial-grade LEDs offer massive lifecycle savings compared to legacy fluorescent or metal halide systems. They draw a fraction of the amperage. They produce significantly less ambient heat, which is a major factor in climate-controlled coating bays. They do not suffer from ballast degradation or color shifting over time.
In detailing environments involving wet washing or heavy compounding dust, the fixtures must be protected. Utilizing IP-rated fixtures ensures dust and water resistance. This prevents premature diode failure and keeps maintenance costs strictly predictable. You avoid the hassle of constantly replacing burnt-out tubes or cleaning dust out of open reflectors.
Heat management dictates LED longevity. While LEDs do not emit infrared heat forward like halogen bulbs, the diodes themselves generate significant heat at the circuit board level. This heat must be dissipated through aluminum heat sinks. If you install fixtures flush against a heavily insulated ceiling without adequate airflow, the drivers will overheat and fail prematurely. Always leave a small air gap behind surface-mounted fixtures to allow for convective cooling.
Remote driver placement is an excellent strategy for high-end installations. By mounting the LED drivers in a separate, ventilated utility room rather than on the fixtures themselves, you remove the primary heat source from the detailing bay. This lowers the cooling load on your HVAC system. It also makes maintenance much easier. If a driver fails, your electrician can replace it in the utility room without having to set up scaffolding over a customer's vehicle.
Installing an LED light tunnel or a large suspended grid requires careful spatial planning. Minimum height requirements must be observed to allow clearance for lifted trucks and large SUVs. Even though LEDs run cooler than halogens, they still require adequate distance from the vehicle. This allows the light to properly diffuse through ceiling scrims before hitting the paint.
Mounting hardware dictates your installation speed. If you have open-web steel bar joists, loop aircraft cable over the bottom chord for fast, level suspension. For finished drywall over wood trusses, you will likely need to span the trusses with unistrut to carry the weight of heavy aluminum frames. Always verify the weight of the lighting array and the load-bearing capacity of your ceiling structure before beginning installation.
High-output lighting arrays draw substantial power. You must have a licensed electrician pull the panel cover and check your available amperage before ordering fixtures. A detailing bay often runs multiple high-draw machines simultaneously. These include dual-action polishers, air compressors, and heavy-duty vacuums.
Adding a massive lighting array to an already taxed circuit will cause breaker trips and voltage drops. All fixtures and drivers must carry legitimate UL or ETL certifications. This complies with local fire codes and commercial insurance requirements. Do not risk your facility by installing uncertified, imported lighting fixtures that lack proper thermal management.
The most perfectly engineered car beauty station lighting can be entirely ruined by uncontrolled ambient light. Natural sunlight pouring in through open bay doors or clear skylights washes out carefully calibrated station lighting. It destroys gradient reflections. Sunlight introduces harsh, moving shadows that change throughout the day. This makes consistent paint inspection impossible.
Mitigation strategies are mandatory. Hang heavy vinyl blackout curtains on industrial track rollers across your bay doors. Applying heavy tint to glass or using zoned lighting controls allows the technician to isolate the vehicle. You create a controlled optical environment. This ensures the artificial lighting performs exactly as designed. You dictate the reflections, not the sun.
Take the following steps to upgrade your facility lighting:
A: A range of 5000K to 6500K is optimal because it mimics natural daylight. This provides the highest contrast for spotting swirls and scratches. 5000K is generally preferred for long working sessions to prevent the eye strain commonly associated with the harsher, blue-tinted 6500K spectrum.
A: Use indirect lighting by bouncing light off white ceilings at the correct angle to the camera. Alternatively, use heavy diffusion materials and large scrims over LEDs to create soft, continuous reflections. This prevents blown-out highlights and showcases the true depth of the paint.
A: Hexagonal grids provide multiple angles of straight-line reflections, making it easier to spot paint texture issues like orange peel from any vantage point. The intersecting lines act as a visual topographical map, instantly revealing dents or uneven clear coat leveling.
A: A minimum of 10 to 12 feet is generally recommended. This ensures adequate clearance for larger vehicles like lifted trucks and SUVs. It also allows the light to properly diffuse before hitting the paint. Lower ceilings can result in harsh hot spots.
A: IP65 or higher ratings are highly recommended if the station is used for wet washing or if polishing dust is prevalent. Sealed fixtures ensure longevity and safety. Unsealed fixtures quickly accumulate compounding dust on the diodes, reducing lumen output and causing overheating.


