


Views: 0 Author: Site Editor Publish Time: 2026-09-15 Origin: Site


Professional detailing carries a hidden labor cost. Adjusting portable work lights, moving tripod stands, and physically repositioning vehicles drain valuable time from every project. Traditional directional lighting creates harsh shadows and frustrating blind spots across lower panels and complex curves. Detailers fall into a repetitive cycle. They correct a panel, move the lights, and re-check the surface. This constant interruption introduces physical fatigue. It also increases the risk of missing high spots in ceramic coatings or leaving micro-marring in clear coats.
We need a structural solution to optimize shop efficiency. A well-designed LED light tunnel offers a high-visibility setup designed to eliminate constant environmental adjustments. This setup wraps the vehicle in continuous illumination, fundamentally changing how technicians interact with the paintwork.
Efficiency in a detailing bay relies on continuous momentum. We define a successful workflow by the ability to perform continuous machine polishing without stopping to adjust environmental factors. Every time a technician powers down a dual-action polisher to move a light stand, they lose focus and waste billable minutes. Over a full multi-stage paint correction, these minor interruptions compound into hours of lost productivity.
Consider the exact sequence of wasted steps in a traditional setup:
Standard overhead shop lights fail to illuminate modern vehicle geometry. Single-source overhead fixtures cast intense light on the hood and roof. They create deep shadows on vertical surfaces like lower door panels, rocker panels, and complex bumper intakes. Detailers cannot correct what they cannot see.
To combat this, shops rely on portable tripod lighting. While effective for localized inspection, tripods introduce severe operational friction. They require constant manual adjustment to maintain the correct angle of incidence. Power cords snake across wet floors, creating significant tripping hazards. Moving hot halogen or high-output portable fixtures around a freshly prepped vehicle increases the risk of accidental impact damage. A tripod tipped over onto a polished fender means hours of rework and potential repainting.
Inadequate ambient lighting directly impacts service quality and profitability. Shadows obscure remaining swirl marks, holograms, and sanding pigtails. When a vehicle pulls out into natural sunlight, these hidden defects suddenly become visible. This leads to frustrated customers and costly rework.
Ceramic coating applications suffer equally in poor lighting. Coatings require precise leveling to remove excess product before it flashes and cures. Blind spots allow high spots to harden on the clear coat. Removing a cured high spot often requires heavy compounding or wet sanding, completely destroying the workflow. Investing in comprehensive illumination prevents these critical errors.
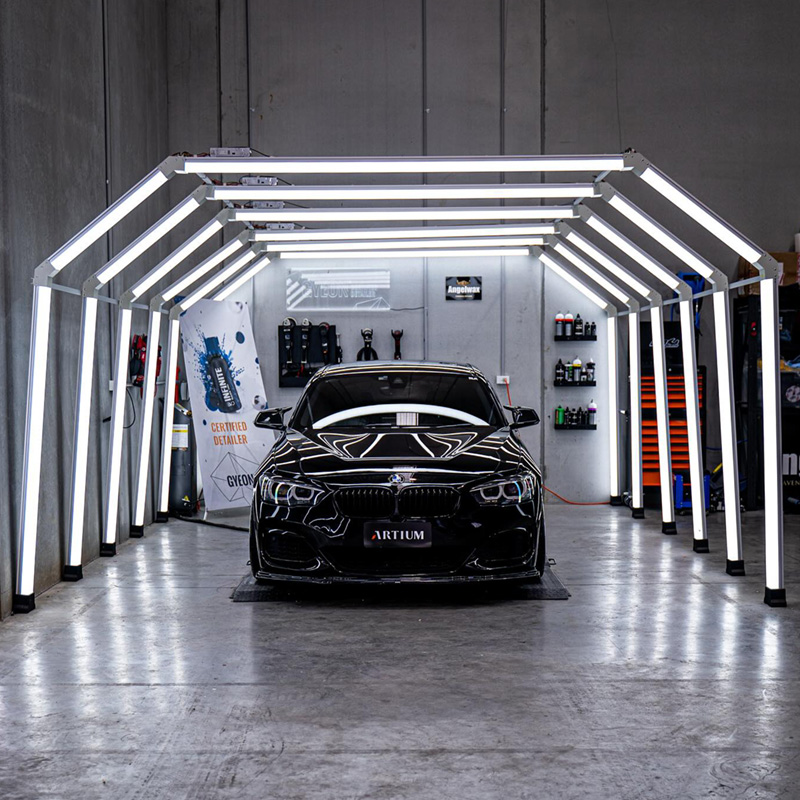
A structural lighting upgrade changes how technicians interact with the vehicle. Instead of bringing the light to the panel, the environment itself provides the necessary visibility. This shift fundamentally streamlines the entire detailing process.
The geometry of a detailing light tunnel solves the shadow problem. Continuous arches or interconnected geometric grids wrap light entirely around the vehicle. By positioning light sources along the ceiling and down the side walls, the system illuminates vertical and horizontal panels simultaneously.
This comprehensive coverage means a technician can polish a front fender, transition to the driver's door, and finish on the rear quarter panel without ever touching a light switch. The grid layout catches the upper edge of a door line while the side arches illuminate the flat vertical surface below the trim. The vehicle remains stationary. The detailer maintains their ergonomic posture. The workflow remains uninterrupted.
We must differentiate between general visibility and defect isolation. General visibility handles tasks like washing, interior detailing, and applying trim dressings. Defect isolation requires intense, focused light to reveal the true condition of the clear coat during compounding and polishing.
A tunnel provides the ultimate base visibility. It drastically cuts down the need to move the car or adjust primary light sources. It floods the bay with even, consistent illumination. This environment prevents eye strain and ensures technicians can easily monitor their working area, pad rotation, and product breakdown.
Despite the massive upgrade, macro-lighting does not replace micro-inspection. Detailers will still rely on handheld point-source lights. A tunnel provides broad, diffused light. Handheld lights provide sharp, directional beams necessary for micro-inspection of specific scratch depths.
You use the tunnel to perform the heavy lifting of paint correction and coating application. You use the handheld light for final quality control. Sweeping a handheld light across the panel verifies finish clarity and ensures absolute perfection before vehicle delivery.
Selecting the right system requires understanding the technical specifications that impact paintwork visibility. Not all high-output fixtures belong in a detailing bay. You must balance raw power with optical clarity.
Shop owners generally choose between two primary structural designs. Off-the-shelf car detailing light tunnel kits offer predictable installation. These prefabricated hexagonal or grid systems feature fixed dimensions and modular connectors. They assemble quickly and provide excellent top-down and angled illumination. They suit standard-sized bays perfectly.
Custom-built continuous arches offer a tailored approach. Installers bend and mount continuous tracks to match specific bay sizes. This method accommodates unique ceiling slopes or oversized commercial bays. Custom builds require rigorous testing. You must perform extensive alignment to optimize the light environment and prevent unwanted shadows.
Technical baselines dictate the success of your lighting upgrade. Color Rendering Index (CRI) measures how accurately a light source reveals the true colors of an object compared to natural sunlight. For accurate paintwork inspection, a CRI of 90+ is non-negotiable. Lower CRI ratings wash out metallic flakes and hide subtle color shifts in custom paint jobs.
Color temperature is equally critical. The industry standard sits between 5000K and 6500K. This range mimics natural daylight. Warmer temperatures under 4000K cast a yellow hue that hides defects. Cooler temperatures over 7000K introduce a blue tint that distorts clear coat clarity.
Raw lumen output without proper diffusion creates severe problems. Bare LED diodes create harsh hot spots on glossy clear coats. These concentrated reflections can temporarily blind the detailer. Intense glare obscures swirl marks and fine scratches, defeating the purpose of the lighting upgrade.
Effective systems utilize frosted or milky polycarbonate diffusers. These covers scatter the light evenly across the panel. Diffusion softens the reflection, allowing the technician's eyes to focus on the actual surface texture rather than the blinding light source itself.
| Diffuser Material | Light Transmission | Glare Reduction | Best Application |
|---|---|---|---|
| Clear Polycarbonate | 95%+ | Minimal | High-ceiling general warehouse lighting |
| Frosted Acrylic | 85% | Moderate | Standard wash bays and interior detailing |
| Milky/Opal Polycarbonate | 75% - 80% | Maximum | Intensive paint correction and coating application |
Operating at full output is not always optimal. Applying a delicate carnauba wax or cleaning interior leather does not require maximum lumens. Premium setups feature adjustable illumination levels.
Zonal switching allows detailers to isolate specific vehicle sections. You can power down the ceiling grid while keeping the wall arches active to inspect side panels critically. Automated smart controls take this further. They adjust brightness step-by-step based on ambient shop light or the specific detailing phase, maximizing both visibility and energy conservation.
Upgrading shop infrastructure requires a clear understanding of return on investment. You must weigh the initial capital expenditure against long-term operational benefits.
Calculating ROI involves tracking wasted minutes. Monitor how much time your team spends moving lights, untangling cords, and repositioning vehicles daily. Multiply those lost hours by your shop's hourly labor rate.
Compare the upfront cost of the tunnel and professional installation against these billable hours saved over a year. In high-volume correction shops, the labor savings often offset the equipment costs within the first twelve months. Efficiency directly increases daily vehicle throughput.
We cannot ignore the secondary benefits of premium lighting. High-end car workshop tunnel lights act as a powerful visual trust signal. When a client walks into a brilliantly lit, futuristic bay, they immediately perceive a higher level of professionalism. It justifies premium pricing for ceramic coatings and paint protection film (PPF) installations.
These environments provide ideal lighting for social media documentation. Portfolio photography benefits immensely from diffused, 360-degree illumination. High-quality before-and-after photos drive digital marketing and attract discerning clientele.
Beyond raw efficiency, premium lighting impacts technician morale and physical health. Constantly bending over to check lower panels with a handheld light causes severe lower back strain. Squinting through harsh glare induces tension headaches. By providing an optimized, well-lit environment, you reduce the physical toll on your staff.
Detailers working in comfortable, high-visibility bays experience less fatigue and report higher job satisfaction. In an industry struggling with high turnover rates, investing in your team's physical workspace serves as a powerful retention tool. Experienced technicians prefer working in shops equipped with professional-grade infrastructure.
Operational costs matter for long-term profitability. Commercial-grade LEDs offer massive advantages over legacy lighting systems.
| Lighting Metric | Legacy Halogen/Fluorescent | LED Tunnel Systems |
|---|---|---|
| Energy Consumption | Extremely high power draw | Highly efficient, lower wattage per lumen |
| Heat Generation | Produces significant ambient heat | Solid-state technology runs cool |
| Lifespan | Requires frequent bulb replacements | 50,000+ hours of continuous operation |
| Durability | Fragile glass tubes and filaments | Impact-resistant polycarbonate and aluminum |
Contrast the energy efficiency and solid-state durability of LEDs against the frequent bulb replacements of fluorescent shop lighting. LEDs draw significantly less amperage, lowering monthly utility bills while providing vastly superior illumination.
Installing a massive lighting structure involves practical challenges. Shop owners must address structural, electrical, and ergonomic realities before committing to a purchase.
High-output lighting grids draw substantial power. A standard 15-amp shop outlet can handle about 1440 watts continuously. A large grid system might draw 2000 to 3000 watts. You run a severe risk of overloading existing shop circuits if you simply plug a massive system into standard wall outlets.
You must hire a licensed electrician to assess your infrastructure. Professionals will evaluate breaker capacity, wiring gauge, and local compliance codes. Running a dedicated 20-amp or 30-amp circuit with proper 12-gauge or 10-gauge wiring is usually mandatory to handle the startup load and continuous draw safely. Never compromise on electrical safety to save on installation costs.
Physical footprint dictates system viability. Low ceilings, garage door tracks, or narrow bays can interfere with the optimal arch geometry required for an effective setup. If the ceiling is too low, the light source sits too close to the vehicle roof, creating unavoidable glare.
Measure your bay carefully. If a standard bay is 12 feet wide, and a modern truck is roughly 6.5 feet wide, that leaves less than 3 feet on either side. If the side arches protrude 6 inches, the working space shrinks. Detailers need at least 24 to 30 inches of clearance to operate a polisher comfortably without hitting the wall tracks.
Shop owners rarely factor in the cost of operational downtime during installation. Assembling a massive overhead grid requires clearing the bay completely. For a prefabricated system, a two-person team can typically complete the mechanical assembly and mounting in one to two days.
Custom continuous arches require bending tracks, cutting diffusers to exact lengths, and soldering LED strip connections on-site. This custom process can shut down a profitable detailing bay for three to five days. You must schedule the installation during traditionally slow periods or over a long weekend to minimize the impact on your monthly revenue.
Custom installations carry a hidden time cost. Achieving the perfect light environment rarely happens on the first try. It often requires days of testing, adjusting angles, and rebuilding sections.
You must pull different colored vehicles into the bay to test visibility. You will likely need to adjust the pitch of the side lights to optimize visual performance and eliminate new blind spots created by the structure itself.
Hardware degradation is an inevitable reality. While LEDs last for years, drivers and power supplies occasionally fail. Evaluate the difficulty of replacing individual dead drivers or LED strips within a massive interconnected structure.
Choose systems that utilize modular components and easily accessible external drivers rather than internal drivers hidden behind the diffusers. If a single section fails, you should be able to swap it out without dismantling the entire ceiling grid. Accessibility ensures minimal downtime during repairs.
Working inside a high-lumen environment for 8 to 10 hours a day introduces ergonomic risks. Intense light causes eye strain, headaches, and general fatigue. You must mitigate this risk through proper environmental management.
Utilize dimming controls to lower output during non-critical tasks. Encourage technicians to take visual breaks. Optimizing the light environment means balancing intense defect visibility with long-term human comfort.
A: No. While it provides comprehensive ambient and panel lighting that eliminates tripod repositioning, handheld point-source lights are still required to isolate specific micro-scratches and verify finish clarity.
A: The industry standard for paint correction is between 5000K and 6500K. This range mimics natural daylight and reveals true paint color and surface defects without yellow or blue distortion.
A: Most setups require a minimum ceiling height of 9 to 10 feet. This ensures adequate clearance for SUVs and trucks while maintaining enough distance to prevent intense, localized glare on the vehicle's roof.
A: The physical assembly of aluminum or polycarbonate tracks is generally straightforward. However, the electrical integration for high-lumen, multi-zone systems often requires a licensed electrician to ensure load safety.
A: By utilizing a continuous arch or a wide-spanning geometric grid that extends down the side walls, the light source surrounds the vehicle. This projects illumination from multiple angles simultaneously rather than just top-down.
A: Premium models feature dimmable drivers and multi-zone switching. This allows detailers to lower the output during general washing or increase it for intensive paint correction and ceramic coating leveling.


