


Views: 0 Author: Site Editor Publish Time: 2026-09-03 Origin: Site


The rapid adoption of continuous grid lighting in automotive and commercial spaces has prompted commercial photographers to test these systems in studio environments. Product photographers constantly battle to achieve even, wrap-around illumination on highly reflective surfaces without relying on overly complex, space-consuming multi-strobe diffusion setups. Managing specular highlights on metal, glass, and gloss finishes traditionally requires massive light modifiers that clutter the shooting floor and restrict camera movement. While traditional softboxes and scrims remain industry standards, assessing whether honeycomb LED lights can streamline workflows requires a technical evaluation of their light quality, modularity, electrical requirements, and practical limitations in a studio setting. Transitioning from standard strobes to a fixed continuous grid fundamentally changes how a studio operates, demanding a hard look at the physics and practical applications of these broad-source arrays.
Defining success in product lighting comes down to controlling specular highlights, ensuring accurate color rendition, and managing contrast ratios. You need light that wraps around the subject smoothly without creating blown-out hotspots. Traditional setups use large diffusion panels and bounce cards to achieve this effect. A grid system approaches the problem differently by distributing hundreds of small light sources across a wide geometric plane, fundamentally altering how light interacts with the subject.
Broad-source continuous illumination changes the physical behavior of light on three-dimensional objects. When you power on a large grid, you create a massive, uniform light bank. The interconnected structure removes single-point hotspots entirely. Instead of one bright reflection bouncing off a curved surface, the light wraps around the object from multiple angles simultaneously. This creates a highly even exposure across complex curves and deep recesses.
The geometric layout specifically targets how reflections form on glossy surfaces. A single strobe with a standard reflector creates a harsh, localized highlight. A large softbox creates a large, rectangular highlight with a soft gradient edge. A grid system creates a vast, patterned reflection that covers the entire top hemisphere of the product. This broad coverage fills in shadows naturally without requiring secondary fill lights, reflectors, or negative fill flags.
Light fall-off behaves differently depending on the source size and the distance from the subject. The inverse square law dictates that light intensity drops rapidly as distance increases. When you use a close-proximity softbox placed two feet from a product, the light intensity drops by 75% when it reaches four feet. This rapid fall-off creates deep shadows on the far side of the object, resulting in high micro-contrast.
Conversely, a ceiling-mounted grid sits much further away but covers a vastly larger surface area. If the grid is ten feet high, the distance to the top of a product might be eight feet, and the distance to the bottom might be ten feet. The relative difference in distance is minimal. Therefore, the light intensity remains nearly identical across the entire vertical plane of the product. The entire shooting bay becomes bathed in an even wash of light, significantly reducing micro-contrast.
| Lighting Characteristic | Traditional Softbox (Strobe) | Overhead Hexagonal Grid (LED) |
|---|---|---|
| Light Fall-Off (Inverse Square Law) | Rapid fall-off due to close proximity. High contrast between lit and shadow sides. | Gradual fall-off due to distance and massive surface area. Low contrast. |
| Micro-Contrast | High. Emphasizes fine textures and surface details. | Low. Flattens textures but provides perfectly even exposure. |
| Specular Highlights (Catchlights) | Solid rectangular or octagonal shapes with soft gradient edges. | Distinct geometric honeycomb pattern covering a wide surface area. |
| Floor Space Required | High. Requires heavy C-stands, boom arms, and sandbags. | Zero. Ceiling mounted, leaving the studio floor completely clear. |
Long shoot days generate significant heat on set. Traditional continuous lighting, especially tungsten bulbs or high-output COB (Chip on Board) LEDs, creates intense localized heat. This makes the studio uncomfortable for the crew and talent. More importantly, it can damage heat-sensitive products like cosmetics, wax, food, or electronics during extended macro sessions.
Grid systems distribute the thermal load efficiently. By spreading the LED nodes across a large aluminum or polycarbonate frame, heat dissipates passively over a wide area. You eliminate the need for loud, internal cooling fans found in high-wattage monolights. This distributed thermal management keeps the studio cooler. It also provides a completely silent shooting environment, which is a mandatory requirement if you are recording simultaneous video audio on set.
Not all products benefit from broad, flat illumination. The physical characteristics of the item dictate the lighting strategy. Understanding where these grid systems excel helps you determine if they fit your specific studio workflow and client demands.
These systems originated as car detailing lights. Engineers designed them specifically to expose surface defects, swirl marks, and highlight clear-coat reflections during paint correction. This inherent design makes them exceptionally well-suited for photographing vehicles, motorcycles, and large machinery in a studio environment.
Traditional modifiers often fail to provide sufficient coverage for an entire car without massive, custom-built overhead silks and heavy-duty truss systems. A grid system covers the entire ceiling easily. It reflects perfectly in the windshield and the curved body panels. The geometric pattern emphasizes the shape and contours of the vehicle, providing a striking, modern aesthetic that works perfectly for automotive parts, large furniture, and industrial equipment.
Photographing glassware, jewelry, and bare metal presents unique challenges. You are not photographing the object itself; you are photographing what reflects in it. Continuous grid lights manage glare on cylindrical and spherical metallic objects by providing a consistent, unbroken environment for the metal to reflect.
However, the grid pattern heavily impacts glass refraction. A wine bottle or a crystal decanter will show a distinct geometric pattern in its reflection. Sometimes this double-reflection is desirable for a high-tech, aggressive, or modern look. Other times, it distracts from the product's natural elegance. Managing these reflections requires precise camera positioning and focal length adjustments. You must decide if the geometric catchlight enhances the product or clutters the visual space.
High-volume e-commerce photography demands absolute consistency. When shooting 360-degree product spins, the exposure must remain identical as the product rotates on the turntable. Any directional key light will create moving shadows that look jarring and unprofessional in the final animation.
An overhead grid provides an ultra-wide, shadowless footprint. As the product rotates, the lighting remains perfectly static. You do not need to adjust fill lights, tweak bounce cards, or reposition flags for different angles. This drastically speeds up the workflow. You can place the product, hit record, and move immediately to the next item. The even wash of light ensures the white background remains pure and easily isolated in post-production.
Broad lighting has a major weakness: it flattens texture. If you photograph apparel, leather goods, or matte cosmetics under a massive overhead grid, the product will look two-dimensional. Texture requires directional light to create micro-shadows that give the material depth and a tactile feel.
To photograph textured items successfully, you cannot use the grid as a flat overhead wash. Instead, you must use a single panel or a smaller modular section as a directional key light. By bringing the light in from a low, raking angle, you preserve the depth of the material. A full ceiling grid is usually the wrong choice for heavily textured, non-reflective goods unless used purely as a low-power ambient fill.
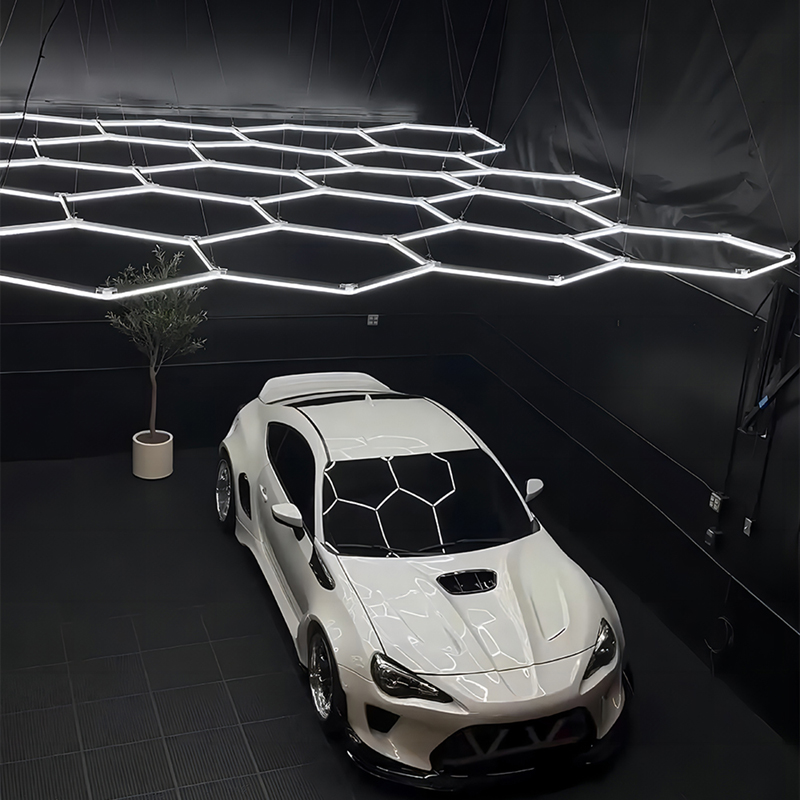
Choosing a lighting system requires looking past the physical shape and examining the internal electronics. A light that looks great in a commercial garage might ruin a professional photo shoot. You must evaluate specific technical metrics to ensure the system meets commercial photography standards.
The critical difference between standard commercial lighting and photography-grade equipment lies in color accuracy. Cheap LEDs often have a CRI of 80 or lower. They lack the ability to reproduce reds and skin tones accurately, and they often introduce heavy magenta or green color shifts that ruin product accuracy.
For commercial product shoots, you must establish a strict baseline requirement. Look for a CRI of 95 or higher and a Television Lighting Consistency Index (TLCI) of 96 or higher. Without this accuracy, you will create massive bottlenecks in post-production. Trying to color-grade a product shot illuminated by poor-quality LEDs is nearly impossible because the missing color spectrum data cannot be recovered. High spectrum accuracy ensures that the brand colors of the product match the real-world item perfectly.
Most professional grid systems are daylight-balanced, typically sitting around 5600K. This matches natural window light and standard studio strobes, allowing you to mix light sources if necessary. The challenge lies in consistency across the entire grid installation.
A massive setup might use dozens of individual light tubes. If you purchase a cheaper, non-professional kit, you risk mixed-temperature nodes. One tube might output 5400K, while the one next to it outputs 6000K. This creates uneven color casts across highly reflective products, showing up as alternating warm and cool bands in the reflections. You must verify that the manufacturer guarantees color temperature stability across all modular components.
Product videography and high-speed sync (HSS) photography require specific driver technology. Cheap LEDs use low-frequency pulse-width modulation (PWM) to dim the lights. PWM turns the light on and off rapidly to simulate lower brightness.
To the human eye, low-frequency PWM looks fine. To a camera shooting at 1/1000th of a second, or recording slow-motion video at 120 frames per second, it causes severe banding. Dark bars will roll across your images. You must evaluate the driver technology before installation. Professional hexagonal LED lights use high-frequency or flicker-free constant current drivers. This mitigates banding issues entirely, allowing you to shoot at any shutter speed or frame rate without visual artifacts.
One of the primary benefits of these systems is modularity. You assess the structural connectors and power routing to determine how easily the system scales. They typically use simple plug-and-play connectors that pass both structural support and electrical current simultaneously.
Studios can scale the physical footprint of the light bank based on the shooting bay size. You can build a small 4x4 foot grid for a tabletop macro setup, or expand it to a 20x20 foot ceiling installation for automotive work. This scalability allows you to adapt the lighting to the specific dimensions of your studio space without needing entirely new fixtures or complex custom wiring harnesses.
A massive overhead grid draws significant power. While individual LEDs are highly efficient, combining hundreds of them requires careful electrical planning. You must calculate the total wattage of the intended setup before ordering parts.
Determine if standard studio circuits can handle the load. A typical 15-amp or 20-amp studio circuit can handle a moderate grid setup. However, if you build a massive wall-to-wall installation, you may exceed the circuit's capacity, leading to tripped breakers during a shoot. Dedicated high-amperage wiring might be required. Always map out the power routing and calculate the total amperage draw before finalizing the installation.
Adopting a new lighting paradigm introduces workflow changes. You must weigh the aesthetic benefits against the practical limitations of a fixed grid installation to ensure it aligns with your studio's daily operations.
The geometric reflection is the most polarizing aspect of this lighting style. Analyzing the aesthetic impact on glossy products is a necessary step. A hexagonal light catchlight on a motorcycle helmet looks aggressive, technical, and modern. It acts as a creative asset. The same catchlight on a classic perfume bottle or a luxury watch might look messy and distracting, becoming a commercial liability.
You can mitigate this issue practically on set. If you need a seamless softbox effect, rig a large overhead silk or diffusion fabric directly below the grid. The fabric blends the individual hex patterns into one massive, smooth light source. This gives you the broad coverage of the grid without the geometric reflections. It requires extra rigging hardware but provides immense versatility for different clients.
Suspended overhead grids require secure, professional rigging. You must consider weight considerations and rigging safety. While aluminum and polycarbonate tubes are lightweight individually, a large grid becomes surprisingly heavy. You cannot simply screw these into drywall. You must anchor the system securely to ceiling joists using unistrut channels, or attach it to a heavy-duty aluminum truss system using rated aircraft cable.
This creates inflexibility. A fixed grid installation cannot be moved easily. Compared to mobile C-stand setups, you lose the ability to quickly swing a light to a different angle. The product must be brought to the light, rather than bringing the light to the product. This requires a dedicated shooting bay specifically reserved for broad-lit products.
Evaluate the initial capital expenditure of a high-CRI honeycomb system against a traditional three-point strobe kit. High-end strobes, heavy-duty boom arms, and large modifiers require a significant investment. A professional-grade LED grid also requires a solid upfront investment, plus potential installation costs.
The long-term ROI depends entirely on your workflow. If you shoot high-volume, standardized products, the grid pays for itself rapidly in workflow speed. You eliminate the time spent adjusting individual modifiers and metering lights. The hybrid photo/video versatility of continuous lighting means you do not need separate lighting setups for stills and motion. If your studio shoots both formats daily, the value ratio heavily favors the continuous grid.
Honeycomb LED setups are highly effective for specific niches. They excel at lighting large reflective items, facilitating 360-degree spins, and streamlining high-volume continuous lighting setups. However, they are not a universal replacement for directional studio strobes when shooting heavily textured or matte products that require deep micro-shadows.
Studios should invest in these systems if their primary bottlenecks involve lighting large metallic surfaces. They are also ideal if you shoot hybrid photo/video content requiring massive, even continuous light. The efficiency gained in setup time often outweighs the inflexibility of a fixed installation.
Take the following steps to integrate this lighting into your workflow:
A: Yes, large installations produce massive lumen output. While a single tube is relatively low-power, a full grid combines hundreds of diodes. This provides enough ambient light to shoot at f/8 or f/11, provided you adjust your ISO and shutter speed appropriately for continuous lighting.
A: Absolutely. Suspending a large silk or diffusion fabric below the grid blends the geometric pattern into a seamless, solid block of light. This mimics a massive traditional softbox, removing the distinct hexagonal reflections from glossy products.
A: The primary difference is color accuracy and driver technology. Detailing lights prioritize brightness and often have a low CRI, causing color shifts. Photography-grade LEDs feature a CRI of 95+, accurate daylight color temperatures, and flicker-free drivers for high-speed shooting.
A: Cheap models using low-frequency PWM dimming will cause severe banding at high shutter speeds or slow-motion frame rates. Professional photography-grade grids use constant current or high-frequency drivers to ensure completely flicker-free performance across all camera settings.
A: Power consumption varies by size. A standard 10x15 foot grid can draw anywhere from 500 to 1000 watts depending on the diode density. Always calculate the total wattage and ensure your studio circuit has the necessary amperage to handle the continuous draw safely.
A: They are typically mounted using suspended wire cables attached to ceiling joists or clamped directly to an overhead aluminum truss system. The modular pieces clip together, and the entire lightweight structure is hoisted and leveled above the shooting bay.
A: They are generally too large and broad for true macro work, which usually requires highly directional, pinpoint lighting to emphasize tiny textures. However, a single, small modular hex section can be used as a soft, wrap-around fill light for close-up shots.


