


Views: 0 Author: Site Editor Publish Time: 2026-09-01 Origin: Site


The demand for high-quality video content in workshops, garages, and detailing studios exposes the limitations of standard shop lighting. Traditional fixtures create harsh glare, deep shadows, and visible camera flicker. Precision work like paint correction or machining requires flawless visibility. Modern camera sensors need consistent, flicker-free, and diffused illumination to capture clean footage. Standard point-source lighting forces a compromise between practical visibility and media quality.
Modern workshops operate as dedicated content studios. Upgrading your lighting infrastructure creates a productive environment and ensures functional visibility. We are evaluating whether upgrading to a grid of hexagonal LED lights provides a legitimate technical solution for overlapping light distribution and camera-friendly environments, or if it remains a visual aesthetic trend driven by social media builds.
Shooting professional video in a workshop requires the physical environment to meet strict optical standards. The camera sensor needs consistent exposure across the entire frame to prevent blowing out highlights or crushing shadows. Color representation must remain perfectly accurate to showcase paintwork or materials truthfully. The footage must be completely free of sensor banding or strobing.
Standard shop lights fail these baseline requirements. They push excessive light into the center of the room while leaving the perimeter dark. This uneven distribution forces cameras to constantly adjust ISO levels. High ISO levels introduce digital noise and ruin the footage quality. You need a lighting setup that provides a flat, even field of illumination from wall to wall.
Traditional high-bay fixtures or linear fluorescent tubes cast hard, directional shadows. When you lean over a workbench, an engine bay, or a vehicle hood, your own body blocks the primary light source. This physically obscures details from both your naked eye and the camera lens. You cannot polish paint, machine parts, or solder wires effectively if your own shadow hides your hands.
Relying on portable work lights to fill these dark spots wastes time. Portable lights also introduce conflicting color temperatures into the workspace. Mixing a 4000K shop light with a 6000K portable floodlight confuses camera white balance settings, resulting in footage that looks unnaturally blue or yellow in different areas of the frame.
Point-source lighting creates massive technical challenges in environments filled with highly reflective surfaces. Clear coats, polished metals, wet paint, and glass act like mirrors. A concentrated LED bulb reflects directly back into the camera lens. This creates blown-out highlights that destroy the video exposure and hide the actual surface condition.
Workers suffer from severe eye fatigue when staring at these intense reflections for hours. You need broad, highly diffused light sources to manage surface glare effectively. Diffusion spreads the intensity of the light over a larger physical area, protecting both the camera sensor and your vision while still providing enough raw illumination to see fine scratches.
Cheap LED drivers cause severe technical mismatches with modern digital cameras. Standard video is shot at specific shutter speeds, usually 1/50 or 1/60 of a second. Low-quality LED drivers pulse alternating current power to the diodes at frequencies that clash with these shutter speeds. This pulsing creates visible rolling bands across your video footage.
You cannot fix this banding in post-production software. The only permanent solution requires upgrading to lighting systems equipped with continuous-current, flicker-free drivers designed specifically for media environments. These drivers supply a steady stream of direct current to the diodes, ensuring the light output remains perfectly constant regardless of the camera's frame rate.
The physics of a honeycomb pattern fundamentally changes how a room is illuminated. Overlapping light fields project from multiple angles simultaneously. A broad ceiling grid fills in dark corners effortlessly, creating a virtually shadowless environment. The entire ceiling essentially functions as a massive photographic softbox.
Light wraps around three-dimensional objects rather than hitting them from a single harsh angle. This geometric light distribution ensures perfectly even exposure for wide-angle camera shots. It eliminates the dark vignettes common in standard garages. When you walk around a vehicle, the light follows the curves of the metal smoothly without dropping off into heavy shadow.
Continuous, geometric reflection patterns are highly sought after as car detailing lights. The uniform grid lines reflect cleanly and predictably across curved vehicle panels. This makes dents, scratches, swirl marks, and paint defects instantly visible to the naked eye. You can identify imperfections without blinding yourself with inspection flashlights.
The diffused output prevents the intense hotspots caused by traditional bare-bulb shop lights. Camera sensors capture these clean reflection lines beautifully, making the final video look highly professional and technically precise. The grid acts as a massive defect-finding tool that covers the entire vehicle at once.
Modern workshops frequently double as content creation studios for social media and video platforms. The geometric layout serves a dual purpose for these creators. It acts as a visually striking, distinctly modern backdrop. This raises the perceived production value of any footage shot in the space.
Viewers immediately recognize the distinctive honeycomb pattern. It signals a clean, high-end, and professional work environment. Upgrading the lighting transforms a basic, utilitarian garage into a branded set design. This visual upgrade helps businesses stand out online and attracts higher-paying clients who associate a clean shop with quality work.
Distributed light sources offer significant ergonomic and psychological benefits to the people working underneath them. Reducing harsh glare directly minimizes eye strain during long, detail-oriented shifts. You experience fewer headaches when working under properly diffused lighting.
A well-lit, visually appealing space dramatically boosts overall morale. People actually enjoy spending time in the environment. This physical and mental comfort directly translates to higher long-term productivity, fewer mistakes, and better attention to detail on complex fabrication or detailing projects. Good lighting keeps you focused and alert.
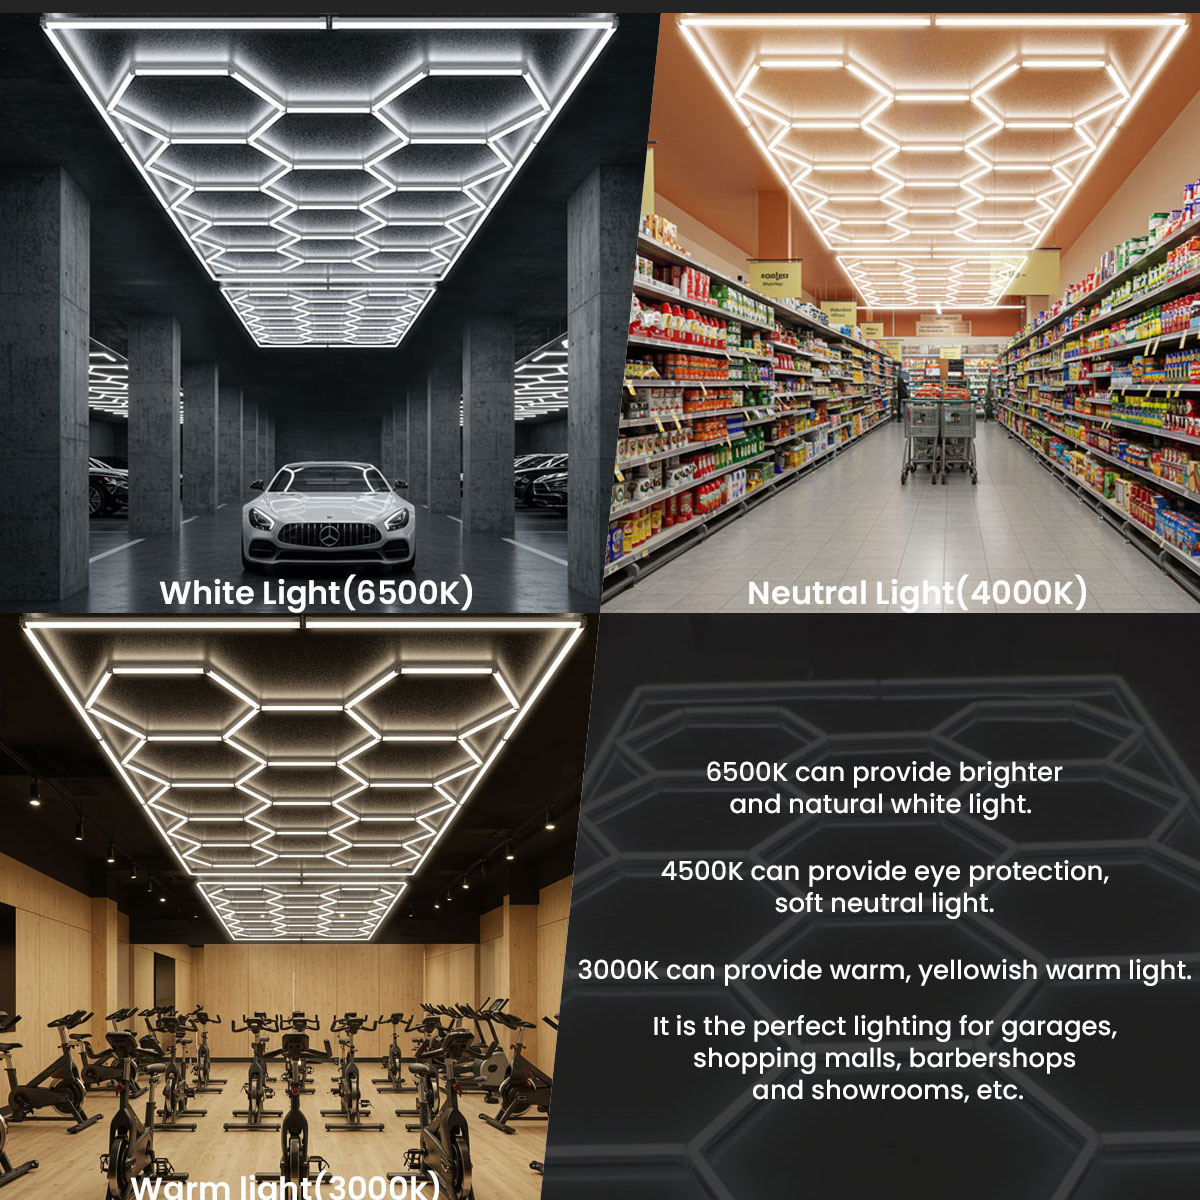
Accurate color representation is non-negotiable for paint matching, detailing, and video production. You must select fixtures with a Color Rendering Index (CRI) of 85 or higher. Aim for a CRI above 90 for professional applications. Lower CRI ratings make red paint look orange, wash out skin tones, and hide subtle color shifts in clear coats.
You also need the correct Kelvin rating for a daylight-balanced camera sensor. A color temperature between 5000K and 6500K provides crisp, clean white light. Avoid fixtures that dip below 4000K for detail work, as they introduce a muddy yellow tint that makes color matching impossible and requires heavy color correction in video editing software.
The physical cover over the LED diodes dictates the ultimate light quality. Polycarbonate covers offer optimal light diffusion. They scatter the light evenly across the room without causing excessive lumen loss. This ensures the light stays bright enough for real mechanical work while looking smooth and consistent on camera.
Cheap plastic covers block too much light, turn yellow under UV exposure, and become brittle over time. High-quality diffusers completely hide the individual LED dots, creating a seamless, continuous bar of light. If you can see the individual diodes through the cover, the diffuser is too thin and will create micro-shadows on your work surface.
The internal power supply determines your camera compatibility. You must verify if a system uses continuous-current drivers. These advanced drivers support high-frame-rate video capture, including 60fps and 120fps slow-motion, without any visual interference. Standard drivers will strobe visibly on camera, ruining your footage.
Look for explicit flicker-free certifications from manufacturers. Do not trust generic honeycomb LED lights without verifying the driver specifications. The external housing tells you nothing about the internal electronics. Ask the supplier directly if their drivers use Pulse Width Modulation (PWM) dimming, as low-frequency PWM is the primary cause of camera banding.
Marketing materials often boast aggressively about total lumen output. Total lumens do not measure the actual light hitting your workbench or vehicle hood. You need to calculate the usable Lux delivered to the working surface. This calculation depends heavily on your specific ceiling height.
A fixture producing 10,000 lumens at 15 feet delivers far less usable Lux than the same fixture mounted at 9 feet. Focus strictly on surface illumination metrics rather than raw, inflated output numbers.
Consumer-grade kits rely heavily on plug-and-play plastic connectors. They are lightweight and easy to assemble for a weekend project but lack long-term structural durability. The plastic clips can become brittle in unheated garages during winter months.
Commercial systems use hardwired electrical connections and rigid aluminum housings. They are engineered for continuous daily operation in harsh, temperature-fluctuating environments. Commercial fixtures dissipate heat much better, extending the lifespan of the internal LED diodes. Evaluate your expected daily usage hours carefully before choosing between a basic consumer kit and a robust commercial installation.
To make an informed upgrade decision, you must compare a hexagonal light setup against traditional alternatives. Each lighting system offers distinct advantages depending on the ceiling height, budget, and primary workflow of the space.
| Lighting System | Primary Advantages | Ideal Application | Camera Performance |
|---|---|---|---|
| Hexagonal LED Grids | Superior shadow reduction, broad softbox effect, modern aesthetic, low glare. | Detailing studios, content creation workshops, precision assembly areas. | Excellent (if equipped with flicker-free drivers and high CRI). |
| High-Bay UFO Lights | Easier installation, high raw lumen output, lower upfront hardware cost. | Warehouses, ceilings over 15 feet, general storage facilities. | Poor to Average (prone to harsh hotspots and heavy shadowing). |
| Standard Linear Shop Tubes | Highly modular, ubiquitous availability, easy to replace individual failing tubes. | Basic home garages, woodworking shops, budget-constrained upgrades. | Average (creates directional shadows, requires multiple rows for even coverage). |
High-bay UFO lights dominate large commercial warehouses. They push massive amounts of light from very high ceilings efficiently. However, they act as intense, concentrated point sources. This creates severe shadows and blinding hotspots on reflective surfaces. If you stand under a UFO light, your shadow completely covers the engine bay you are working on.
Hexagonal grids solve this exact problem by spreading the light source across a massive surface area. UFO lights remain better for 20-foot ceilings, but grids dominate spaces under 12 feet where precision detailing and video production matter most. The grid provides the wrap-around lighting that UFO fixtures physically cannot produce.
Linear fluorescent or LED tubes are cheap, familiar, and easy to source locally. You can replace a single dead tube in seconds without tools. However, they only provide light from a single, rigid direction. You must install multiple parallel rows to achieve decent floor coverage, and even then, you still get directional shadows between the rows.
Hexagonal systems provide a continuous, multi-directional light field. They offer vastly superior vertical illumination on the sides of vehicles. The modern, geometric aesthetic of a grid also outperforms the sterile, industrial look of basic linear tubes. For a space designed to look good on camera, the grid layout provides a much cleaner background.
Installing these systems requires careful spatial planning and measurement. Calculate the exact drop distance from the ceiling to the fixture. Installing grids on ceilings lower than 8 feet can cause intense light pooling. The light will not have enough vertical distance to diffuse properly before hitting the subject, creating bright spots directly under the tubes.
Ceilings above 12 feet reduce the usable Lux at the workbench significantly. High ceilings require dedicated suspension cables to drop the grid to an optimal 9-to-10-foot working height. Suspension kits allow you to level the grid perfectly, even if the actual ceiling is sloped or uneven.
Massive interconnected grids draw significant electrical power. You must calculate the total amperage draw of the entire system before beginning installation. A large multi-bay grid can easily pull 5 to 8 amps continuously. Standard residential lighting circuits are usually rated for 15 amps.
You must mitigate the risk of overloading these circuits. Do not share the lighting circuit with heavy machinery like air compressors, vacuums, or welders. The National Electrical Code (NEC) recommends keeping continuous loads to 80% of the breaker's capacity. Dedicated lighting circuits ensure stable voltage, prevent nuisance breaker trips, and protect the LED drivers from power surges caused by large motors starting up.
Preventing grid sag is a major installation priority. You cannot rely solely on the plastic electrical connectors to hold the total weight of the grid. Over time, gravity and garage temperature fluctuations will cause the center of the grid to bow downward, ruining the aesthetic and stressing the electrical joints.
You must use multi-point anchoring systems. Secure the grid directly to ceiling joists using heavy-duty screws or aircraft cable. If your grid layout does not align perfectly with your 16-inch or 24-inch on-center joists, install wood blocking above the drywall or use heavy-duty toggle bolts rated for at least 50 pounds each. Proper anchoring maintains the clean, geometric aesthetic and prevents structural failure.
Assembling and mounting a large grid requires significant time and effort. A full-scale garage transformation often requires a multi-person team. You need clear staging areas to pre-assemble the grid on the floor. Lifting a 10-foot by 15-foot interconnected frame requires coordinated effort and multiple ladders.
You must understand the practical reality of maintaining an interconnected system. Replacing a single burnt-out segment in the exact middle of a grid is challenging. You have to unlink the specific connectors holding that tube in place. This often requires slightly shifting or loosening adjacent tubes.
It is significantly more labor-intensive than swapping a standard shop tube. You must disconnect the power at the breaker, carefully pry the plastic Y-connectors apart, slide the dead tube out, and press the new one in without bending the surrounding frame. Buy extra replacement tubes during your initial purchase to ensure perfect color temperature matching years down the road, as LED batches vary slightly in color over time.
Hexagonal LED grids provide a highly effective upgrade for modern workspaces. They alter the illumination geometry of a room to eliminate shadows and reduce harsh glare. For workshops prioritizing precision productivity and camera-friendly aesthetics, they offer unmatched performance, provided the hardware meets strict driver and CRI standards.
To execute this lighting upgrade successfully, follow these next steps:
A: They significantly improve visibility. The geometric layout physically reduces shadows by projecting light from multiple overlapping angles. The broad grid acts as a massive softbox, providing even illumination. This multi-directional light makes them highly functional for precision work, reducing eye strain and eliminating dark spots.
A: Video recording requires lighting with flicker-free drivers and a high Color Rendering Index (CRI). Flicker-free drivers prevent rolling bands on camera sensors at standard shutter speeds. A high CRI ensures the camera captures accurate paint colors and subtle details without washing out the image.
A: You can install plug-and-play kits yourself, but it requires careful planning. Pre-assembling the grid on the floor is straightforward. Lifting and mounting large grids safely requires multiple people to avoid stressing the connectors. Hardwiring the system to your main electrical panel requires a licensed electrician.
A: Focus on covering the primary work area rather than wall-to-wall installation. A standard 5-hex by 2-hex grid usually covers a single vehicle bay perfectly. This targeted approach maximizes usable Lux on the vehicle surface while keeping power consumption and installation complexity manageable.
A: Most standard kits are non-dimmable due to the constraints of their internal drivers. The interconnected design makes dimming technically complex. If you require dimming capabilities, you must purchase specific hardware with compatible dimmable drivers and dedicated low-voltage wiring.
A: It is more labor-intensive than swapping a standard shop tube. Replacing a center tube requires unlinking the specific plastic connectors holding it in place. You must gently shift the adjacent tubes to free the broken segment. Always keep spare tubes on hand for future maintenance.
A: They work well, but ceilings over 12 feet require suspension kits. If mounted flush on a very high ceiling, the light diffuses too much before reaching the workbench, reducing usable Lux. Suspending the grid drops the light to an optimal 9-to-10-foot height, maintaining both performance and aesthetics.


