


Views: 0 Author: Site Editor Publish Time: 2026-09-11 Origin: Site


Ceramic and graphene coatings carry immense financial and reputational stakes for any automotive detailing business. A single missed high spot during the application process often results in costly wet-sanding, heavy compounding, and complete re-application. Standard garage lighting or ambient sunlight actively works against you during this critical phase. Basic overhead bulbs mask solvent flashing and hide uneven leveling. This creates a dangerous false sense of perfection. We call this the "looks good from 10 feet away" illusion. The surface appears flawless until the vehicle rolls into natural sunlight, revealing dark smudges and streaks of improperly cured product. Purpose-built car detailing shop lights solve this problem directly. They serve as a mandatory quality control tool rather than just basic illumination. Upgrading your bay shifts the focus away from raw, blinding brightness toward optical clarity and precise defect isolation. Proper diffusion and targeted beam angles allow you to monitor chemical reactions on the paint surface in real time.
Ceramic and elastomeric coatings rely heavily on solvent evaporation to bond with the clear coat. When you level a coating, you actively manage a chemical reaction. As carrier solvents evaporate, the liquid undergoes a phase change. This creates a visible "rainbow" or "sweating" effect on the paint. You must level the product at the exact moment this flashing occurs. Wiping too early removes the protective layer. Wiping too late causes the coating to cure unevenly, creating a sticky, immovable mess. Specific light wavelengths make this subtle chemical transition visible. Standard fluorescent tubes wash out the surface. They render the rainbow effect completely invisible to the naked eye.
High-solids coatings sit heavy on the paint and require intense light to see the thick leveling process. Fast-flashing coatings sweat quickly and demand immediate visual feedback. Excess product that cures unevenly creates a high spot. These high spots plague detailers because liquid coatings naturally pool in complex geometries. The product gathers in panel gaps, around emblems, inside door cups, and along trim edges. Standard overhead lighting fails to highlight these micro-level surface discrepancies. The light simply does not reach into tight corners. Without targeted illumination, you inevitably leave excess product in these recessed areas. This results in localized curing failures that require aggressive machine polishing to remove.
A professional lighting setup must seamlessly handle the transition from paint correction to coating application. During the compounding and polishing phase, the light must reveal the smallest micro-scratches, buffer trails, and swirl marks. Once the paint is perfect, the exact same lighting environment must pivot to highlight solvent behavior and liquid leveling. You transition from looking for physical defects in the clear coat to monitoring the chemical behavior of a liquid applied on top of it. This dual-purpose requirement demands highly engineered fixtures.
We define the success criteria for a detailing lighting setup through strict baseline requirements. The system must possess the intensity to reveal micro-marring instantly. It must deliver accurate color representation to differentiate between a high spot and a natural shadow. Finally, it must eliminate harsh shadows across the vehicle without blinding the technician. Achieving this balance requires careful selection of hardware and strategic placement within the bay.
The Color Rendering Index (CRI) measures how accurately a light source reveals the true colors of an object compared to natural sunlight. For paint correction and coating application, a CRI of 95 or higher is strictly non-negotiable. Lower CRI ratings muddy the visual feedback. They hide the subtle color shifts of flashing solvents and mask faint high spots on metallic finishes. Color temperature, measured in Kelvin, also dictates your accuracy. Warm light around 4500K provides excellent contrast for spotting high spots on lighter paint colors like white or silver. Conversely, cool daylight around 6500K excels at revealing micro-marring and solvent sweating on dark, solid colors like black or navy blue.
Detailers often make the mistake of chasing maximum lumens. Lumens simply measure the total light output at the source. Lux measures the usable light that actually hits the vehicle panel. You do not care how bright the ceiling fixture is. You only care about the clarity at the surface of the door or hood. To ensure superior clarity, a standard detailing bay should achieve between 750 and 1000 lux at the working surface. Calculating this requires factoring in ceiling height, fixture beam angles, and the distance from the light source to the vehicle.
Here is a breakdown of lighting requirements based on the detailing task:
| Detailing Task | Recommended Lux Level | Ideal Color Temperature | Primary Light Source |
|---|---|---|---|
| General Wash & Prep | 300 - 500 Lux | 5000K | Overhead Panels |
| Heavy Compounding | 750 - 1000 Lux | 6000K - 6500K | Overhead & Mobile Stands |
| Ceramic Coating Application | 800 - 1000 Lux | 5000K - 6000K | Diffused Overhead & Side Lighting |
| Final High-Spot Inspection | 1000+ Lux | Variable (4500K - 6500K) | Handheld Inspection Lamps |
Harsh, undiffused light actively works against you. Bare LED diodes create intense, blinding hotspots on the clear coat. This concentrated glare washes out the surrounding panel. It makes it impossible to see the subtle leveling of a liquid coating. You cannot accurately judge a wipe-down when you stare into a blinding reflection. Frosted covers and high-quality diffusers solve this issue. They spread the light output, creating a wide, readable surface reflection. You watch the coating sweat and flash across a smooth, diffused band of light. This allows you to work accurately and quickly, leveling the product with total confidence.
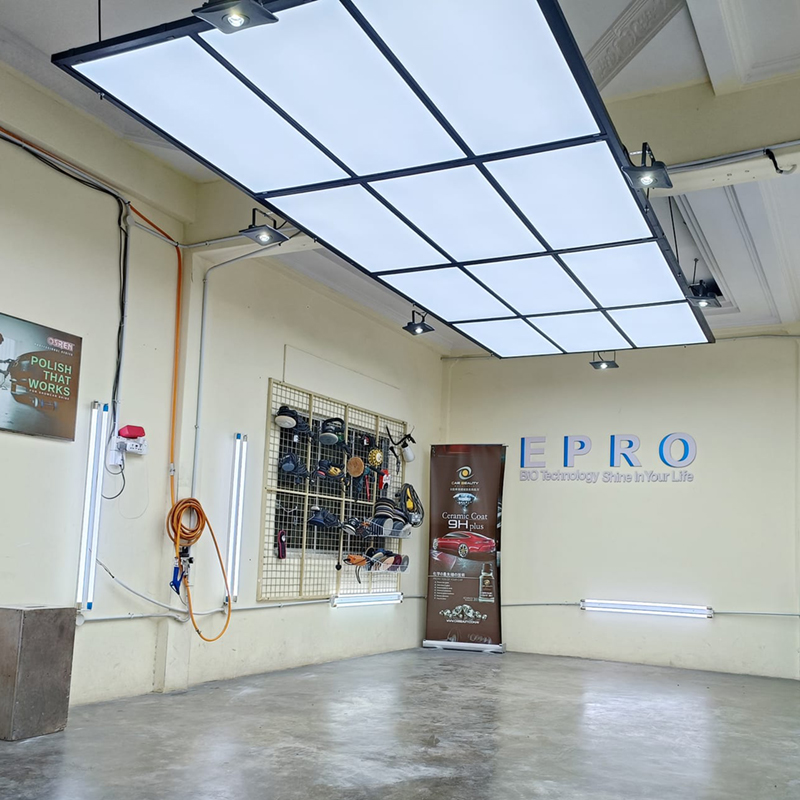
General wash, decontamination, and prep stages require broad, even coverage across the entire vehicle. A standard ceiling panel light provides this necessary baseline utility. It floods the upper horizontal surfaces with consistent illumination. This ensures you do not miss embedded iron particles or tar deposits during the prep wash. Broad overhead panels establish the foundation of a well-lit bay. They allow you to navigate the workspace safely while performing general cleaning tasks.
For more advanced correction and coating work, shops utilize modular arrays. A square LED ceiling light allows you to build custom grids tailored to the specific dimensions of your bay. These grid configurations eliminate overhead blind spots by overlapping light cones. They deliver consistent clarity across the hood, roof, and trunk. High-end detailing studios often install continuous LED ceiling panel light systems, frequently referred to as light tunnels. These continuous fixtures create a highly controlled environment. They facilitate rigorous quality control measures by providing uniform, unbroken reflections for final inspections. This ensures no high spot goes unnoticed on the upper panels.
Overhead infrastructure alone is insufficient for a complete coating job. Ceiling lights cannot push illumination down to the rocker panels or the bottom edges of the doors. Vertical panels require dedicated side-lighting. A wall-mounted LED detailing light panel illuminates every corner and lower nook where overhead light simply cannot reach. This horizontal beam path highlights the vertical curves of fenders and doors. It ensures you level the coating perfectly on the sides of the vehicle.
Even with excellent wall and ceiling fixtures, you must utilize handheld and stand-mounted inspection lamps. These mobile, variable-temperature lights represent the ultimate tool for final high-spot checking. Before the coating fully cures, you must walk the perimeter of the vehicle with a mobile lamp. By manually adjusting the angle of the light, you inspect complex geometries, mirror housings, and intricate grilles. Mobile lamps allow you to cast light parallel to the paint surface. This reveals the faintest traces of un-leveled product that static fixtures might miss.
To properly set up your bay lighting, follow these practical steps:
The detailing industry currently faces a divide between the "Instagram Bay" and the working bay. Complex hexagon lighting grids offer massive marketing appeal. They look incredible on camera, create striking reflections on finished vehicles, and help attract high-end clientele through social media. However, you must objectively contrast this aesthetic appeal against practical functionality. High-end paint correction and precision coating applications require focused, directional beam patterns. Hexagon lights provide broad, multi-angled ambient light that helps you work quickly, but they lack the intense, focused beam required to spot micro-marring. You must supplement aesthetic grids with dedicated inspection lights to achieve true accuracy.
You must also weigh the benefits of fixed versus dynamic lighting. Investing heavily in a static overhead infrastructure provides immediate convenience. You flip a switch, and the entire bay is illuminated evenly. However, static fixtures cannot adapt to different vehicle shapes. A lifted truck requires a different lighting angle than a low-slung sports car. The most effective approach utilizes a hybrid system. You install fixed ceiling panels for general visibility and supplement them with high-end mobile inspection lights mounted on adjustable stands. This dynamic approach ensures you can always position the light source exactly where the paint requires it.
Hardware reliability plays a major role in your setup. LED diodes degrade over time. Cheaper fixtures may look bright on day one, but they often suffer from lumen depreciation and color temperature shifting after a few thousand hours of use. A light that shifts from 5000K to a sickly green hue ruins your ability to spot coating flashes. You must evaluate the warranty coverage of the fixtures and consider the practical effort required to replace proprietary panels when they eventually fail. Prioritize fixtures built with high-quality drivers and robust aluminum heat sinks to ensure long-term color stability.
Working in a hyper-bright environment takes a severe physical toll on the technician. Staring into intense, specular reflections on polished clear coat for eight hours causes severe eye strain, headaches, and fatigue. Fatigued detailers make mistakes. This leads to missed high spots late in the day. You mitigate this risk by installing dimmable zones within your bay. Lowering the ambient light output during the initial application phase, and only ramping up to maximum intensity for the final inspection, preserves your vision. Anti-glare diffusers also soften the light, making the working environment significantly more comfortable.
Poor fixture layout creates dangerous shadows and blind spots. A common mistake is placing the primary light fixtures directly over the center line of the vehicle. In this configuration, the roof of the car blocks the light from reaching the side panels. This casts the doors into deep shadow. You must space your fixtures around the perimeter of the bay. Position the lights slightly outside the footprint of the vehicle, angling them inward. This perimeter layout ensures overlapping light cones that reach deep into panel gaps and illuminate the vertical surfaces effectively.
While LEDs run significantly cooler than traditional halogen work lights, high-density light arrays still generate ambient heat. In a poorly ventilated, enclosed detailing bay, a massive ceiling grid can marginally increase the room temperature. Ceramic coatings are highly sensitive to temperature and humidity. An unexpected increase in ambient heat accelerates the coating's flash time. A product that normally gives you three minutes to level might suddenly flash in sixty seconds. You monitor your bay temperature closely and ensure adequate ventilation to prevent unexpected curing failures.
A: The optimal color temperature for applying ceramic coatings falls within the 5000K to 6000K range. This pure white daylight spectrum provides the highest contrast, allowing you to clearly see the solvent flashing process and easily identify high spots before they cure.
A: Standard hardware store LED lights lack the necessary Color Rendering Index (CRI). Their low CRI ratings fail to reveal subtle high spots, micro-marring, and imperfections in nooks and crannies. They often produce harsh glare that washes out the panel, making precise coating application nearly impossible.
A: Instead of focusing on total lumens at the ceiling, focus on lux at the paint surface. A professional detailing garage requires 750 to 1000 lux hitting the vehicle panels to achieve superior clarity for paint correction and coating application.
A: Hexagon lights serve a dual purpose. They provide massive marketing aesthetics for social media and deliver broad, multi-angled ambient light that helps detailers work quickly. However, they lack focused intensity and must be supplemented with dedicated inspection lights for rigorous quality control.
A: Square fixtures offer broader, more even light distribution across the panel. They reduce the harsh, narrow striping reflections caused by traditional tube lights, making it easier to read the paint surface. They also offer easier grid modularity for custom bay layouts.
A: You must use dedicated side-lighting. Overhead lights cannot reach these areas. Installing wall-mounted LED detailing light panels or using low-angle mobile inspection stands ensures you illuminate every corner, shadow, and panel gap where coatings naturally pool.


