


Views: 0 Author: Site Editor Publish Time: 2026-08-26 Origin: Site


Ceramic coating failures—specifically high spots, streaking, and uneven leveling—are rarely the result of poor product quality. They happen because you cannot see the chemical flash window clearly. Standard garage lighting and ambient daylight create shadows, false reflections, and blind spots across the vehicle surface. Relying solely on handheld inspection lights slows down the application process. It leaves vertical panels vulnerable to missed leveling and often leads to inaccurate initial client estimates due to hidden clear coat damage.
Upgrading to purpose-built, daylight-balanced lighting setups shifts coating application from a guessing game to a predictable, repeatable process. Proper illumination reveals the exact moment a coating sweats, ensuring you wipe off excess carrier solvents before they cure into semi-permanent high spots. This guide evaluates the technical specifications, layout strategies, and operational impact of professional detailing lighting systems.
Precision Requires Specific Metrics: High Color Rendering Index (CRI > 90) and daylight color temperatures (5000K–6000K) are non-negotiable for accurately identifying coating flash times and high spots.
Diffusion Over Raw Output: Eliminating shadows and glare is more critical than maximizing lumens. Diffused, multi-directional lighting prevents operator fatigue and reveals surface inconsistencies.
Form Factor Matters: Integrating an LED detailing light panel system provides uniform coverage that traditional tube lighting cannot match, directly reducing costly rework and polishing corrections.
Strategic Layouts Drive ROI: A shadowless bay layout combining overhead and wall-mounted fixtures ensures consistent visibility across both horizontal and vertical vehicle surfaces.
Dual-Purpose Investment: Professional car detailing shop lights not only ensure flawless coating application but also serve as critical tools for accurate job estimating and capturing high-quality before-and-after marketing photography.
Applying a ceramic or graphene coating involves a precise chemical transition. As you drag a microfiber applicator block across a hood, the liquid product transfers to the clear coat. Immediately, the carrier solvents begin to evaporate into the surrounding air. This evaporation process creates a visual phenomenon commonly referred to as flashing, sweating, or rainbowing. The remaining silica or polymer solids must be leveled with a low-pile microfiber towel at the exact moment these solvents flash.
If you wipe the panel too early, the coating smears. The active ingredients fail to crosslink with the clear coat, severely degrading the longevity of the protection. If you wipe too late, the solids begin to cure and harden. This results in dark, oily-looking streaks known as high spots. Standard fluorescent garage lights or single overhead bulbs completely fail to capture this subtle optical shift. The rainbowing effect relies on light refracting through the thin layer of evaporating solvents. Without a broad, highly diffused light source, this refraction remains invisible. Detailers working under poor lighting end up guessing the flash time based on ambient temperature and humidity. This leads to inconsistent leveling across different vehicle panels and inevitable high spots.
The visual stages of coating application require specific lighting to monitor:
Application Phase: The liquid appears thick and glossy as it is spread in a cross-hatch pattern.
Solvent Evaporation: The liquid begins to separate, forming small beads or a rainbow-like oil slick appearance.
The Flash Window: The rainbow effect peaks and begins to dissipate, signaling the exact moment for the initial leveling wipe.
Final Buff: A secondary plush towel removes remaining residue, leaving a uniform, high-gloss finish.
Flawless ceramic coating application requires flawless surface preparation. A coating acts as a magnifying glass. It permanently locks in whatever paint condition exists underneath it. Standard lighting routinely fails to reveal the micro-marring, dual-action (DA) haze, and fine holograms left behind during the compounding and polishing stages. A vehicle might look perfect under a standard shop light, but once you pull it into direct sunlight, the buffer trails become glaringly obvious.
If you apply a multi-year ceramic coating over these hidden defects, the only way to fix the error is to aggressively wet sand or heavily compound the cured coating off the vehicle. This destroys the coating, wastes hours of labor, and removes unnecessary clear coat. High-quality lighting ensures the paint correction phase achieves true perfection before the first drop of coating touches the paint. You need to see the true finish after the panel wipe removes the polishing oils, and only daylight-balanced lighting provides that clarity.
Many detailers rely on handheld or tripod-mounted inspection lights to check their work. These single-point light sources are excellent for localized paint correction. If you are focusing on a specific deep scratch on a fender, a handheld light provides the intense, directional beam needed to monitor your compounding progress. However, they are highly inefficient for the continuous, whole-panel visibility required during coating application.
Coating leveling requires two hands and continuous movement across large surface areas like hoods and roofs. You cannot hold an inspection light at the precise angle needed to check for high spots while simultaneously performing the cross-hatch leveling technique. Moving a tripod light around the vehicle for every single panel breaks the workflow. It slows down the application process and increases the risk of the coating flashing too quickly on the opposite side of the panel while you adjust the stand.
The operational impact of missed high spots extends far beyond simple frustration. When a high spot cures, it hardens into a dense layer of silicon dioxide. Removing it requires taping off the surrounding trim, setting up the polishing machine, compounding the specific area, performing a final polish to restore gloss, using a panel prep spray to remove polishing oils, and reapplying the coating. This sequence easily consumes an hour of labor for a single missed spot.
Multiply this across several vehicles a week, and the financial drain caused by inadequate lighting becomes substantial. Investing in proper car detailing shop lights eliminates this specific bottleneck. It ensures vehicles are delivered on time without emergency rework. You stop wasting expensive coating liquids and you stop burning through billable hours fixing mistakes that should have been caught during the initial wipe-down.
The Color Rendering Index measures a light source's ability to accurately reveal the true colors of an object compared to natural sunlight. Sunlight has a CRI of 100. Standard garage lighting often hovers around a CRI of 70. This low rating washes out colors and masks subtle surface defects. For professional auto detailing, a CRI of 90 or higher is an absolute requirement.
High-CRI lighting ensures the paint's metallic flake, pearl effects, and true base color are accurately represented. More importantly, high CRI is necessary for spotting chemical streaks during the coating process. A low-CRI light blends the dark, oily appearance of a high spot into the surrounding clear coat. It makes the defect invisible until the vehicle is driven outside. Fixtures rated at 90+ CRI provide the sharp contrast necessary to identify and level these inconsistencies immediately.
Color temperature, measured in Kelvin (K), dictates the warmth or coolness of the light. The ideal range for auto detailing and coating application falls strictly between 5000K and 6000K. This range closely mimics natural daylight. It provides a neutral, crisp illumination that neither artificially warms nor cools the appearance of the paint.
Lighting below 4000K emits a yellow or amber hue. This warm light acts as a visual filter, actively hiding swirl marks, light scratches, and coating streaks. Conversely, lighting above 6500K shifts into a harsh blue spectrum. While extremely bright, this blue light distorts the clarity of the clear coat. It also causes severe eye strain for detailers working long shifts. Maintaining a strict 5000K to 6000K environment ensures optimal defect visibility without compromising operator comfort.
While 5000K is the standard baseline, advanced detailing bays benefit significantly from tunable or dialable color temperatures. Different paint colors react differently to light spectrums. Silver, white, and light metallic vehicles can be notoriously difficult to inspect under pure white light. The bright reflection washes out the visibility of high spots. Shifting the light to a slightly warmer temperature around 4500K creates better contrast against light-colored paint.
Solid black, dark blue, and deep red paints absorb light heavily. Inspecting these colors requires a slightly cooler, more intense light around 6000K to penetrate the clear coat and reveal the true condition of the surface. Adjustable fixtures allow detailers to adapt their bay environment to the specific vehicle they are working on. This maximizes accuracy across all paint systems and ensures no defects slip through the cracks based on the vehicle's color.
A common mistake when upgrading a detailing bay is focusing solely on lumens. Lumens measure the total raw output of a light fixture at the source. A fixture producing 20,000 lumens is useless if it is mounted 25 feet in the air, as very little of that light actually reaches the vehicle. The inverse square law dictates that light intensity drops rapidly as the distance from the source increases.
Lux is the metric that matters for detailing. Lux measures the intensity of light that actually hits a specific surface area. One lux equals one lumen per square meter. A professional detailing bay should target a surface illumination of 750 to 1,000 lux at the vehicle's beltline. Achieving this requires calculating the distance from the light source to the vehicle and selecting fixtures with appropriate beam angles. This ensures the light is directed exactly where the detailer needs it, rather than scattering uselessly across the ceiling.
Recommended Lighting Specifications for Auto Detailing
Specification Metric | Recommended Target | Impact on Coating Application | Risk of Ignoring |
|---|---|---|---|
Color Rendering Index (CRI) | 90+ | Reveals true paint color and subtle chemical streaks. | High spots blend into the clear coat and go unnoticed. |
Color Temperature (Kelvin) | 5000K - 6000K | Provides neutral, daylight-balanced defect visibility. | Yellow light hides scratches; blue light causes severe eye strain. |
Surface Illumination (Lux) | 750 - 1000 Lux at beltline | Ensures adequate brightness reaches the working panels. | Shadows form on lower panels, leading to missed leveling. |
Light Diffusion | Frosted or opaque covers | Creates broad reflections to spot the rainbowing effect. | Harsh glare blinds the detailer and obscures the flash window. |
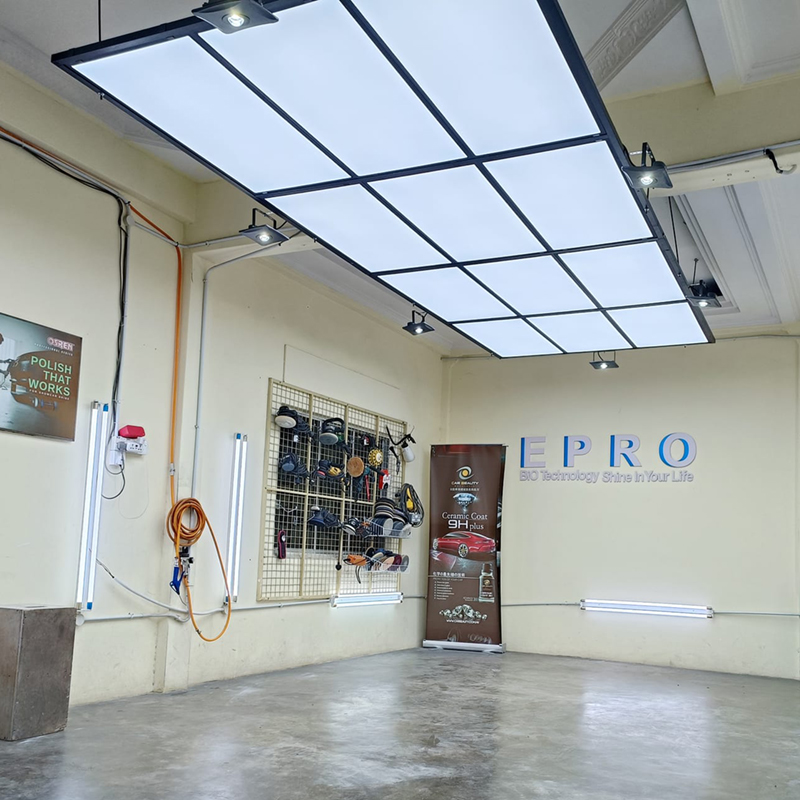
The physical shape and diffusion method of a light fixture drastically alter how it reflects off a vehicle's clear coat. Traditional fluorescent tubes or exposed LED strips create harsh, narrow lines of reflection. These sharp lines are excellent for spotting isolated straight-line scratches, but they are terrible for evaluating the overall evenness of a ceramic coating. The narrow reflection means you can only see a tiny sliver of the coating's flash process at any given time.
Transitioning to a modern ceiling panel light solves this issue. Panel lights utilize a broad, flat surface area covered by a frosted diffuser. This creates a large, soft, and uniform block of light that reflects widely across the hood or roof. This broad reflection allows you to monitor the sweating effect of the coating across a much larger surface area simultaneously. It ensures consistent wipe-downs and eliminates the risk of localized high spots forming just outside a narrow beam of light.
Shadows are the enemy of precision auto detailing. When overhead lights are spaced too far apart, or if they emit light in a highly directional beam, dark zones form between the fixtures. If you are applying a coating in one of these dark zones, you are essentially working blind. You cannot see the solvent evaporation, and you cannot verify if your leveling towel has picked up all the excess residue.
Implementing a square LED ceiling light configuration is a highly effective strategy for shadow reduction. By utilizing square fixtures arranged in a grid, the light pools emitted from each fixture overlap seamlessly. This geometric arrangement ensures light hits the vehicle from multiple overhead angles simultaneously. When you lean over the hood to level a coating, the overlapping light from the surrounding square fixtures prevents your own body from casting a hard shadow over your work area.
A common pitfall in detailing bay design is relying entirely on overhead lighting. Ceiling lights are perfect for horizontal surfaces like hoods, roofs, and trunk lids. However, they fail to adequately illuminate vertical surfaces. The curvature of a vehicle's doors, fenders, and rocker panels naturally blocks overhead light. This casts the lower half of the vehicle in deep shadow. This is exactly where the majority of coating high spots are missed.
To achieve total visibility, overhead fixtures must be paired with vertical LED detailing light panel installations mounted on the side walls of the bay. Wall-mounted panels project light horizontally, directly illuminating the doors and quarter panels. This dual-axis lighting approach ensures you have the exact same level of visibility when sitting on a stool working on a rocker panel as you do when standing over the hood.
The requirements for a home garage enthusiast differ vastly from a high-volume professional detailing studio, but the core principles of lighting remain identical. Modular LED panel systems offer the distinct advantage of scalability. A DIY detailer operating out of a standard two-car garage can start with a central overhead grid to cover the primary working zone. As needs expand, or as a professional shop moves into a larger commercial facility, these modular systems can be linked together.
Scalable systems allow shop owners to add wall-mounted units or expand the ceiling grid without having to tear out existing fixtures or mismatch different brands of lights. This modularity ensures the lighting setup grows in tandem with the business. It maintains consistent color temperatures and lux levels regardless of the bay's square footage or ceiling height.
Building a shadowless environment requires strategic placement of fixtures based on the physical dimensions of modern vehicles. To eliminate blind spots on vertical panels, wall-mounted lights should be installed at two specific heights. You cannot just mount a single row of lights on the wall and expect full coverage.
The lower tier of lights should be mounted approximately 3 feet off the ground. This height targets the rocker panels, lower bumpers, and the bottom half of the doors. These areas are notorious for collecting road tar and requiring heavy polishing. They are also extremely difficult to inspect during coating application. The upper tier should be mounted at approximately 6 feet. This height illuminates the upper doors, windows, and A-pillars. It intersects with the downward beam of the overhead lights to completely wrap the side of the vehicle in uniform illumination.
Bay Layout Zones and Target Coverage Areas
Lighting Zone | Mounting Location | Primary Vehicle Target Area |
|---|---|---|
Zone 1: Overhead Grid | Ceiling (Centered over bay) | Hood, roof, trunk lid, upper windshield. |
Zone 2: Upper Wall | Side walls (6 feet high) | Upper doors, A-pillars, C-pillars, side glass. |
Zone 3: Lower Wall | Side walls (3 feet high) | Rocker panels, lower doors, wheels, lower bumpers. |
The overhead layout dictates the baseline visibility for the entire bay. Integrating LED ceiling panel light grids requires precise geometric spacing to maintain consistent lux levels without creating intense hot spots that cause glare.
For a standard detailing bay, roughly 14 feet wide by 24 feet deep, a perimeter layout often works best. Instead of placing all lights directly down the center line of the ceiling, fixtures should be arranged in a large rectangle that mirrors the footprint of the vehicle. This perimeter grid drops light down the sides and across the horizontal panels simultaneously. The spacing between panels should be calculated based on the beam angle of the specific fixtures to ensure the light pools overlap by at least 20 percent. This overlapping completely eradicates dark zones.
Hexagonal lighting grids have dominated detailing shop aesthetics on social media. Beyond their undeniable value for client photography and marketing, hex grids actually serve a highly practical purpose for coating application.
The interconnected geometric pattern of a hex grid means light is emitted from dozens of different angles simultaneously. When looking at the reflection of a hex grid on a freshly polished hood, you see a massive, uniform web of light. This extensive surface area reflection makes it incredibly easy to spot the subtle chemical streaking of a flashing ceramic coating. While a standard rectangular panel grid is highly effective, the multi-directional diffusion of a hex layout provides an exceptional environment for spotting high spots from any viewing angle.
The return on investment for professional detailing lights begins before the polishing machine is even turned on. During the initial client intake, a vehicle must be thoroughly inspected to provide an accurate estimate. If a shop's lighting is inadequate, you might only see minor swirl marks and quote the client for a single-step polish.
Once the vehicle is washed, decontaminated, and placed under a handheld inspection light, deeper scratches and heavy oxidation become visible. This requires a multi-step correction. Because the initial quote was too low, the shop either absorbs the cost of the extra labor or delivers subpar results. Proper bay lighting reveals the absolute true condition of the clear coat immediately. This ensures every job is quoted accurately and profitability is maintained from the moment the client drops off the keys.
Upgrading a detailing bay's lighting infrastructure requires an upfront capital allocation, but the break-even point is reached rapidly through the reduction of rework. Calculating this return involves tracking the historical frequency of coating corrections in your shop.
If a shop averages one missed high spot per week that requires an hour of compounding, prep, and re-coating, that represents a direct loss of billable labor. Over a year, this lost time equates to thousands of dollars in wasted operational capacity. By installing a shadowless, high-CRI lighting system, the frequency of missed high spots drops to near zero. The lighting system pays for itself by reclaiming those lost billable hours and allowing the shop to process more vehicles per week without stopping to fix avoidable errors.
Retrofitting a commercial space with high-output lighting introduces significant electrical realities. Modern LED technology is highly energy-efficient compared to legacy halogen or metal halide fixtures. However, installing dozens of panels across a large bay still generates a substantial cumulative amperage draw.
Shop owners must evaluate their existing electrical panels before purchasing fixtures. Plugging massive lighting grids into existing wall outlets often leads to tripped breakers, especially when high-draw polishing machines, air compressors, and shop vacuums are running simultaneously on the same circuit. Professional installation requires mapping out dedicated circuits specifically for the lighting grid, calculating voltage drop over long wire runs, and ensuring all wiring complies with commercial building codes.
Steps to Evaluate Bay Electrical Capacity:
Calculate the total wattage of the planned lighting grid.
Divide the total wattage by the bay's voltage (usually 120V or 240V) to determine the required amperage.
Inspect the main breaker panel to identify available slots for new dedicated circuits.
Hire a licensed electrician to run dedicated wiring to the ceiling and wall mounting zones.
There is an occupational hazard associated with over-illuminating a detailing bay. Intense brightness is necessary for defect removal. However, working under maximum output for 10 to 12 hours a day causes severe glare fatigue, headaches, and eye strain for detailers.
Balancing brightness with operator comfort requires two specific strategies. First, all fixtures must utilize frosted or opaque diffusers to soften the light source and prevent harsh, blinding reflections off the clear coat. Second, implementing dimmable LED drivers is mandatory. You need 100% output during the paint correction and coating inspection phases, but you do not need that level of intensity while washing the vehicle, cleaning the interior, or applying tire dressing. Dimmable circuits allow you to adjust the bay's brightness based on the specific task, protecting your vision and reducing fatigue.
Measure your bay dimensions and calculate the required lux levels to ensure adequate surface illumination without over-purchasing fixtures.
Assess your current electrical panel capacity and consult a licensed electrician to map out dedicated circuits for a new lighting grid.
Install overhead diffused panels first to secure the primary coating application zone.
Phase in wall-mounted units at 3-foot and 6-foot heights for vertical panel visibility.
Implement dimmable drivers to control glare and reduce operator eye strain during non-correction tasks.
A: The ideal color temperature is strictly between 5000K and 6000K. This daylight-balanced spectrum provides a neutral, crisp light that accurately reveals chemical streaks and high spots without the yellowing effect of warmer lights or the harsh, vision-straining glare of blue-tinted lights above 6500K.
A: Focus on lux rather than lumens. A professional bay requires 750 to 1,000 lux of surface illumination at the vehicle's beltline. This ensures adequate brightness reaches the actual working panels, rather than just measuring the raw output at the ceiling fixture.
A: Hex lights provide excellent multi-directional diffusion, creating a large web of reflection that makes spotting coating high spots very easy. High-quality standard LED panels with frosted diffusers are equally functional for application accuracy, provided they are arranged in an overlapping grid to eliminate shadows.
A: A Color Rendering Index (CRI) of 90 or higher is required. High CRI ensures accurate representation of the paint's true color and provides the necessary contrast to spot the dark, oily appearance of flashing ceramic coatings against the clear coat.
A: Utilize fixtures with frosted or opaque diffusers to soften the light source. Install dimmable LED drivers so you can lower the brightness during interior cleaning or washing, reserving maximum output strictly for paint correction and coating inspection.
A: Yes. Overhead lighting cannot bend around the curvature of a vehicle. Wall-mounted lights are essential for illuminating vertical surfaces like doors, rocker panels, and lower bumpers, which are the most common areas for missed high spots during coating application.


