


Views: 0 Author: Site Editor Publish Time: 2026-08-23 Origin: Site


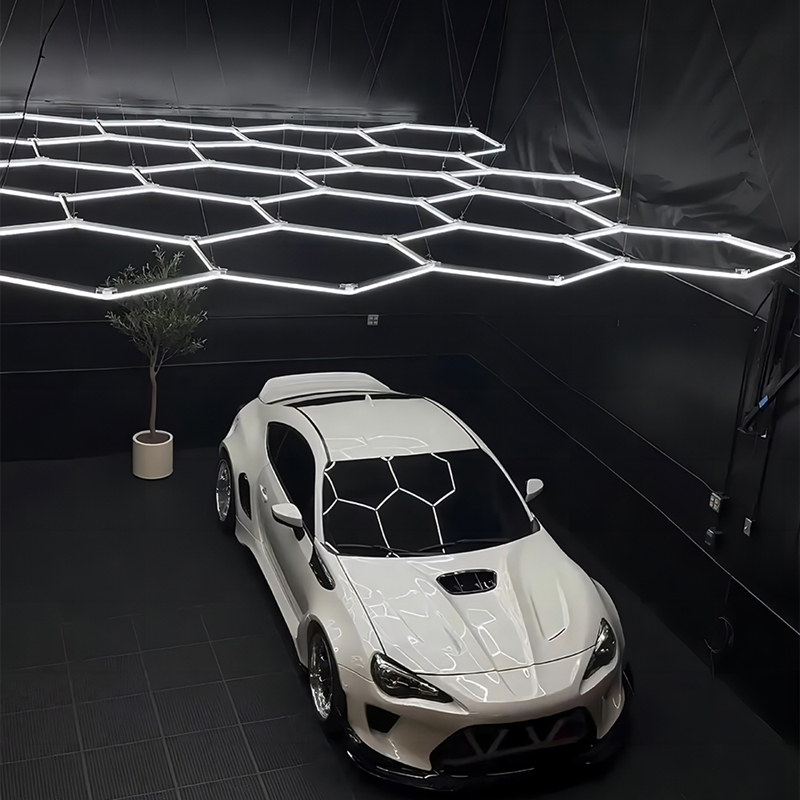
Walk into any modern auto detailing shop, and you will see a massive geometric lighting grid suspended above the correction bay. This striking visual setup immediately raises a practical question. Is this an aesthetic trend, or does it serve a functional necessity? Detailers and shop owners face a constant struggle when illuminating a workspace. They require lighting powerful enough to expose micro-marring, holograms, and swirl marks. At the same time, the light must be diffused enough to prevent severe eye fatigue or the dreaded washing out of the clear coat during extended correction sessions.
Finding the exact balance between ambient illumination and targeted defect detection dictates the quality of the final paint finish. Relying on the wrong lighting infrastructure leads to missed high spots in ceramic coatings or leftover compounding haze. We need to evaluate how a hexagonal light system performs under strict paint inspection standards compared to traditional directional lighting.
Functionality vs. Aesthetics: Hexagonal lighting provides exceptional ambient illumination and uniform coverage, but must meet strict Color Rendering Index (CRI) standards to be viable for paint inspection.
The Washout Risk: Over-illuminating a workspace with highly diffused light can hide fine scratches; proper layout, dimmability, and lumen control are critical.
Hybrid Systems are Mandatory: For true high-level paint correction, a fixed hexagonal grid must be paired with directional, point-source inspection lights.
Safety and Durability: Industrial-grade installations require verified UL/ETL certifications, proper load balancing, and durable aluminum or polycarbonate housing to mitigate electrical and degradation risks.
Dual-Purpose ROI: Beyond inspection, these systems offer significant marketing value by creating a premium showroom aesthetic for customer handovers and social media content.
Understanding how a geometric lighting grid functions requires looking at the physics of light diffusion. Traditional shop lighting often utilizes single-tube fluorescent or linear LED fixtures. These cast harsh, unidirectional shadows across the vehicle surface. A hexagonal grid changes this dynamic by distributing light through interconnected, multi-angled tubes. This geometry ensures photons hit the vehicle's clear coat from six different directions simultaneously within any given section of the grid. The result is a flat, even wash of light over horizontal and vertical vehicle panels. This drastically reduces harsh shadows that obscure surface details.
When evaluating success criteria for spotting broad defects under diffused lighting, this multi-directional approach proves highly effective. The overlapping light fields excel at highlighting surface texture anomalies. For instance, when applying a ceramic coating, technicians must identify high spots. These are areas where the coating has flashed but has not been properly leveled. The broad reflection of a geometric grid across a hood makes these high spots stand out. They appear as distinct smudges or oily streaks against the uniform reflection. Similarly, this lighting profile is superior for identifying orange peel texture, large scuffs, and leftover polishing residue. Because the light source spreads over a massive surface area, you can read the reflection of the tubes on the paint to gauge surface flatness. Paintless Dent Repair (PDR) technicians often use similar reflection-reading techniques to spot minor ripples and dents in the sheet metal.
Raw lumen output means nothing if the light quality distorts the actual color of the vehicle. The Color Rendering Index (CRI) measures a light source's ability to reveal true colors compared to a natural light source. For accurate color matching and defect detection, a minimum rating of 90+ CRI is the baseline technical requirement. Lower CRI ratings will wash out metallic flakes and distort pearl finishes. They make it nearly impossible to distinguish between a deep scratch and surface-level marring. Advanced detailers also look at the R9 value within the CRI spectrum, which measures how accurately the light renders deep reds. A low R9 value makes red paint look muddy or orange, hiding subtle defects.
Color temperature, measured in Kelvin (K), dictates the warmth or coolness of the light. Professional detailing environments typically target the 5000K to 6500K range. At 5000K, the light mimics natural daylight. This provides a neutral baseline that prevents the yellowing effect of lower temperatures. Pushing closer to 6500K introduces a cooler, crisper white light that increases contrast. This high-contrast environment helps detect polishing haze and micro-marring on darker clear coats. Pushing beyond 6500K into the blue spectrum causes rapid eye strain. It distorts red and warm-toned paints, rendering accurate inspection impossible.
The core debate in detailing bay design centers on broad ambient light versus focused beams. Hexagonal LED lights provide broad, static coverage. They flood the entire workspace, ensuring technicians have maximum general visibility. This eliminates the need to constantly reposition heavy light stands while washing, claying, or performing interior work. The static nature of the grid is its greatest asset for tasks requiring consistent, shadow-free illumination.
Conversely, directional point-source lights emit a high-intensity, focused beam from a single origin point. This single-source illumination is mandatory for deep scratch and hologram identification. When a single beam of light hits a microscopic scratch in the clear coat, it casts a microscopic shadow on the opposite side of the scratch valley. This shadow is what the human eye perceives as a swirl mark. If you attempt to find these same micro-scratches using only a broad overhead grid, the multi-directional light fills in those microscopic shadows. This effectively renders the scratches invisible to the naked eye.
Skeptics of geometric overhead grids often point to the washout effect. Their concerns are technically valid. Excessive, multi-directional lumens can flood a highly reflective surface like polished clear coat. When light hits the paint from 360 degrees, it bounces back into the technician's eyes. This causes pupil constriction and masks fine swirl marks. The surface appears flawless under the grid, but a quick inspection with a handheld light reveals a web of micro-marring.
To combat this, modern detailing bays must implement adjustable or dimmable overhead systems. Controlling lumen output during different phases of paint correction is a non-negotiable requirement. During the initial heavy compounding phase, technicians need high ambient light to track their working area. During the final jeweling or polishing phase, the overhead grid should be dimmed significantly. This allows the technician to rely primarily on targeted inspection beams.
A practical decision framework for balancing these light sources involves a three-step approach:
Preparation and Decontamination: Overhead grid at 100% output. Maximum visibility for washing, claying, and masking.
Defect Removal: Overhead grid at 50% output. Handheld or stand lights activated to track heavy defect removal while maintaining ambient light.
Final Inspection and Coating: Overhead grid dimmed to 10% or turned off for final swirl checking with point-source lights. Grid returned to 100% for coating application to spot high spots.
When specifying a lighting layout, raw lumen counts advertised on packaging can be highly misleading. Professional detailing environments require specific benchmarks for lumen output per square foot. A standard correction bay typically requires between 75 and 100 lumens per square foot. Calculating this requires measuring the total square footage of the bay and matching it against the true output of the lighting grid. For example, a 20-foot by 20-foot bay equals 400 square feet. To hit the 100 lumens per square foot target, the overhead grid must produce a true output of 40,000 lumens.
Evaluating honeycomb LED lights requires a close look at luminous efficacy. This is the ratio of luminous flux to power. High-quality systems operate at an efficacy of 110 to 130 lumens per watt. This trade-off between energy consumption and actual light output matters for commercial shops running lights 10 to 12 hours a day. A highly efficient system will deliver the necessary lumens for a bay while keeping the amperage draw low enough to avoid tripping standard breakers.
Detailing bays are inherently wet and damp environments. The introduction of pressure washers, foam cannons, and atomized detailing chemicals creates a significant risk for electrical shorts. Electrical safety is the most important evaluation dimension when selecting an overhead grid. Buyers must verify UL (Underwriters Laboratories) or ETL certifications. These independent testing laboratories confirm that the wiring, connectors, and drivers can handle continuous commercial use. Cheap, unrated imports often use substandard wiring gauges that overheat under continuous load.
Housing materials directly impact both the longevity of the fixture and its thermal management. LED diodes generate heat. If that heat is not properly dissipated, the diodes will prematurely degrade. This leads to color shifting and lumen depreciation. Aluminum frames are vastly superior to brittle PVC or cheap plastic alternatives. Aluminum acts as a natural heat sink, drawing thermal energy away from the diodes. Aluminum frames resist sagging over wide spans, ensuring the geometric grid remains perfectly flat.
Staring at highly reflective paint under intense lighting for eight hours a day causes severe eye strain. This leads to headaches and decreased work quality. The optical covers used on the LED tubes dictate how the light is dispersed and how much glare reaches the technician. Systems typically offer either clear or frosted polycarbonate diffusers.
Clear covers maximize raw lumen output but create harsh, piercing reflections on the clear coat. Frosted polycarbonate diffusers are the industry standard for professional environments. The frosting scatters the light as it exits the tube, softening the beam and creating a uniform glow. This proper diffusion mitigates the harsh glare that causes eye fatigue. It allows technicians to focus on the paint surface comfortably during multi-day paint correction jobs.
The business value of these lighting systems extends far beyond paint correction. In the competitive automotive detailing market, perceived value and shop presentation directly influence the rates a business can charge. A well-lit, visually striking workspace builds immediate trust with high-end clientele.
Showroom-style symmetry and border framing elevate the shop's perceived value. When a customer arrives to pick up their freshly coated vehicle, handing the keys over under a brilliantly illuminated geometric grid creates a premium handover experience. This lighting acts as a passive marketing tool. The distinct reflections on the vehicle's hood provide perfect lighting for social media content creation. Shops can capture high-contrast, professional-grade photos and videos without needing secondary photography lights.
Lighting System Comparison
Feature | Hexagonal Overhead Grid | Directional Point-Source Light |
|---|---|---|
Primary Function | Ambient illumination, leveling, high-spot detection | Deep defect, swirl, and hologram identification |
Light Distribution | Multi-directional, diffused, broad coverage | Unidirectional, focused, high-intensity beam |
Shadow Generation | Minimal to none (fills in shadows) | High (casts shadows to reveal micro-scratches) |
Eye Fatigue | Low (with frosted diffusers) | High (requires careful positioning to avoid glare) |
Ideal Correction Phase | Prep, washing, coating application, final wipe | Compounding, polishing, final defect inspection |
Installing a grid without calculating the specific geometry of the room will result in suboptimal lighting. Mounting height is the first variable to lock down. Technical guidelines dictate an optimal mounting height of 9 to 12 feet from the floor. Mounting the grid lower than 9 feet creates intense hot spots on the roof of taller vehicles like SUVs and trucks. It also restricts the technician's physical clearance. Mounting higher than 12 feet causes the light to disperse too widely before reaching the vehicle. This results in a significant loss of intensity on horizontal panels. If you have open joists, suspending the grid on adjustable aircraft cables allows you to dial in the exact height regardless of the actual ceiling peak.
Grid dimensions must scale relative to the primary workspace footprint. A common mistake is building a grid that is exactly the size of the vehicle. This layout fails to illuminate the vertical panels effectively. The grid should extend at least 2 to 3 feet beyond the perimeter of the largest vehicle typically serviced. This ensures proper border framing, allowing the light to cast downward at an angle onto the doors and fenders.
Even with an oversized overhead footprint, ceiling-mounted lighting has a fundamental limitation. It cannot properly illuminate the lower half of doors, rocker panels, and bumpers. The curvature of the vehicle naturally blocks overhead light from reaching these lower sections, forcing technicians to work in shadows.
To solve this, advanced bay designs integrate wall-mounted arrays. By dropping hexagonal sections down the walls or angling them at 45 degrees where the wall meets the ceiling, shops can create a 360-degree inspection tunnel. This side-lighting strategy ensures that vertical panels receive the same uniform wash of light as the horizontal panels. When wall mounting is not structurally feasible, integrating low-profile linear LED strips along the baseboards serves as an effective alternative for rocker panel visibility.
While many kits are marketed as plug-and-play, the realities of installation require careful planning. DIY installation is possible for the physical assembly of the modular connectors, which typically snap or screw together. Safely wiring the system to standard 110V or 220V circuits often requires a licensed electrician. The primary risk involves exceeding the amperage limits of the shop's existing wiring. Running a massive grid on standard 14 AWG wire meant for a single garage door opener will cause immediate breaker trips.
Load limits must be strictly calculated. You must determine exactly how many grids or individual tubes can be daisy-chained on a single power supply or breaker. Overloading a circuit risks severe voltage drop, which causes the lights at the end of the chain to dim or flicker. In worst-case scenarios, overloading leads to melted wiring and electrical fires. Always calculate the total wattage of the assembled grid, divide by the voltage, and ensure the resulting amperage does not exceed 80% of the breaker's rated capacity.
Commercial lighting operates under heavy duty cycles, meaning eventual component failure is inevitable. Evaluating the scalability and repairability of modular systems before purchase saves significant downtime later. If a single tube or connector fails, the system must allow for that specific piece to be swapped out without dismantling the entire ceiling grid. You should also check the IP rating of the fixtures. An IP54 rating offers basic dust protection, but an IP65 rating is necessary if the lights will be exposed to direct water spray from pressure washers.
A major implementation risk lies in purchasing white-labeled kits with proprietary connectors from unverified overseas vendors. If the vendor disappears, sourcing replacement parts becomes impossible. This renders the entire grid obsolete over a single burnt-out driver. Mitigate this risk by sourcing kits from established manufacturers with accessible replacement tubes, standardized pin connectors, and transparent warranty policies.
To implement a professional lighting setup and integrate car detailing lights effectively, follow these immediate steps:
Measure your bay's exact length, width, and ceiling height to determine the maximum viable grid footprint.
Calculate your available circuit load to ensure your existing electrical panel can support the continuous wattage draw.
Consult with a commercial lighting specialist to design a hybrid layout that incorporates both overhead diffused grids and targeted wall-mounted or stand-based inspection lights.
Request specification sheets from manufacturers to verify CRI ratings and housing materials before committing to a purchase.
A: The ideal color temperature ranges from 5000K to 6500K. At 5000K, the light replicates natural daylight, providing a neutral baseline for color matching. Moving toward 6500K offers a cooler, high-contrast white light that excels at highlighting polishing haze and surface texture anomalies without distorting the paint's true color.
A: No. Honeycomb grids provide diffused, multi-directional light that fills in the microscopic shadows created by fine scratches, effectively hiding them. Handheld swirl finders provide the focused, unidirectional point-source light necessary to reveal micro-marring and holograms. The two systems are complementary and must be used together.
A: CRI stands for Color Rendering Index. It measures how accurately a light source reveals the true colors of an object compared to natural sunlight. For auto detailing, a CRI of 90 or higher is required to accurately match paint colors, evaluate metallic flake pop, and identify subtle surface defects.
A: Assembling the modular tubes and plug-and-play connectors is safe for DIY assembly. However, hardwiring the primary power supplies into your building's electrical mains should be handled by a licensed professional. Always ensure the kit carries genuine UL or ETL safety ratings to prevent fire hazards.
A: Basic entry-level models are typically static and operate only at 100% output. Premium, professional-grade kits offer dimmability. Dimmability is crucial in detailing to prevent clear coat washout, allowing technicians to lower ambient light while using focused inspection beams during the final polishing stages.
A: The standard mounting height for optimal diffusion is between 9 and 12 feet from the floor. Mounting below 9 feet restricts clearance and creates intense hot spots on vehicle roofs. Mounting above 12 feet causes the light to disperse too much, losing the intensity needed for accurate paint inspection.
A: Despite their massive size, they are highly efficient because they use LED technology. A typical individual tube draws between 6 and 15 watts depending on its length. While a large grid may draw several hundred watts in total, it consumes significantly less electricity than older fluorescent or halogen shop lighting setups.


